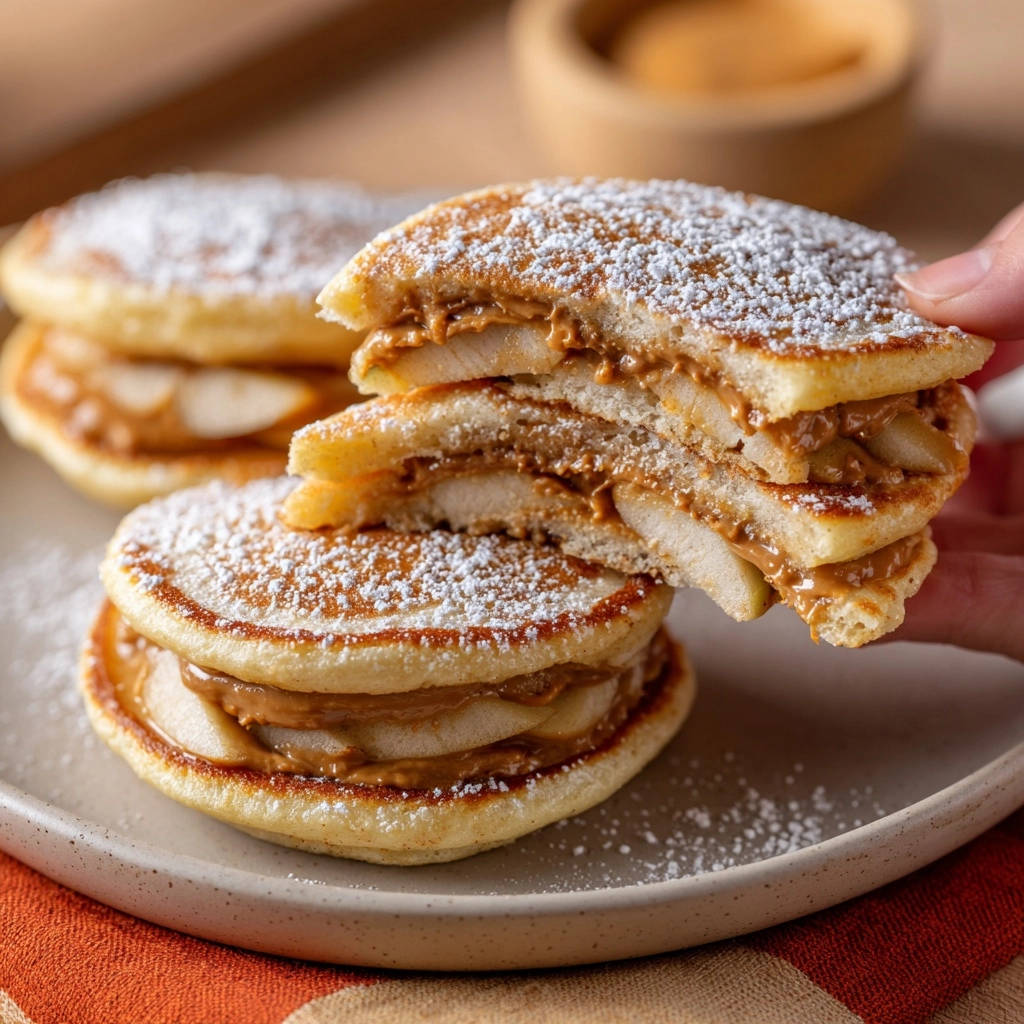
Fluffy Pear & Peanut Butter Stuffed Pancakes: The Secret to Fluffy Bites
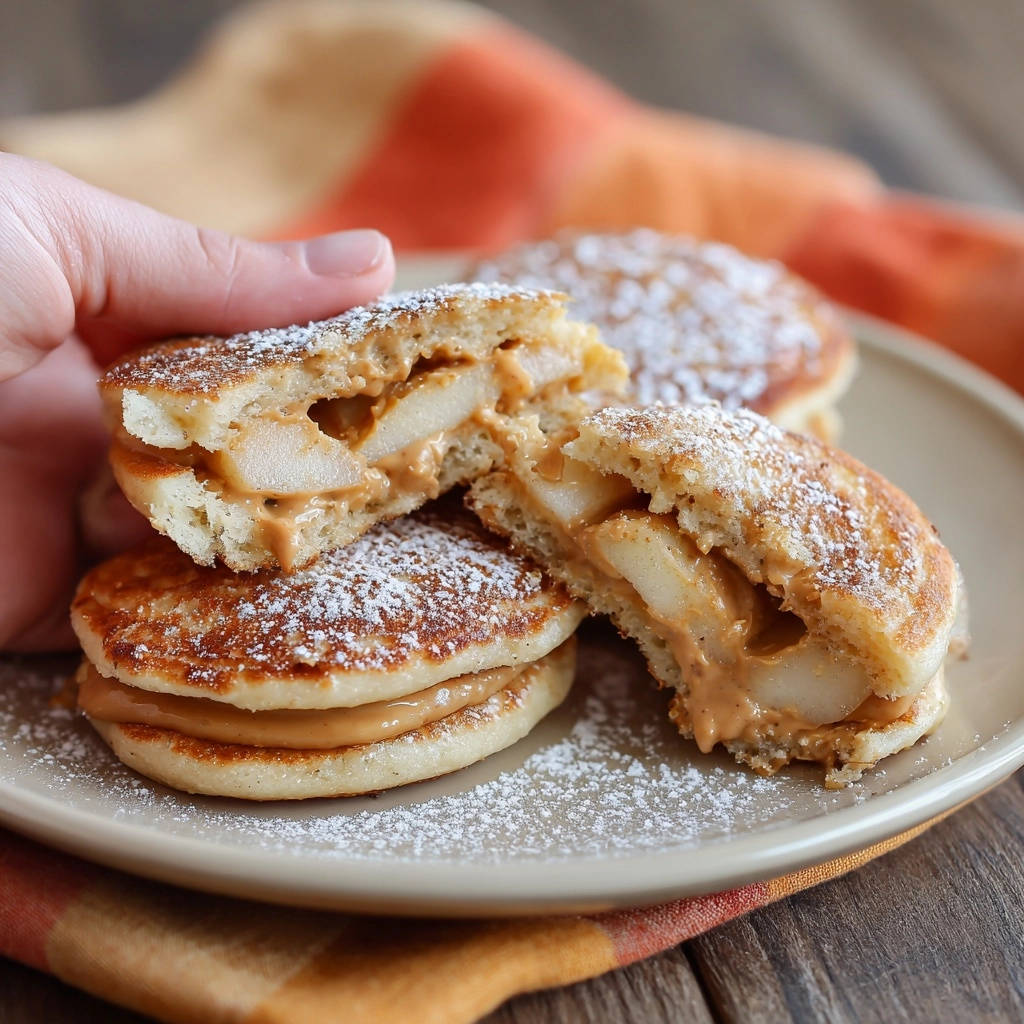
I remember the frustration of cutting into a seemingly perfect pancake, only to find a raw, doughy center, especially with ambitious fillings. It took countless attempts to truly master the art of the stuffed pancake, but now I can confidently say that these Fluffy Pear & Peanut Butter Stuffed Pancakes are foolproof.
This recipe isn’t just about combining ingredients; it’s about a technique that guarantees golden exteriors, a light, airy crumb, and a warm, gooey filling every single time. Get ready to elevate your breakfast game with a delightful twist that will impress everyone at your table.
Why These Stuffed Pancakes Are Your New Weekend Obsession
Forget everything you thought you knew about challenging stuffed pancakes. This recipe tackles common pitfalls head-on, delivering a breakfast experience that’s both gourmet and effortlessly achievable.
The “Never Dense” Promise: Achieving That Perfect Fluff
Many stuffed pancake recipes result in a heavy, doughy texture due to overmixing or incorrect cooking temperatures. Our method prioritizes gentle batter handling and precise heat, ensuring an unbelievably light and airy pancake that truly melts in your mouth.
A Gooey, Warm Center Every Single Time
The “secret” to a perfectly cooked, warm filling is a combination of controlled heat and a clever lid trick. This ensures the delicate pear softens beautifully and the peanut butter becomes lusciously molten, creating a delightful contrast with the fluffy exterior.
Beyond Basic: A Flavorful Twist on Breakfast Classics
The pairing of sweet, tender pear with creamy, salty peanut butter creates an unexpected harmony that’s incredibly comforting and sophisticated. It’s a flavor combination that feels both novel and deeply satisfying, moving beyond traditional syrup-only pancakes.
A similar approach to keeping things light and fluffy works well in this cinnamon streusel coffee cake.
Gather Your Pantry Essentials: What You’ll Need
Success begins with understanding your ingredients. Each component plays a vital role in achieving the perfect texture and flavor profile for your fluffy pear and peanut butter stuffed pancakes.
For the Irresistibly Fluffy Batter
We start with everyday staples to build a robust yet tender pancake foundation. Quality ingredients make a noticeable difference in the final product.
All-Purpose Flour: Use unbleached for the best texture. It provides the necessary structure without being too heavy.
Granulated Sugar: Just enough to add a hint of sweetness to the batter, complementing the natural sugars in the pear.
Baking Powder: Our primary leavening agent. Ensure it’s fresh for maximum lift and those desirable airy pockets.
Salt: A pinch enhances all the other flavors, balancing the sweetness and richness.
Large Egg: Binds the ingredients, adds richness, and contributes to the golden color.
Milk (Any Kind): Whole milk offers the richest flavor, but dairy-free alternatives like almond or oat milk work beautifully without compromising texture.
Cooking Oil: A neutral-flavored oil like canola, vegetable, or melted coconut oil is ideal. It adds moisture and helps create a tender crumb.
The Star Stuffing: Pear & Peanut Butter Duo
The heart of these stuffed breakfast treats lies in their exquisite filling. Careful selection here ensures an optimal eating experience.
Creamy Peanut Butter: Opt for a smooth, creamy variety that’s not too stiff or overly oily. This consistency ensures it melts beautifully and spreads easily.
Large Pear (Bosc or Bartlett recommended): These varieties hold their shape well when cooked and offer a delicate sweetness. Look for firm, ripe pears; overly soft pears can become mushy, while hard ones won’t soften enough.
The Perfect Finishing Touch
A simple dusting is often all that’s needed to complete these gourmet pancakes.
Powdered Sugar: A generous dusting adds an elegant visual appeal and a final touch of sweetness. It’s purely optional but highly recommended.
Essential Tools for Your Pancake Masterpiece
Having the right kitchen equipment can make your pancake-making experience smoother and more successful. These tools are crucial for creating perfectly cooked, fluffy pear and peanut butter stuffed pancakes.
Griddle or Frying Pan: The Right Heat is Key
A good quality nonstick griddle or large frying pan is indispensable for preventing sticking and ensuring even cooking. Consistent heat distribution across the cooking surface is vital for uniform browning.
Whisks, Bowls, and Spatulas: Your Pancake Prep Squad
You’ll need at least two mixing bowls for separating wet and dry ingredients, which is a foundational step for fluffy pancakes. A sturdy whisk and a wide, thin spatula are essential for gently incorporating ingredients and successfully flipping the delicate stuffed pancakes.
Crafting Perfection: Your Step-by-Step Guide to Stuffed Pancakes
Follow these detailed instructions to create truly exceptional homemade stuffed pancakes, embracing each step for optimal results.
- Prepare Your Dry Ingredients:
In a large bowl, whisk together the flour, granulated sugar, baking powder, and salt. This step is crucial for aerating the flour and ensuring that the leavening agent and salt are evenly distributed, leading to a consistent rise and flavor throughout the batter.
- Combine Wet Ingredients:
In a separate medium bowl, whisk together the egg, milk, and 2 tablespoons of cooking oil until well combined. Thoroughly mixing the wet ingredients separately ensures uniform moisture distribution when combined with the dry, preventing overmixing later.
- Gentle Mixing for the Perfect Batter:
Pour the wet ingredients into the dry. Stir gently with a spoon or whisk just until combined; a few lumps are okay. Overmixing develops gluten, which results in tough, dense pancakes instead of the desired fluffy texture. The batter should be thick enough to hold the generous pear and peanut butter filling without it sinking or oozing.
- Preheat Your Griddle (Low Heat is CRUCIAL!):
Heat a nonstick griddle or large frying pan over medium-low heat. Brush lightly with a little extra cooking oil or butter. This low heat setting is absolutely essential; it allows the heat to gradually penetrate the thick, filled center, ensuring the pancakes cook through completely without burning the exterior.
- Form the Base Pancake Disc:
For each pancake, pour about 2 tablespoons of batter onto the griddle, forming a small, thick disc. Aim for a disc roughly 3-4 inches in diameter, providing a stable and adequately thick base to hold the hearty filling.
- Add the Delicious Filling:
Immediately place 2 to 3 thin pear slices and a small dollop (about 1 teaspoon) of peanut butter on top of the batter disc. Arrange the pear slices evenly and place the peanut butter dollop centrally to ensure an even distribution of flavor and texture in every bite.
- Encasing the Gooey Center:
Spoon another 1 to 1.5 tablespoons of batter over the filling, gently spreading it to cover the pear and peanut butter as much as possible. This critical step ensures the filling is completely encased, preventing it from oozing out during cooking and creating a perfectly sealed pocket of deliciousness.
- The Patient First Cook:
Cook the pancakes for 3 to 4 minutes on the first side, or until you see small bubbles forming on the surface and the edges look set and golden brown. Patience is key here; cooking slowly allows the heat ample time to penetrate the thick, filled center, setting it up for thorough cooking.
- The Flip and Final Cook (with a Secret!):
Carefully flip each pancake. Reduce the heat slightly if they are browning too quickly. Cook for another 4 to 5 minutes on the second side, or until deeply golden brown and cooked through. To guarantee a fully cooked center, cover the pan with a lid for the last 2 minutes of cooking on the second side; this traps steam, helping the dough cook through without drying out the exterior.
- Serve Warm and Dusted:
Transfer the cooked pancakes to a plate. Serve immediately, dusted generously with powdered sugar. Enjoy your perfectly cooked, fluffy, and flavorful Fluffy Pear & Peanut Butter Stuffed Pancakes, a truly satisfying start to any day.
If you enjoy this fruity pancake combination, try these bright and zesty lemon poppy seed pancakes for another fluffy morning treat.
Chef’s Secrets: Elevate Your Stuffed Pancake Game
Beyond the basic steps, these expert tips will ensure your Fluffy Pear & Peanut Butter Stuffed Pancakes are consistently outstanding.
Don’t Overmix the Batter: Remember, a few lumps are a sign of perfectly mixed batter. Overmixing develops gluten, which leads to a dense, chewy pancake texture, completely counteracting our goal of light and airy fluffiness.
The Magic of Low Heat: This is arguably the most crucial tip for any stuffed pancake. Medium-low heat prevents the exterior from burning while allowing sufficient time for the internal filling and batter to cook thoroughly, eliminating raw centers.
Perfectly Sliced Pears: Aim for thin, even slices, about 1/8 to 1/4 inch thick. This ensures they soften evenly without becoming watery or remaining crunchy, contributing perfectly to the warm, gooey interior of these stuffed breakfast treats.
The Lid Trick: Your Guarantee for Cooked Centers: Covering the pan during the final cooking stage creates a steamy environment that gently cooks the inside of the thick pancakes. This internal steaming is a game-changer for guaranteeing a fully cooked center without over-browning the outside.
Keep Them Warm: If cooking a large batch, preheat your oven to its lowest setting (around 175°F/80°C). Place cooked pancakes on a wire rack set over a baking sheet in the oven to keep them warm and prevent sogginess.
Peanut Butter Consistency: For the best results, use a creamy peanut butter that’s easy to dollop and spread. If your peanut butter is very stiff, gently warm it for 10-15 seconds in the microwave to make it more pliable, ensuring a perfectly gooey result.
Troubleshooting Common Stuffed Pancake Hurdles
Even with the best intentions, cooking can sometimes present challenges. Here are solutions to common issues you might encounter with stuffed pancakes.
“Why are my pancakes raw in the middle?”
This is most commonly caused by the griddle heat being too high, insufficient cooking time, or not utilizing the crucial lid trick. Correct this by lowering your heat to medium-low, extending the cooking time slightly, and always covering the pan for the last two minutes of cooking on the second side to steam the center.
“My filling is oozing out!”
Oozing filling can occur if the batter is too thin, not enough batter was used to cover the filling completely, or the pancake was flipped prematurely. Ensure your batter is thick enough, generously cover the filling with the second spoonful of batter, and wait for clear bubbles and set edges before flipping.
“My pancakes are dense, not fluffy.”
The primary culprit for dense pancakes is almost always overmixing the batter. Remember to stir just until the wet and dry ingredients are combined; a few lumps are desirable and will bake out, leaving a light, airy texture.
“My pancakes are burning before they’re cooked through.”
This issue points directly to your griddle heat being too high. Maintain a consistent medium-low temperature throughout the entire cooking process for these thick, filled pancakes. Patience with lower heat is the key to preventing burned exteriors and ensuring a thoroughly cooked interior.
Beyond Breakfast: Serving & Storing Your Delicious Creation
These Fluffy Pear & Peanut Butter Stuffed Pancakes are versatile enough for any meal and can be enjoyed in various creative ways.
Creative Serving Suggestions: More Than Just Powdered Sugar
While powdered sugar is a classic, don’t stop there. A drizzle of warm maple syrup enhances the sweetness, while a dollop of whipped cream or a scoop of vanilla ice cream turns these into an indulgent dessert. A sprinkle of cinnamon or a light chocolate sauce can also complement the pear and peanut butter beautifully.
Make-Ahead & Storage Tips
The batter can be prepared the night before and stored in an airtight container in the refrigerator; just give it a gentle stir before cooking. Cooked pancakes can be stored in the refrigerator for up to 3 days or frozen for up to 2 months. Layer them with parchment paper in an airtight bag or container to prevent sticking.
Batch Cooking for Busy Mornings
This recipe is easily scaled up to make a larger batch for meal prepping. Freeze extra cooked pancakes individually, then reheat them in a toaster, microwave, or oven for quick, gourmet pancakes on busy weekday mornings. They’re a fantastic make-ahead option for a delicious start to your day.
Your Burning Questions Answered: Fluffy Pear & Peanut Butter Stuffed Pancakes FAQ
Here are answers to some common inquiries about these delightful stuffed pancakes.
Can I use different fruits or fillings?
Absolutely! This recipe is adaptable. Consider combinations like sliced apple with almond butter, banana with hazelnut spread, or even a few chocolate chips for a sweeter treat. When substituting fruit, choose varieties with similar moisture content to pears to maintain texture.
What if I don’t have Bosc or Bartlett pears?
You can substitute with other firm, ripe pear varieties like Anjou or Comice. The key is to select pears that are not overly soft, as they can turn mushy, and not too hard, as they won’t soften enough during cooking. Apples, like Honeycrisp or Gala, can also be a great alternative.
Can I make these gluten-free or dairy-free?
Yes, both are possible! For gluten-free, substitute the all-purpose flour with a 1:1 gluten-free baking flour blend that contains xanthan gum. For dairy-free, simply use your preferred unsweetened dairy-free milk alternative (almond, oat, or soy work well) and a dairy-free butter or oil for the griddle.
How do I know when the pancakes are fully cooked?
Look for deeply golden brown exteriors and firm, set edges. The most reliable indicator for stuffed pancakes, however, is using the lid trick during the last 2 minutes of cooking. This trapped steam ensures the interior is thoroughly cooked without any raw spots, giving you confidence every time.
Ready to Impress? Share Your Fluffy Pear & Peanut Butter Stuffed Pancakes Masterpiece!
You now possess all the secrets to creating truly exceptional Fluffy Pear & Peanut Butter Stuffed Pancakes. Say goodbye to raw middles and hello to perfectly cooked, lusciously filled breakfast delights that will make any morning special.
What’s Next?
If you enjoyed the nutty, fruity notes in these stuffed pancakes, here are two other recipes that play with similar flavors and textures.
- For a crunchy, salty-sweet contrast, bake a batch of Classic Peanut Butter Cookies that stay soft and chewy.
- Balance the richness with a bright, citrusy treat like the Glazed Lemon Blueberry Loaf, perfect for a morning or afternoon snack.
Don’t just keep this triumph to yourself! We’d love to see your creations. Try out this recipe, share your beautiful results on social media, and tell us about your experience in the comments below. Happy cooking!

Stuffed Pancakes
Course: BreakfastCuisine: AmericanDifficulty: easy6
pancakes20
minutes30
minutes300
kcal50
minutesMaster the art of stuffed pancakes with this easy recipe, ensuring perfectly cooked, fluffy pancakes with a warm, gooey pear and peanut butter filling every time. Golden on the outside, deliciously soft inside.
Ingredients
1 cup all purpose flour
2 tablespoons granulated sugar
2 teaspoons baking powder
1/2 teaspoon salt
1 large egg
1 cup milk (any kind)
2 tablespoons cooking oil (plus extra for griddle)
1/2 cup creamy peanut butter
1 large pear (such as Bosc or Bartlett), cored and thinly sliced
Powdered sugar, for dusting
Directions
- In a large bowl, whisk together the flour, granulated sugar, baking powder, and salt.
- In a separate medium bowl, whisk together the egg, milk, and 2 tablespoons of cooking oil until well combined.
- Pour the wet ingredients into the dry ingredients. Stir gently with a spoon or whisk until just combined. A few lumps are okay; do not overmix, as this can lead to dense pancakes. The batter should be thick enough to hold the filling.
- Heat a nonstick griddle or large frying pan over medium-low heat. Brush lightly with a little extra cooking oil or butter. This low heat is crucial for ensuring the pancakes cook through without burning.
- For each pancake, pour about 2 tablespoons of batter onto the griddle, forming a small, thick disc.
- Immediately place 2 to 3 thin pear slices and a small dollop (about 1 teaspoon) of peanut butter on top of the batter disc.
- Spoon another 1 to 1.5 tablespoons of batter over the filling, gently spreading it to cover the pear and peanut butter as much as possible. This step ensures the filling is fully encased.
- Cook the pancakes for 3 to 4 minutes on the first side, or until you see small bubbles forming on the surface and the edges look set and golden brown. The key here is patience; cooking slowly allows the heat to penetrate the thick, filled center.
- Carefully flip each pancake. Reduce the heat slightly if they are browning too quickly. Cook for another 4 to 5 minutes on the second side, or until deeply golden brown and cooked through. To help guarantee a fully cooked center, you can place a lid over the pan for the last 2 minutes of cooking on the second side. This traps steam and helps the dough cook without drying out.
- Transfer the cooked pancakes to a plate. Serve immediately, dusted generously with powdered sugar. Enjoy your perfectly cooked, fluffy, and flavorful stuffed pancakes!
Notes
- Patience with low heat is crucial for thorough cooking. Don’t overmix the batter; a lid helps cook the center.