Golden Peach Galette: Crisp Crust, Juicy Peaches
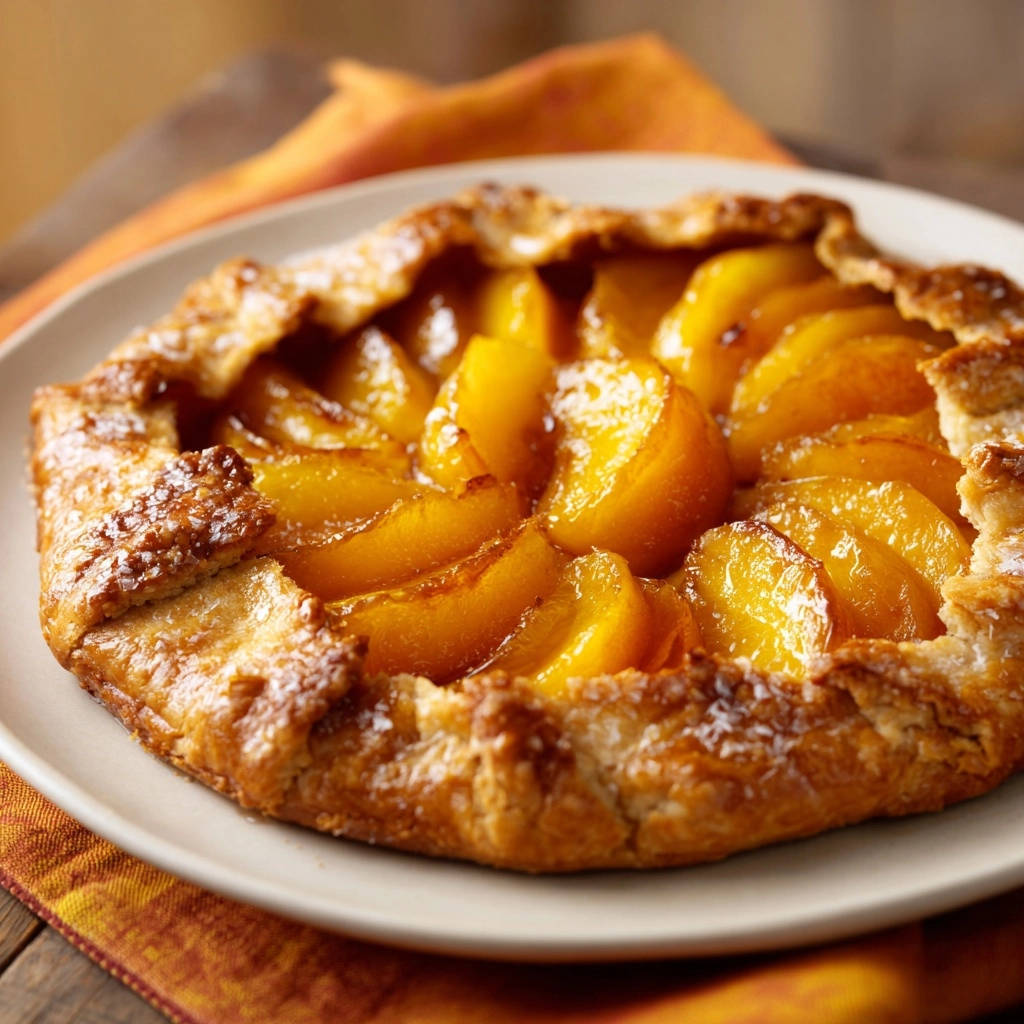
There’s nothing quite as disheartening as a beautiful fruit tart with a soggy bottom. For years, I struggled with this exact challenge, especially when trying to perfect a rustic dessert like the Golden Peach Galette. Thankfully, through countless test batches, I finally uncovered the simple secret to achieving a consistently crisp, golden crust that cradles perfectly tender, sweet peaches.
This recipe delivers a truly special experience, where every bite offers that desired textural contrast – a buttery, flaky crust giving way to luscious, warm fruit. It’s an approachable yet impressive dessert that encapsulates the very essence of summer, promising pure perfection without the fuss.
Why This Golden Peach Galette is Your New Summer Essential
No More Soggy Bottoms: Our Secret Weapon Revealed
The core innovation in this galette recipe is a simple flour coating for the peaches. This acts as a protective barrier, diligently absorbing any excess moisture released by the fruit during baking.
The result is a beautifully crisp bottom crust, preventing the common culinary frustration of a wet, unappetizing pastry beneath juicy fruit.
Rustic Charm, Effortless Elegance
A galette, by its very nature, is a free-form tart that embraces imperfection. Its rustic, hand-folded edges lend it an immediate charm that looks far more complicated than it actually is.
More Ways to Enjoy Stone Fruit Season
If that Golden Peach Galette has you craving more fruit-forward treats with crisp edges and soft centers, these two recipes share that same balance of texture and sweetness.
- For a savory-sweet contrast with the same golden-brown crunch, pair the galette with Sugared Fried Cheese Balls — the salty cheese and sugary coating echo the galette’s crust-and-fruit dynamic.
- When you want a nutty, tender crumb to soak up extra peach juices, bake a batch of Bakery-Style Almond Muffins; their moist interior and sliced-almond topping match the galette’s rustic, buttery finish.
This Golden Peach Galette recipe ensures you achieve that effortlessly elegant look, making it suitable for both casual family gatherings and more sophisticated backyard soirées.
A Symphony of Sweet & Tangy Flavors
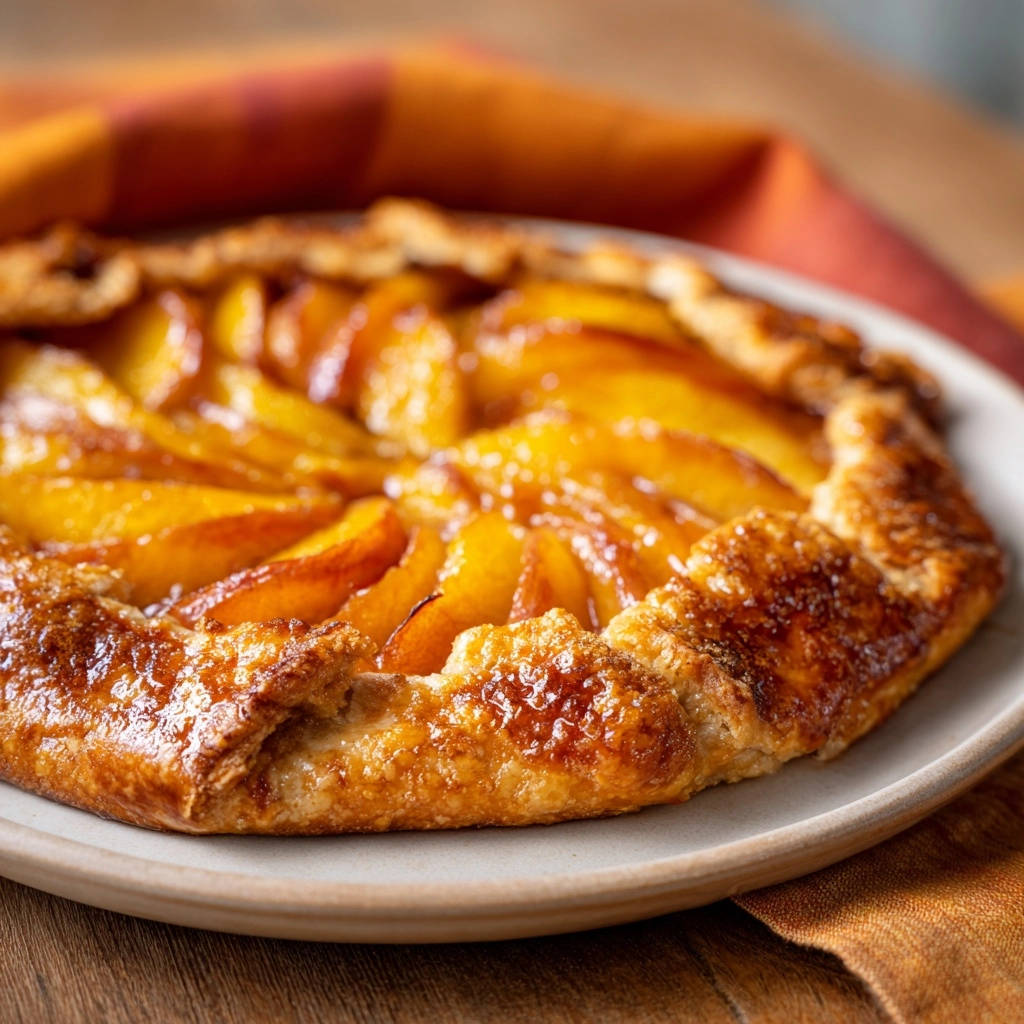
At the heart of this summer dessert is the natural, sun-kissed sweetness of ripe peaches. This is subtly enhanced by granulated sugar, creating a perfect balance that can also accommodate a hint of peach’s inherent tang.
The buttery, flaky crust and sparkling turbinado sugar provide a delightful textural and flavor contrast, making each bite a celebration of fresh, vibrant fruit.
The same flour coating trick that keeps the galette crust crisp works beautifully in this cherry cobbler method.
The Building Blocks: Ingredients for an Irresistible Galette
The Star of the Show: Ripe Peaches
Choosing ripe, aromatic peaches is paramount for flavor. Look for fruit that yields slightly to gentle pressure and has a fragrant, sweet aroma.
Carefully peel, pit, and slice them about 1/4 inch thick. This uniform thickness ensures even cooking and tenderness in your rustic pie.
Mastering the Crust: Dough & Flour
You have flexibility here: use a high-quality store-bought pie crust for convenience, or your favorite homemade recipe for ultimate flakiness.
The tablespoon of all-purpose flour in the filling is critical. It’s the secret ingredient that absorbs fruit juices, directly preventing a soggy bottom and guaranteeing a crisp Golden Peach Galette.
Sweeteners & Finishing Touches
Granulated sugar brings out the peaches’ natural sweetness and helps create a syrupy filling. Turbinado sugar, sprinkled on the crust, offers a delightful crunch and sparkle.
The simple egg wash (beaten egg with water) provides a professional, deep golden-brown finish, adding visual appeal to your homemade dessert.
Crafting Your Golden Peach Galette: A Detailed Method
- Prepare Your Workspace: Preheat and Line
Preheating your oven to 400°F (200°C) ensures an even bake from the start. Lining a baking sheet with parchment paper is crucial for easy removal and prevents sticking.
- The Secret to Success: Coating the Peaches
In a medium bowl, gently toss the sliced peaches with 1/4 cup granulated sugar and 1 tablespoon all-purpose flour.
This flour is your ultimate defense against a soggy bottom crust, absorbing excess moisture as the peaches bake.
- Unfurl Your Crust Canvas
Carefully unroll your chosen pie crust onto the prepared baking sheet. If using homemade dough, roll it into a 10 to 12-inch circle for the perfect rustic base.
- Arranging the Golden Filling
Arrange the floured peach slices in a single layer over the center of the pie crust, leaving a generous 2-inch border.
Avoid mounding them too high; keeping them flat promotes even cooking and prevents excessive moisture pooling.
- Folding the Rustic Edge
Gently fold the exposed pie crust border up and over the outer edge of the peaches, creating natural pleats as you go.
This free-form style is the hallmark of a beautiful galette, embracing its imperfect charm.
- The Golden Glaze: Egg Wash Application
Brush the folded crust edges with the egg wash (1 beaten egg mixed with 1 tablespoon water).
This simple step is key to achieving that desirable, deeply golden brown, professional-looking finish.
- A Sprinkle of Sparkle: Turbinado Sugar
Evenly sprinkle the turbinado sugar over the egg-washed crust. This adds an extra layer of sweetness, a delightful crunch, and a sparkling visual appeal.
- Bake to Golden Perfection
Bake for 35-45 minutes, or until the crust is deeply golden brown and the peach filling is visibly bubbly and tender.
Keep a close eye during the last 10-15 minutes to prevent over-browning.
- The Crucial Cooling Phase
Let the galette cool on the baking sheet for at least 15-20 minutes before slicing and serving.
This cooling time allows the filling to set completely, ensuring your crust remains crisp and the galette holds its shape beautifully.
Chef’s Secrets: Elevating Your Golden Peach Galette
Don’t Skip the Flour Coating: Reinforce the importance of coating the peaches with flour. This isn’t just a suggestion; it’s the critical step for preventing a soggy crust in your Golden Peach Galette.
Work with Cold Dough: If using homemade dough, ensure it’s well-chilled. Cold dough is easier to handle, less likely to stick, and creates a flakier crust. If using store-bought, keep it chilled until just before use for best results.
Mind Your Peaches: For best results, use firm-ripe peaches. Overly soft peaches can release too much liquid, while under-ripe ones lack flavor and texture. Perfect peaches make a perfect fruit tart.
Ventilation is Key: While the galette is free-form, ensure there are small gaps or vents between the folded crust and the fruit to allow steam to escape. This helps prevent a steamy, potentially soggy interior and ensures an overall crisp crust.
Rotate for Even Browning: For consistent golden color, rotate your galette halfway through baking, especially if your oven has hot spots. This guarantees a uniformly beautiful finish.
The Art of Cooling: Emphasize that patience during cooling is paramount. Rushing this step can lead to a messy slice and a less-than-crisp crust; allow the filling to properly set.
Troubleshooting Your Galette: Common Issues, Simple Solutions
Crust Spreading Too Much During Baking?
This often indicates the dough wasn’t cold enough or was overworked. Ensure your dough is well-chilled before rolling and handling it as little as possible. You can also quickly chill the formed galette for 10-15 minutes before baking to firm up the butter.
Peaches Not Tender Enough After Baking?
This might mean your peaches were under-ripe or sliced too thickly. For next time, use riper fruit and ensure slices are consistently 1/4 inch thick. You can also tent the galette loosely with foil if the crust is browning too quickly, allowing the peaches more time to cook through.
Edges Browning Too Quickly?
If your crust edges are getting too dark before the rest of the galette is done, you can create a foil ring or small strips to gently cover just the edges. This protects them from direct heat while the center finishes baking evenly.
Your Golden Peach Galette Questions Answered
Can I use frozen peaches for this galette?
Yes, you can use frozen peaches, but be sure to thaw them completely and pat them very dry with paper towels to remove as much excess moisture as possible. You might also add an extra teaspoon of flour to your peach mixture to account for any residual liquid from the frozen fruit.
What’s the best way to store leftover galette?
Store any leftover galette loosely covered at room temperature for up to 2 days, or in the refrigerator for up to 3-4 days. For best crust crispness, you can briefly reheat individual slices in a toaster oven or warm oven before serving, restoring some of that flaky crust goodness.
Can I make this galette gluten-free?
Absolutely! Simply substitute the standard pie crust with your favorite gluten-free pie crust dough. The flour in the peach mixture can remain all-purpose, or you can use a gluten-free all-purpose blend as well, ensuring a delicious gluten-free summer dessert.
What other fruits work well in a galette?
Galettes are incredibly versatile! Apples, berries (strawberries, blueberries, raspberries), plums, or a mix of stone fruit work beautifully. Adjust sugar content based on the sweetness of your chosen fruit. Always consider adding a tablespoon of flour for juicy fruits to maintain a crisp crust.
Enjoying & Preserving Your Homemade Galette
Serving Suggestions: The Perfect Accompaniments
A warm slice of Golden Peach Galette is sublime on its own, its fresh flavors speaking for themselves. However, it truly shines when paired with a scoop of creamy vanilla bean ice cream, a dollop of freshly whipped cream, or a drizzle of tangy crème fraîche.
For a perfect pairing, try our Mastering Classic Buttery Shortbread Cookies with a Crisp Snap.
A light dusting of powdered sugar can also add a touch of elegance, making this rustic pie feel even more special for your guests.
Storage & Make-Ahead Tips
To enjoy maximum crispness, galettes are best eaten the day they are baked. If you’re planning ahead, you can prepare the peach filling a few hours in advance and store it in the refrigerator until ready to assemble.
The formed galette can also be assembled and chilled for up to 30 minutes before baking. This helps the crust maintain its shape and flakiness during the initial oven burst.
Bake, Share, & Savor Your Golden Peach Galette!
From its humble, rustic appearance to its explosion of fresh peach flavor and satisfyingly crisp crust, this Golden Peach Galette is more than just a dessert; it’s a testament to simple ingredients coming together to create something truly magical. We hope you’ll find as much joy in baking and sharing this recipe as we do, making it a staple for your summer dessert repertoire.
Don’t be shy – dive in, experiment with different stone fruit, and make this easy baking recipe your own. Your taste buds (and your guests) will thank you!
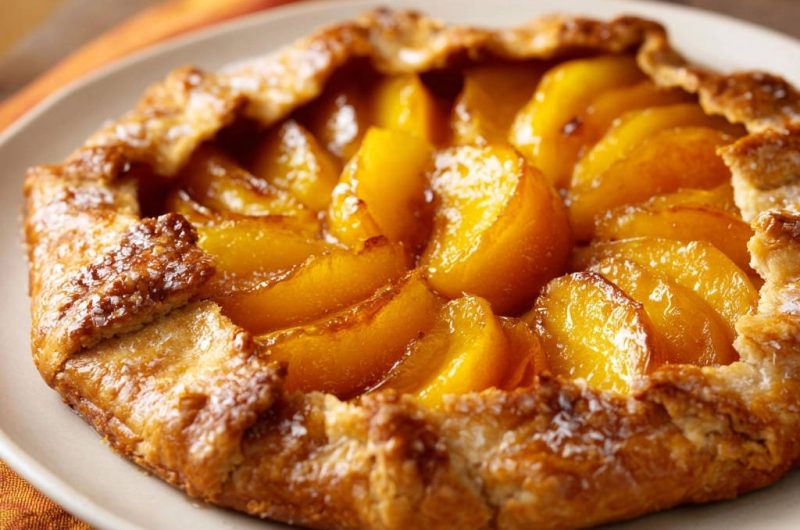
Peach Galette
Course: PastryCuisine: American/French-inspiredDifficulty: easy6
servings20
minutes35
minutes240
kcal60
minutesMaster the art of baking a stunning Golden Peach Galette with a perfectly crisp crust and juicy, tender peaches. This simple recipe ensures no more soggy bottoms, delivering a delightful dessert that’s pure perfection in every slice.
Ingredients
2-3 medium ripe peaches, peeled, pitted, and sliced 1/4 inch thick
1 round pie crust (store-bought or your favorite recipe)
1/4 cup granulated sugar
1 tablespoon all-purpose flour
1 large egg, beaten with 1 tablespoon water (for egg wash)
1 tablespoon turbinado sugar, for sprinkling
Directions
- Preheat your oven to 400°F (200°C). Line a baking sheet with parchment paper.
- In a medium bowl, gently toss the sliced peaches with 1/4 cup granulated sugar and the 1 tablespoon all-purpose flour until the peaches are evenly coated. This flour is your secret weapon for preventing a soggy crust! It will absorb any excess moisture released by the fruit during baking, keeping your bottom crust beautifully crisp.
- Unroll your pie crust onto the prepared baking sheet. If using homemade dough, roll it out into a 10 to 12-inch circle.
- Arrange the floured peach slices in a single layer over the center of the pie crust, leaving a 2-inch border around the edges. Try to keep them fairly flat and avoid mounding them too high.
- Fold the exposed pie crust border up and over the outer edge of the peaches, pleating it as you go to create a rustic, free-form tart.
- Brush the folded crust edges with the egg wash. This helps create that beautiful golden brown finish.
- Sprinkle the turbinado sugar over the egg-washed crust for extra sparkle and crunch.
- Bake for 35-45 minutes, or until the crust is deeply golden brown and the peach filling is bubbly and tender. Keep an eye on it to ensure it does not over brown.
- Let the galette cool on the baking sheet for at least 15-20 minutes before slicing and serving. This allows the filling to set up completely and ensures your crust stays crisp.
Notes
- Cooling for at least 15-20 minutes is essential for the filling to set and the crust to remain crisp.