Mastering Golden Skillet Dinner Rolls for Bakery-Quality Results
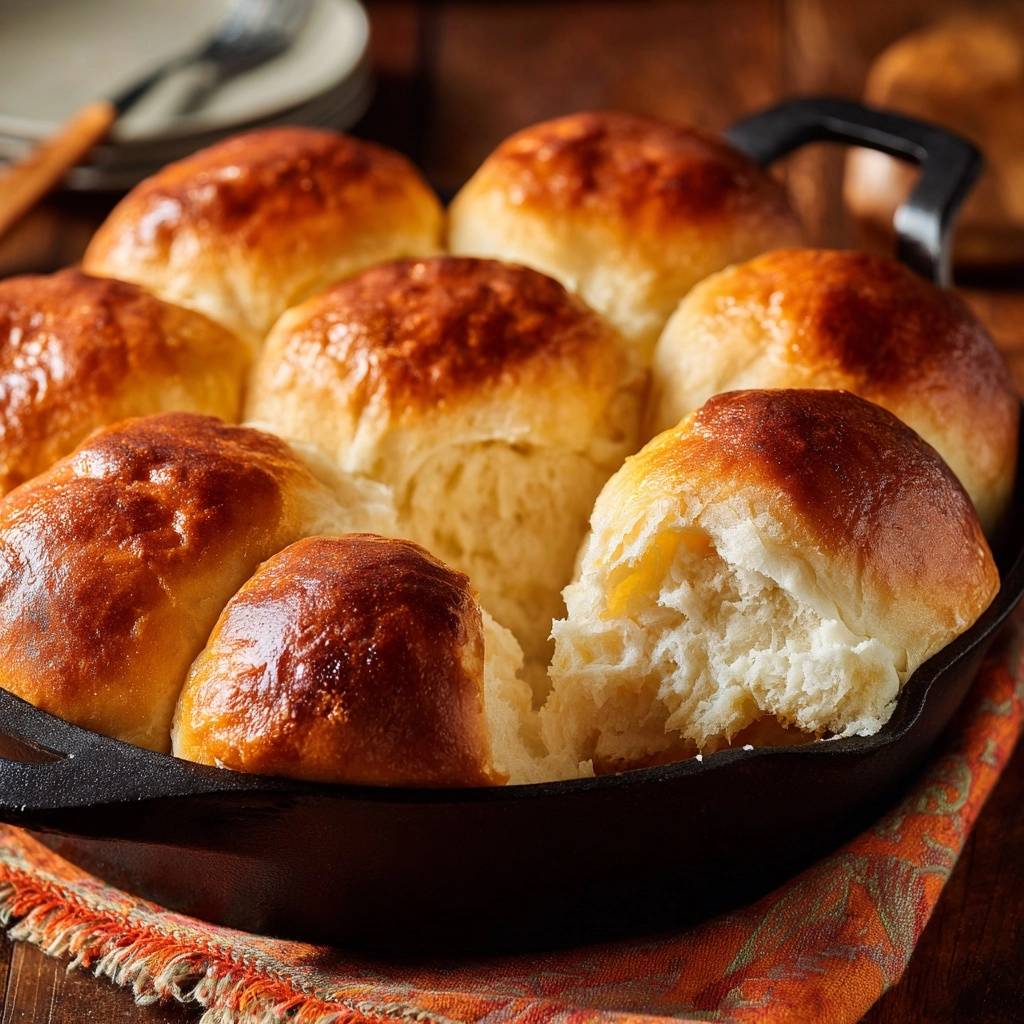
There is nothing quite like the aroma of yeast and honey wafting through a kitchen on a quiet afternoon. You know that moment when you pull a heavy skillet from the oven and the rolls are so soft they practically sigh as you press into them? That is the goal here. Too often, homemade bread ends up feeling like a dense, heavy brick that requires a gallon of water to swallow. We are leaving those days behind.
The secret to these Golden Skillet Dinner Rolls lies in a specific moisture-lock philosophy. By utilizing the intense, even heat of cast iron and a high-hydration dough, we create an environment where steam is trapped within the crumb. This ensures every bite is airy, pillowy, and light. It is about controlling the environment so the bread has no choice but to turn out perfect.
I have found that the biggest mistake most bakers make is adding too much flour the second the dough feels sticky. If you want that professional pull-apart texture, you have to embrace a slightly tacky dough. That extra moisture is exactly what transforms into steam in the oven, pushing the dough upward for a massive rise. Trust the process, keep your hands lightly oiled, and let the gluten do the heavy lifting.
The Science of Softness: Why These Rolls Work
When you mix your ingredients, you are starting a chemical chain reaction. A tacky dough might feel intimidating to handle, but it is the key to a superior crumb. High hydration levels mean there is more water available to turn into steam once the skillet hits the hot oven. This steam expands the air pockets created by the yeast, resulting in a roll that feels weightless rather than gummy.
Honey plays a vital role here that goes beyond just adding a hint of sweetness. Honey is a natural humectant, meaning it actually attracts and holds onto moisture. Unlike granulated sugar, which can sometimes lead to a drier crumb over time, honey ensures these rolls stay soft for days. It also helps achieve that beautiful mahogany crust through the Maillard reaction, providing a deep, complex flavor profile.
The fat content from the whole milk and the room-temperature egg further tenderizes the dough. These fats coat the flour proteins, shortening the gluten strands just enough to ensure the bread is soft to the bite but still strong enough to hold its shape. It is a delicate balance of strength and tenderness that makes these rolls stand out from a standard dinner loaf.
The Role of Cast Iron in Heat Distribution
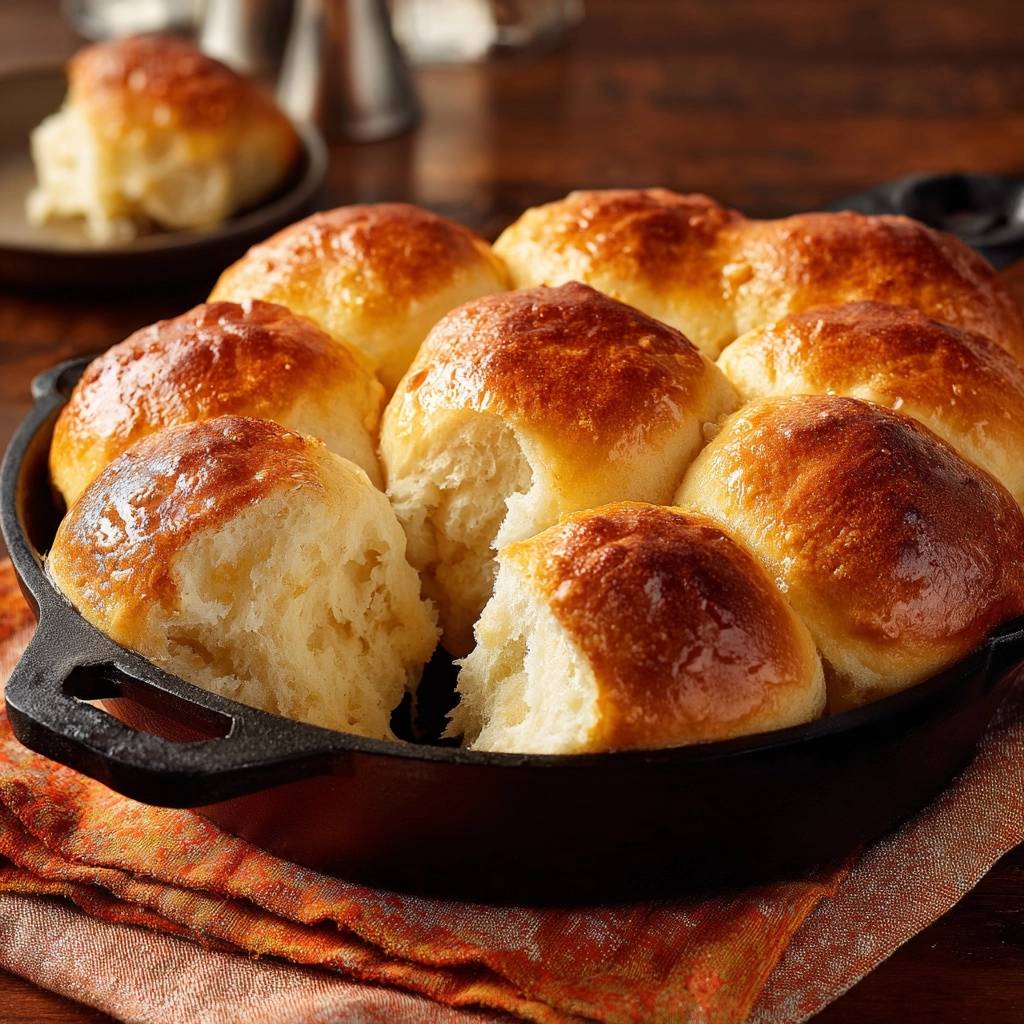
Using a 10-inch cast iron skillet is a total game-changer for bread baking. Cast iron has incredible thermal mass, which means it holds onto heat and radiates it steadily. Unlike a thin baking sheet that can hot-spot and burn the bottoms of your rolls, the skillet provides a gentle, consistent heat that encourages a uniform rise.
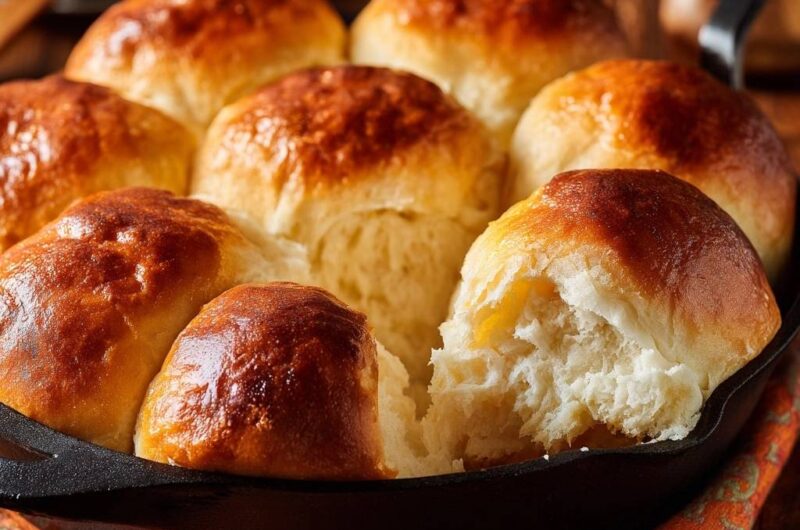
As the rolls bake, the heavy iron sides reflect heat back into the dough, helping the rolls “climb” and support each other. This creates those iconic soft, white sides where the rolls pull apart. The bottom of the roll develops a thin, golden-brown crust that offers a slight crunch, providing a perfect textural contrast to the cloud-like interior.
Essential Components for Golden Skillet Dinner Rolls
Quality ingredients are the foundation of any great bake. For this recipe, I recommend all-purpose flour over bread flour. While bread flour has more protein, it can sometimes make a small roll feel too chewy or tough. All-purpose flour provides just enough structure to keep the rolls tall while maintaining a delicate, melt-in-your-mouth tenderness.
Temperature control is your best friend when working with yeast. Your milk should be exactly 110°F. If it is too cold, the yeast will stay dormant; if it is too hot, you risk killing the living organisms that make your bread rise. Use a digital thermometer to be sure. Similarly, using a room-temperature egg ensures the fats emulsify properly into the dough without chilling the mixture and slowing down your rise time.
Don’t skimp on the butter quality here. Since we use it both in the dough and as a finishing glaze, a high-quality unsalted butter will provide a cleaner, creamier flavor. The final brush of salted butter at the end is what gives these rolls that “bakery-style” savory pop that makes them completely irresistible.
Active Dry Yeast vs. Instant Yeast Adjustments
This recipe calls for active dry yeast, which requires “blooming” in warm liquid before you add the other ingredients. You are looking for a thick, foamy head to develop on top of the milk and honey mixture. If it doesn’t foam after ten minutes, your yeast might be expired, and it is better to start over now than to waste your flour on dough that won’t rise.
If you only have instant yeast on hand, you can skip the blooming step and mix it directly with the dry ingredients. However, you will still want to keep your milk warm to help the dough rise quickly. Instant yeast is more concentrated, so you can use about 25% less than the amount of active dry yeast called for in the recipe.
Phase One: Activating the Yeast and Mixing
Start by whisking your warm milk, honey, and yeast together in your mixer bowl. Let it sit undisturbed. After about five to ten minutes, you should see a bubbly, frothy layer on top and smell a pleasant, earthy aroma. This is the sign that your yeast is alive and ready to work.
Once the yeast is active, whisk in your melted butter, egg, and salt. When you begin adding the flour, do it gradually. You want to watch the dough transition from a wet batter to a “shaggy mass.” This is the stage where the flour has absorbed the liquid but hasn’t yet become smooth. Stop adding flour as soon as the dough starts to pull away from the sides of the bowl.
Phase Two: The Art of the Knead and First Rise
Kneading is where the structure is built. Whether you use a stand mixer or your hands, you need to work the dough for a full 8 to 10 minutes. You are looking for the dough to become smooth, elastic, and shiny. A great way to check is the “Windowpane Test.” Tear off a small piece of dough and gently stretch it; if you can see light through it without it tearing, the gluten is perfectly developed.
Place your dough in a lightly greased bowl and cover it with a damp kitchen towel. I prefer a damp cloth over plastic wrap because it allows the dough to breathe while maintaining the perfect humidity level. Place it in a warm, draft-free spot. You want it to double in size, which usually takes about an hour, depending on the temperature of your kitchen.
Phase Three: Shaping for Maximum Tension
Once the dough has risen, gently punch it down to release the large gas bubbles. Turn it out onto a very lightly floured surface. For a 10-inch skillet, nine rolls is the magic number. I highly recommend using a kitchen scale to weigh each portion to roughly 80 grams. This ensures they all bake at the exact same rate.
To shape the rolls, cup your hand over a dough ball and move it in a circular motion against the counter. You want to create tension on the surface of the dough, pulling it tight until the top is perfectly smooth and round. This tension is what allows the rolls to expand upward in the oven rather than spreading out flat.
Phase Four: The Second Proof and the Egg Wash Secret
Arrange your nine dough balls in the greased skillet, placing one in the center and eight around the perimeter. Cover them again for the second rise. This stage is shorter, about 30 to 45 minutes, but it is vital for that fluffy texture. The rolls should grow until they are snuggled up against each other and look visibly puffy.
Before they go into the oven, apply the egg wash. Whisking the egg with a tablespoon of water is a pro tip that thins the proteins just enough to prevent a streaky, uneven finish. Use a soft pastry brush and be very gentle so you don’t deflate the rolls. This wash is what creates that stunning, high-gloss shine that looks like it came from a professional bread shop.
Phase Five: Baking and the Salted Butter Finish
Slide the skillet into a preheated 375°F oven. As they bake, you will see the rolls undergo a massive transformation. They will swell and brown deeply. You are looking for a rich, mahogany color. Don’t be afraid of a dark crust; that color represents flavor and a fully cooked interior. If they look pale, they will likely be doughy inside.
The moment you pull the skillet out, have your melted salted butter ready. Brush it generously over the hot rolls. You will hear a slight sizzle as the butter hits the crust. This step is crucial because the fat soaks into the top layer, softening the crust so it stays tender while adding a final hit of savory richness. Serve them warm, right out of the skillet, for the best experience.
Troubleshooting Common Bread Baking Obstacles
If your rolls didn’t rise, the most common culprit is the temperature of the milk. If it was too hot, it likely killed the yeast. Always use a thermometer. Another reason could be a cold kitchen; if your house is chilly, try placing the dough inside an oven that is turned off but has the oven light switched on. That small amount of heat is often enough to get things moving.
Dense rolls usually happen because of over-flouring. It is tempting to keep adding flour when the dough feels sticky, but resist the urge! Use a bench scraper to handle the dough instead of your bare hands if needed. Also, ensure you are kneading long enough. Under-kneaded dough won’t have the strength to hold the air bubbles, leading to a heavy, flat result.
If the bottoms of your rolls are getting too dark before the tops are done, your oven rack might be too low. Move the skillet to the middle or upper-middle rack. If the crust feels too tough, you might be over-baking them. Every oven is different, so start checking for that deep golden color around the 18-minute mark to ensure they stay soft.
Make-Ahead Strategies and Storage Solutions
You can easily prep these ahead of time using the “Overnight Fridge Rise” method. After shaping the rolls and placing them in the skillet, cover them tightly with plastic wrap and put them in the refrigerator. They will rise slowly overnight. The next morning, let them sit at room temperature for about 45 minutes to take the chill off before baking as directed.
To freeze these rolls, it is best to bake them fully first. Let them cool completely, then wrap the entire skillet or individual rolls in foil and place them in a freezer bag. They will stay fresh for up to a month. When you are ready to eat, thaw them at room temperature and then warm them in a 300°F oven, still wrapped in foil, for about 10 minutes to restore that “just-baked” softness.
Savory and Herb-Infused Variations
While the classic honey-butter version is a crowd favorite, you can easily customize this base recipe. For a garlic-herb version, mix minced garlic, dried oregano, and parsley into the finishing butter. Brush it on as soon as the rolls come out of the oven for a fragrant, savory twist that pairs perfectly with pasta dishes.
If you want something a bit more rustic, try a Honey-Sea Salt topping. After brushing with the final butter, sprinkle a pinch of flaky sea salt over the tops. The contrast between the sweet honey in the dough and the sharp salt on top is incredible. You can also fold cracked black pepper directly into the dry flour for a subtle, warming heat throughout the roll.
Ideal Pairings for Warm Skillet Rolls
These rolls are the ultimate “sopping” bread. Their sturdy yet soft structure makes them perfect for cleaning up the last bits of a hearty beef stew or a creamy roasted vegetable soup. Because they are baked in a skillet, they have a rustic presentation that looks beautiful in the center of a holiday table next to a roasted chicken or turkey.
For a perfect pairing, try our Peach Glazed Loaf Cake: No More Sinking Fruit!.
They also make fantastic sliders. Because they are slightly sweet and very soft, you can slice them in half and fill them with shredded barbecue beef or even use them for breakfast sandwiches with eggs and cheese. The versatility of a good skillet roll is endless, making them a staple for both casual weeknight dinners and big family gatherings.
Expert Tips for a Professional Gloss
To get that mirror-like shine you see in bakeries, timing is everything. Apply the egg wash immediately before the skillet goes into the oven. If you apply it too early, it can dry out and lose its luster. Also, make sure your finishing butter is completely melted but not boiling hot when you brush it on; you want it to glide over the surface without tearing the delicate crust.
Another trick for a professional look is to ensure your dough balls are perfectly smooth. Any seams or tears on the top of the dough will expand and look jagged after baking. Spend those extra few seconds tensioning the dough against the counter to get a tight, round surface. This small step makes the difference between a “home-cooked” roll and a “bakery-quality” masterpiece.
How should I store leftover rolls to keep them soft?
Store any leftover rolls in an airtight container or a zip-top bag at room temperature for up to three days. To maintain their soft texture, ensure the bag is completely sealed to prevent air from drying them out. If you want to keep them longer, freezing is a better option than the refrigerator, as the fridge can actually cause bread to stale faster. Reheat them in the oven wrapped in foil to bring back that pillowy mouthfeel.
Why did my rolls turn out dense and heavy?
The most common reason for dense rolls is adding too much flour during the mixing or kneading process. The dough should remain slightly tacky to the touch. If you add enough flour to make it completely dry, you lose the moisture needed for a light rise. Additionally, make sure you knead the dough for the full 8-10 minutes to develop enough gluten to trap air bubbles. Under-proofed dough that hasn’t doubled in size will also result in a heavy texture.
Can I use this recipe without a cast iron skillet?
Yes, you can bake these in a 9×9 inch square baking pan or a round cake pan if you don’t have a skillet. However, keep in mind that glass or ceramic pans don’t conduct heat as intensely as cast iron, so you may need to add 2-5 minutes to the baking time. Watch for the same deep mahogany color on top to ensure they are fully baked through. The rolls will still be delicious, though they may lack the specific bottom crust that cast iron provides.
What can I use instead of honey?
If you don’t have honey, you can substitute it with an equal amount of maple syrup or granulated sugar. Maple syrup will provide a similar humectant quality and a lovely depth of flavor. If using granulated sugar, the rolls will still be sweet and fluffy, but they might dry out slightly faster than the honey version. Avoid using liquid sweeteners like corn syrup, as they won’t provide the same flavor profile or browning capabilities.
My dough isn’t rising, what should I do?
First, check the temperature of your environment. If your kitchen is cold, move the dough to a warmer spot like the top of the refrigerator or inside an oven that is turned off. If it still isn’t moving after two hours, your yeast may have been inactive. In the future, always ensure your milk is between 105°F and 115°F. If the yeast doesn’t foam during the blooming stage, do not proceed with the rest of the ingredients, as the dough will not rise regardless of how long you wait.
Can I make these rolls gluten-free?
This specific recipe relies heavily on gluten development through kneading to create its airy structure, so a simple 1:1 flour swap may not yield the same results. Gluten-free doughs usually require different binding agents like xanthan gum and significantly more moisture. If you want to attempt a gluten-free version, you would need to use a dedicated gluten-free bread flour blend and expect a different, more cake-like crumb texture rather than the traditional pull-apart style.
Dinner Rolls
Course: Breads and RollsCuisine: AmericanDifficulty: medium9
rolls20
minutes25
minutes195
kcal45
MinutesThese Golden Skillet Dinner Rolls use a specific hydration method and cast iron baking to ensure an airy, soft interior and a beautiful mahogany crust. Perfect for any family dinner.
Ingredients
3 1/4 cups all-purpose flour (plus extra for dusting)
1 cup warm whole milk (110°F)
2 tablespoons honey
2 1/4 teaspoons active dry yeast
1 teaspoon fine sea salt
4 tablespoons unsalted butter, melted and cooled
1 large egg, room temperature
1 egg beaten with 1 tablespoon water (egg wash for shine)
2 tablespoons salted butter, melted (for finishing)
Directions
- In the bowl of a stand mixer or a large mixing bowl, combine warm milk, honey, and yeast. Let it sit for 5-10 minutes until foamy. This ensures your yeast is active for a proper rise.
- Add the 4 tablespoons of melted butter, the room-temperature egg, and salt. Whisk until combined.
- Gradually add the flour. Using a dough hook or by hand, mix until a soft dough forms.
- Knead the dough for 8-10 minutes. To solve the common problem of dense bread, do not over-flour the surface. The dough should remain slightly tacky to the touch; this high moisture level is what creates the steam needed for a fluffy interior.
- Place dough in a lightly greased bowl, cover with a damp cloth, and let rise in a warm spot for 1 to 1.5 hours, or until doubled in size.
- Punch down the dough to release air. Divide into 9 equal portions (approx. 80g each). Roll them into tight, smooth balls by tensioning the dough against the counter.
- Generously grease a 10-inch cast iron skillet with butter. Arrange the balls in the skillet (one in the center, eight surrounding it). The heavy iron distributes heat evenly, ensuring the bottoms develop a golden crust without burning.
- Cover and let rise again for 30-45 minutes. The rolls should be touching and look puffy.
- Preheat your oven to 375°F. To achieve the high-gloss, deep golden finish seen in the image, gently brush the tops of the rolls with the egg wash.
- Bake for 20 to 25 minutes until the tops are a deep, rich mahogany brown.
- Immediately upon removing from the oven, brush the tops with the remaining 2 tablespoons of melted salted butter. This softens the crust and adds a professional savory finish. Serve warm directly from the skillet.
Notes
- Do not over-flour the surface during kneading; a slightly tacky dough ensures a fluffy interior. Use a 10-inch cast iron skillet for even heat distribution.