Mastering Toasted Coconut Chocolate Bars with a Crisp Shortbread Base
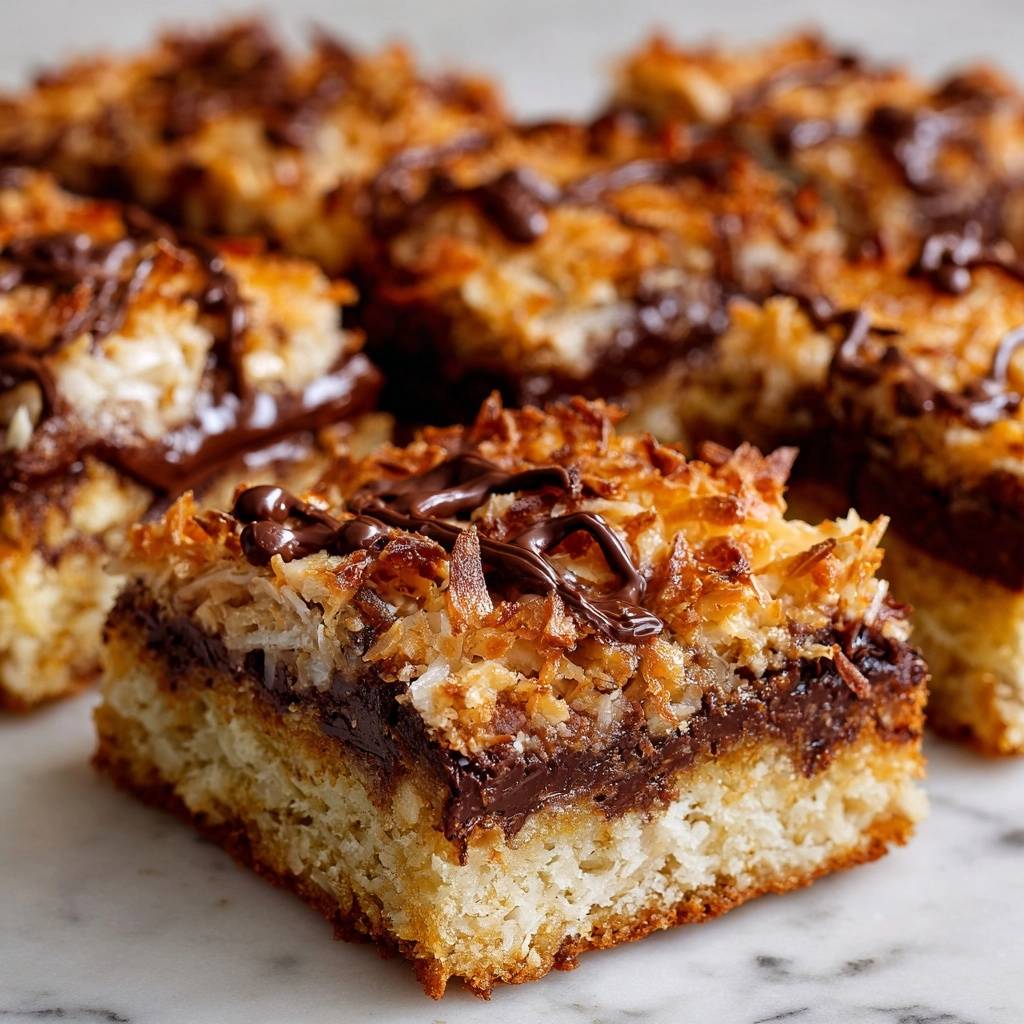
Imagine biting into a dessert where the first thing you notice is the audible crunch of deeply toasted coconut. That nutty, caramelized flavor immediately gives way to a layer of rich, velvety semi-sweet chocolate that melts against your tongue. However, the real star is the base—a buttery, sturdy shortbread that holds its own without crumbling into a mess in your hands.
Most homemade dessert bars suffer from the dreaded “soggy bottom,” where the moisture from the toppings seeps into the crust, turning it into a pale, mushy paste. We’re fixing that today by using a professional double-bake method. This technique ensures every single bite maintains a perfect contrast between the chewy coconut topping and the crisp, golden foundation.
The secret to this structural integrity lies in the par-bake. By fully setting the shortbread before the wet ingredients ever touch it, you create a hardened shield. When you add a layer of melted chocolate on top of that hot crust, you’re essentially “waterproofing” your cookie base, guaranteeing a snap that lasts for days.
The Architecture of a Perfect Toasted Coconut Chocolate Bar
Building a great dessert bar is a lot like engineering. You have to manage moisture migration, especially when working with sweetened condensed milk. This ingredient is delicious, but its high water content naturally wants to soak into anything porous beneath it. If you bake everything at once, the crust stays raw while the top burns.
Our “Anti-Soggy Bottom” philosophy relies on the physics of the par-bake. By baking the shortbread until it is golden and firm, you evaporate the moisture in the dough and tighten the crumb. This creates a structural foundation that can support the heavy, dense layers of chocolate and coconut without sagging or breaking when you lift a square out of the pan.
Essential Components for the Coconut Shortbread Crust
The crust starts with a classic blend of all-purpose flour, softened unsalted butter, and granulated sugar. Using unsalted butter is vital here because it allows you to control the exact amount of seasoning. Since we add a touch of salt to the dough, you won’t end up with a bar that tastes unpredictably salty or flat.

However, we’re taking this shortbread a step further by folding in finely chopped shredded coconut. This isn’t just for flavor; the coconut fibers actually help reinforce the crumb of the cookie. As the butter melts and the flour sets, the coconut bits act like tiny pieces of rebar, giving the crust a unique, sandy texture that complements the chewy topping perfectly.
Selecting the Right Shredded Coconut
For this specific recipe, sweetened shredded coconut is your best friend. The added sugar on the coconut shreds is what facilitates the Maillard reaction, which is the chemical process that turns the coconut that beautiful mahogany brown. If you use unsweetened coconut, you’ll find it takes much longer to color, and you might dry out the condensed milk layer before the top looks toasted.
The Role of Sweetened Condensed Milk
Think of sweetened condensed milk as the “glue” that holds your topping together. Its thick, syrupy viscosity ensures the coconut shreds stay suspended in a chewy matrix rather than falling off like dry flakes. When combined with vanilla extract, it creates a flavor profile reminiscent of a high-end macaroon, providing a soft, fudgy contrast to the crisp base.
If you’re pressing crumbs into a pan for this recipe, the same firm technique is key for these crisp no-sog crust magic bars.
Step-by-Step: Building the Structural Foundation
Start by creaming your softened butter and sugar together. You aren’t looking for a fluffy cake-like consistency; you just want them smoothly combined. When you stir in the flour and salt, the dough will look quite crumbly, almost like wet sand. This is exactly what you want. If it turns into a smooth, greasy paste, you’ve likely over-mixed it or your butter was too hot.
Dump those crumbs into your lined pan and press down with significant force. I often use the bottom of a flat measuring cup to really pack it in. You want to eliminate any air pockets. A tight, dense pack is the only way to ensure the shortbread doesn’t shatter the moment your knife hits it later on.
The Par-Baking Phase: Achieving Golden Edges
This is the most critical part of the entire process. Slide that pan into the oven for 18 to 20 minutes. You are looking for the edges to turn a distinct golden brown, while the center should look matte and feel firm to a light touch. If the center still looks shiny or wet, give it another two minutes. That golden color is the signal that the starches have set and the “moisture barrier” is ready.
Applying the Moisture Barrier and Topping
The moment that pan comes out of the oven, sprinkle your first cup of chocolate chips over the hot crust. Let them sit for about three minutes. The residual heat from the shortbread will soften the chocolate until it’s glossy and spreadable. Use an offset spatula to smooth it out into an even layer, reaching all the way to the corners.
This chocolate layer acts as a waterproof seal. It prevents the liquid from the coconut mixture from soaking into your beautifully crisped crust. Once the chocolate is spread, gently dollop your coconut and condensed milk mixture over the top. Spread it carefully so you don’t swirl the wet chocolate into the white coconut; you want distinct, beautiful layers.
Achieving the Deeply Toasted Coconut Finish
Put the pan back into the oven for the second bake. This is where the magic happens. Keep a close eye on it during the last five minutes. The coconut will transition from pale white to golden, and then very quickly to a deep, toasted brown. You want that deep color because it provides a smoky, nutty depth that cuts through the sweetness of the condensed milk.
The Finishing Touch: The Chocolate Oil Drizzle
While the bars cool, melt your remaining chocolate chips with a tablespoon of coconut oil. The oil is a pro-secret; it lowers the melting point of the chocolate. This means when you bite into the bar, the drizzle gives way softly rather than snapping and sending shards of chocolate flying. It also adds a gorgeous, professional-looking sheen to the finished product.
Microwave the mixture in 30-second intervals, stirring well between each. Chocolate can seize or burn in an instant if it gets too hot. Once it’s smooth and pourable, use a spoon to zig-zag it across the toasted coconut. This adds one more layer of texture and makes the bars look like they came straight from a high-end bakery.
If the parchment sling method makes lifting these bars easy, it does the same for these gooey chocolate coconut pecan toffee bars.
Troubleshooting Common Texture Issues
If you find your crust is too crumbly after baking, it usually means the dough wasn’t pressed firmly enough into the pan. Next time, really put your weight into it! On the flip side, if your coconut is browning too fast on one side, your oven might have a hot spot. Simply rotate the pan halfway through the second bake to ensure an even, toasted finish across the entire surface.
Difficulty slicing is another common hurdle. If the bars are sticking to your knife or the chocolate is smearing, they likely haven’t chilled long enough. That 30-minute stint in the fridge is non-negotiable. It firms up the fats in the butter and the chocolate, allowing for those clean, sharp edges that make dessert bars so satisfying to look at.
Equipment: Why the 8×8 Pan and Parchment Matter
Size matters here. An 8×8 inch pan provides the perfect thickness for these bars. If you try to use a 9×9 pan, the layers will be too thin, and the coconut will likely burn before the center of the bar has a chance to set. You’ll end up with a dry, brittle result instead of a chewy, decadent one.
Parchment paper is also essential. I always leave an overhang on two sides to create a “sling.” Once the bars are chilled and set, you can simply lift the entire block out of the pan. Trying to cut these inside a metal pan is a recipe for scratched cookware and mangled first-row bars. The sling method keeps the shortbread base perfectly intact.
Storage and Make-Ahead Strategies
These bars are incredibly hardy. You can keep them in an airtight container at room temperature for up to three days, and they will stay remarkably crisp. If you prefer a firmer, chewier texture, store them in the refrigerator for up to a week. The cold temperature makes the chocolate layer extra snappy and the coconut topping even fudgier.
For long-term storage, these bars freeze beautifully. Wrap individual squares in plastic wrap and place them in a freezer bag. They’ll stay fresh for up to three months. When you’re ready for a treat, just let them thaw on the counter for 20 minutes. Because of the low moisture content in the crust, they won’t get soggy during the thawing process.
Flavor Variations and Ingredient Swaps
If you want to experiment, try swapping the semi-sweet chocolate for a dark chocolate with 70% cacao. The bitterness of the dark chocolate provides a sophisticated balance to the sweet coconut. You could also sprinkle a pinch of flaky sea salt over the chocolate drizzle while it’s still wet to enhance the buttery notes of the shortbread.
For an extra crunch, some bakers like to add half a cup of toasted, chopped pecans or almonds into the shortbread dough. This adds an earthy flavor that pairs naturally with coconut. Just make sure the nuts are finely chopped so they don’t interfere with the structural integrity of the base. Whatever you add, keep that par-bake step exactly the same!
What to Serve Alongside
These coconut chocolate bars are rich and sweet, so something cool and fruity balances them out. A smoothie bowl with tropical fruit makes a good contrast in texture and temperature.
- Start your meal with a Tropical Mango Smoothie Bowl – the bright mango tang cuts through the chocolate and toasted coconut nicely.
- For a greener take, the Tropical Green Smoothie Bowl adds a mild spinach base that won’t compete with the bar’s buttery shortbread.
Expert Tips for Clean Slicing
To get those perfect, bakery-style squares, use the “hot knife” technique. Fill a tall glass with very hot water and dip a sharp chef’s knife into it. Wipe the blade completely dry with a clean towel, then make one long, smooth cut. The heat from the blade will glide through the chocolate and condensed milk like butter.
Repeat the dipping and wiping process for every single cut. It sounds tedious, but it prevents the sticky coconut topping from building up on the blade and dragging through the lower layers. This ensures that every square has clean, distinct layers of golden crust, dark chocolate, and toasted coconut. It’s the difference between a “home-cooked” look and a professional presentation.
Frequently Asked Questions
Can I use coconut flour instead of all-purpose?
No, coconut flour is not a direct substitute for all-purpose flour in this recipe. Coconut flour is extremely absorbent and requires a much higher ratio of liquid and eggs to bind. If you try to swap it 1:1 in this shortbread, the crust will turn into a dry, sandy mess that won’t hold together. Stick with all-purpose flour for the necessary gluten structure.
Why is my coconut topping still white after 20 minutes?
This usually happens if your oven rack is positioned too low. For the second bake, make sure your rack is in the center or slightly above the center of the oven. If it’s still pale, your oven might be running cool. You can increase the heat by 15 degrees or turn on the broiler for 60 seconds at the very end, but watch it like a hawk so it doesn’t burn.
How do I prevent the chocolate from seizing?
Chocolate seizes when even a tiny drop of water gets into it while melting, or if it’s overheated. Ensure your bowl and spatula are bone-dry. If your chocolate does become grainy and clumped, you can sometimes rescue it by stirring in a teaspoon of neutral oil or additional coconut oil and whisking vigorously, though it’s best to go slow with the microwave to avoid this entirely.
Can I substitute the butter for coconut oil in the crust?
You can, but the texture will change significantly. Butter contains milk solids and a small amount of water which helps the shortbread bind. A coconut oil crust will be much more fragile and “short,” meaning it might crumble more easily when sliced. If you use coconut oil, make sure it is in its solid state when you cream it with the sugar.
Is there a way to make these less sweet?
The best way to reduce the sweetness without ruining the chemistry of the bar is to use bittersweet chocolate chips (60% cacao or higher) and use unsweetened shredded coconut for the topping. However, you must keep the sweetened condensed milk, as it provides the necessary moisture and “glue” for the topping to set properly during the bake.
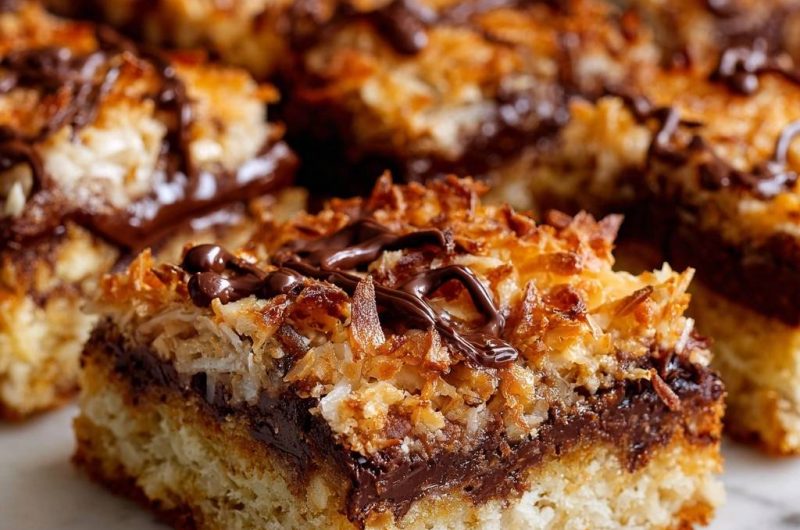
Chocolate Coconut Bars
Course: DessertCuisine: AmericanDifficulty: medium16
bars15
minutes40
minutes285
kcal55
MinutesA sturdy, coconut-infused shortbread crust topped with a rich layer of melted semi-sweet chocolate and a deeply toasted coconut and condensed milk topping.
Ingredients
For the Crust:
1.5 cups all-purpose flour
1/2 cup unsalted butter, softened
1/2 cup granulated sugar
1/2 cup shredded sweetened coconut (finely chopped)
1/4 teaspoon salt
For the Topping:
1.5 cups semi-sweet chocolate chips (divided)
2 cups shredded sweetened coconut
3/4 cup sweetened condensed milk
1 teaspoon vanilla extract
1 tablespoon coconut oil (for the drizzle)
Directions
- Preheat your oven to 350°F (175°C). Line an 8×8 inch baking pan with parchment paper, leaving an overhang on the sides for easy removal.
- In a medium bowl, cream together the softened butter and sugar until smooth. Stir in the flour, salt, and the 1/2 cup of finely chopped coconut until a crumbly dough forms.
- Press the dough firmly and evenly into the bottom of the prepared pan. This tight pack is essential for a crisp, structural base.
- Bake the crust alone for 18 to 20 minutes. You must wait until the edges are golden brown and the center is set. This par-baking step is the only way to prevent a soggy bottom once the wet toppings are added.
- While the crust bakes, combine the 2 cups of shredded coconut, sweetened condensed milk, and vanilla in a bowl. Mix until the coconut is thoroughly coated.
- Remove the hot crust from the oven. Immediately sprinkle 1 cup of the chocolate chips over the surface. Let them sit for 3 minutes to melt, then spread them into a thick, even layer with an offset spatula.
- Drop spoonfuls of the coconut mixture over the melted chocolate and spread gently to cover.
- Return the pan to the oven for 15 to 20 minutes. Bake until the coconut topping is deeply toasted and golden brown.
- While the bars cool, melt the remaining 1/2 cup of chocolate chips with the coconut oil in the microwave in 30-second intervals. Drizzle the melted chocolate in a decorative pattern over the toasted coconut.
- Allow the bars to cool completely in the pan at room temperature, then refrigerate for 30 minutes to set the chocolate drizzle. Lift out by the parchment paper and slice into squares with a sharp knife.
Notes
- The secret to preventing a soggy bottom is par-baking the crust until golden brown before adding the wet toppings. Ensure the bars are completely cooled before slicing for clean edges.