No-Bake Cranberry Cheesecake: Perfectly Firm & Fluffy

There’s nothing quite as disappointing as a no-bake cheesecake that promises perfection but delivers a soggy crust or a wobbly, unsliceable filling. I’ve been there countless times, tweaking and testing, until I finally cracked the code to the ultimate No-Bake Cranberry Cheesecake.
This recipe isn’t just easy; it’s a guaranteed winner, producing a dessert that is consistently perfectly firm, yet delightfully fluffy, holding its beautiful shape while offering a dreamy, melt-in-your-mouth texture that will impress every single time.
Why This No-Bake Cranberry Cheesecake Is Your New Favorite
Unveiling the “Perfectly Firm, Delightsome Fluffy” Secret
The magic behind this cheesecake’s ideal texture lies in two key elements: precise gelatin activation and gentle folding. We’ll guide you through handling gelatin correctly, ensuring your cheesecake sets beautifully without being rubbery.
Careful folding of the whipped cream into the cranberry cream cheese mixture is equally vital. This technique preserves the airy lightness, giving you that truly delightful, fluffy mouthfeel that defines a great no-bake dessert.
Effortless Elegance: Simplicity Meets Stunning Presentation
Forget the oven! This no-bake method dramatically simplifies the process, making it accessible for even novice bakers. Despite its ease, the final cheesecake boasts an undeniable elegance, making it a showstopper for any gathering.
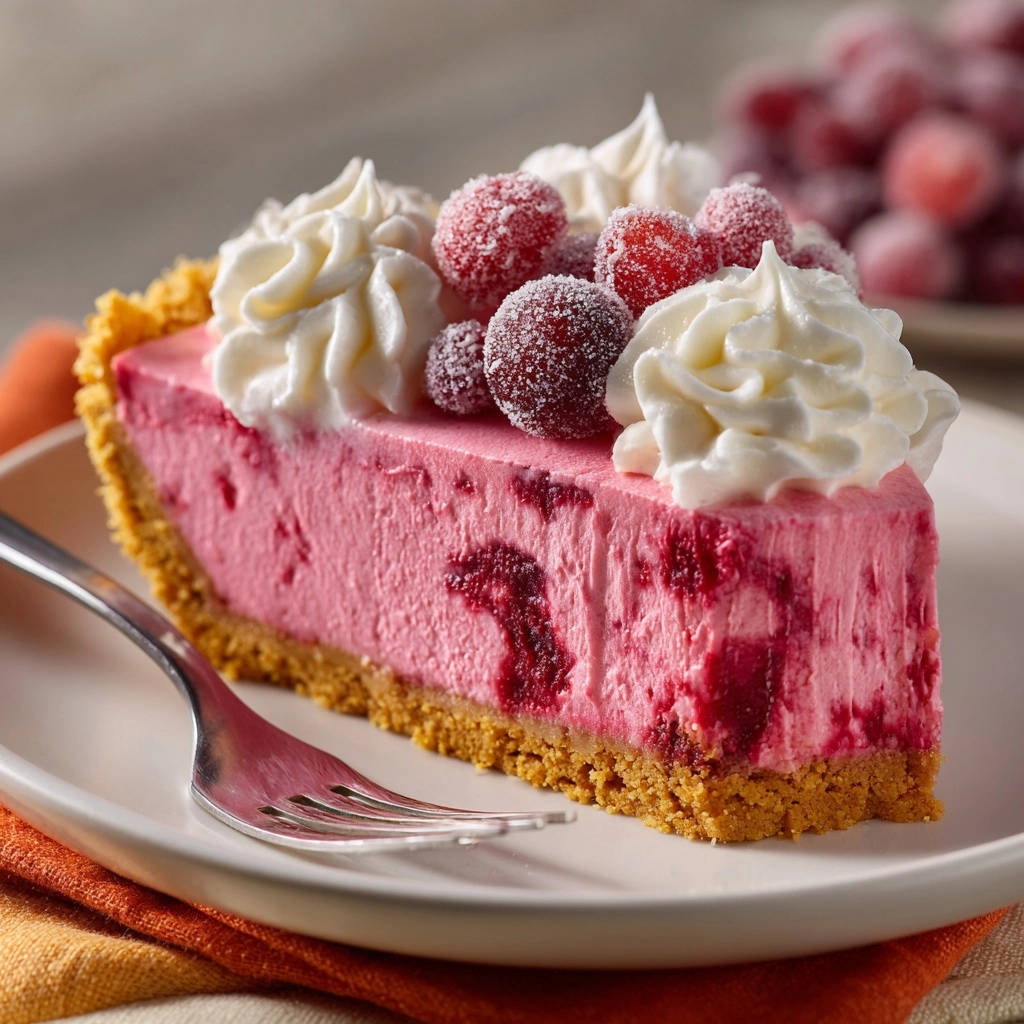
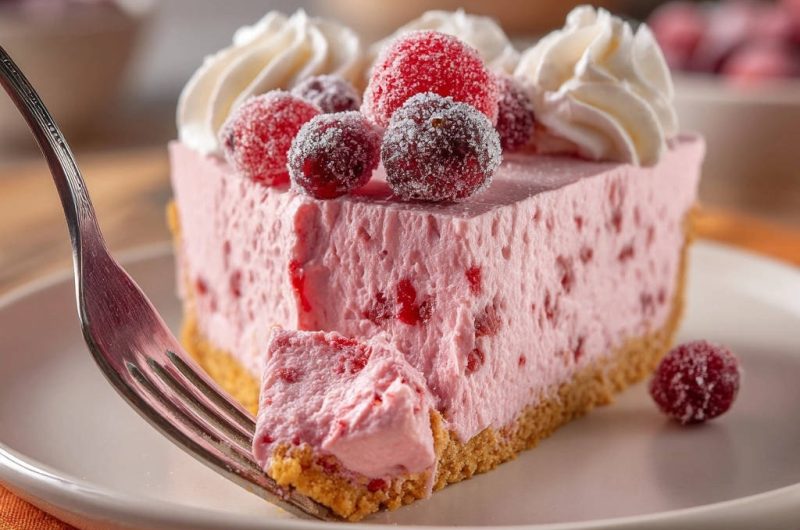
Its vibrant cranberry hue and glossy finish, complemented by the optional sugared cranberries, create a visually stunning dessert. You’ll achieve a professional-looking result with minimal fuss, perfect for effortless entertaining.
A Taste of Festive Cheer, Any Time of Year
While cranberries often evoke holiday sentiments, their bright, tangy flavor is truly versatile and shines year-round. This cheesecake offers a refreshing twist on traditional desserts, bringing a burst of vibrant taste and color to any season.
Its creamy texture and balanced sweetness make it a delightful treat for family dinners, potlucks, or simply a sweet indulgence on a warm afternoon. Enjoy the festive spirit and deliciousness of cranberry any day you choose.
If you enjoy this silky cheesecake texture, you’ll find the same richness in a creamy New York cheesecake.
The Building Blocks of Your Perfect No-Bake Cranberry Cheesecake
Crafting an exceptional No-Bake Cranberry Cheesecake begins with understanding each ingredient’s purpose. Quality matters here, as each component contributes to the final texture and flavor harmony.
For the Foundation: Crust Essentials
A sturdy, flavorful base is non-negotiable for any cheesecake. Our crust relies on classic ingredients for optimal taste and structure.
Graham Cracker Crumbs: These provide the quintessential sweet, subtly spiced base. Ensure they are finely crushed for a uniform texture.
Granulated Sugar: A small amount enhances the graham cracker’s sweetness without overwhelming the tart filling.
Unsalted Butter, Melted: This is your binding agent. Using melted butter ensures the crumbs can be pressed together firmly, creating a stable and cohesive crust that won’t crumble when sliced.
The Heart of the Delight: Creamy Cranberry Filling
The filling is where the magic truly happens, blending richness with vibrant fruit flavor.
Fresh or Frozen Cranberries & Water: Cooked down, these form a tart, fruity puree. Either fresh or frozen work perfectly, offering convenience and consistent flavor.
Cream Cheese, Softened: This is the creamy backbone of your cheesecake. Ensure it’s fully softened to room temperature for a lump-free, silky-smooth filling.
Powdered Sugar: Unlike granulated sugar, powdered sugar dissolves instantly, ensuring a smooth, non-gritty texture in your creamy filling.
Vanilla Extract: A touch of vanilla enhances the overall sweetness and provides a warm, aromatic depth that complements the tart cranberries.
Heavy Cream: Whipped separately, it introduces lightness and airiness to the filling, creating that desirable fluffy texture.
Unflavored Gelatin Powder & Cold Water: This is the secret to a perfectly firm, sliceable no-bake cheesecake. It provides the essential structure, ensuring your dessert holds its shape beautifully.
Elevating the Experience: Garnish Components
Garnishes add visual appeal and a contrasting texture, completing your dessert.
Heavy Cream & Powdered Sugar (for garnish): Whipped to stiff peaks, this creates a light, ethereal topping that balances the richness of the cheesecake.
Fresh Cranberries, Granulated Sugar, & Water (for sugared garnish): These transform into sparkly, jewel-like berries. They add a beautiful pop of color and a delightful burst of tart-sweet flavor.
Essential Tools for No-Bake Cheesecake Success
Having the right equipment makes the no-bake process smooth and enjoyable. These tools are key to achieving consistent, professional results.
Bakeware & Mixing Essentials
8-inch Springform Pan: Absolutely crucial for easy removal of your cheesecake. Its removable sides allow for a clean, undamaged presentation.
Large Mixing Bowls: You’ll need at least two, one for the cream cheese mixture and another for whipping cream. This allows for efficient, separate preparation.
Electric Mixer (Handheld or Stand): Essential for beating the cream cheese to a smooth consistency and whipping the heavy cream to perfection. It ensures an airy and uniform filling.
Precision & Preparation Tools
Fine-Mesh Sieve: This tool is vital for pressing cooked cranberries into a smooth, seedless puree, ensuring a luxurious texture in your filling.
Small Saucepan: Used for cooking down the cranberries for the puree and also for preparing the sugared cranberry garnish. A non-stick pan is ideal.
Double Boiler or Microwave-Safe Bowl: Needed for gently dissolving the bloomed gelatin without scorching it. Controlled heat is crucial for gelatin’s effectiveness.
Crafting Your No-Bake Cranberry Cheesecake: A Detailed Guide
Follow these steps closely for a stunning and delicious No-Bake Cranberry Cheesecake that holds its shape and delights the palate.
- Step 1: Prepare the Crust.
In a medium bowl, combine the graham cracker crumbs, ¼ cup granulated sugar, and ½ cup melted unsalted butter. Mix thoroughly until all crumbs are evenly moistened.
Press this mixture firmly and evenly into the bottom of an 8-inch springform pan. Use the back of a spoon or a flat-bottomed glass to compact it tightly. Chill the crust in the refrigerator for at least 15 minutes while you proceed with the filling prep; this initial chill helps it set.
- Step 2: Make Cranberry Puree.
In a small saucepan, combine 1 ½ cups fresh or frozen cranberries with ¼ cup water. Bring the mixture to a simmer over medium heat.
Cook for about 5-7 minutes, stirring occasionally, until the cranberries burst and soften. This process extracts their flavor and makes them easier to puree.
Remove the saucepan from the heat and let the cooked cranberries cool slightly. Then, press the cooled mixture through a fine-mesh sieve into a bowl, using a spoon to push through the pulp and leave behind skins and seeds, creating a silky smooth puree. Set this vibrant puree aside.
- Step 3: Activate Gelatin (Key for Firm Set!).
In a small, separate bowl, sprinkle 1 tablespoon of unflavored gelatin powder evenly over ¼ cup of cold water. Do not stir it in immediately.
Allow it to stand undisturbed for 5 minutes. During this time, the gelatin will absorb the water and bloom, turning into a thick, solidified mass. This blooming process is crucial for proper dissolution later and ensures your cheesecake sets correctly.
- Step 4: Prepare Cheesecake Base.
In a large mixing bowl, use an electric mixer to beat the 8 ounces of softened cream cheese until it is incredibly smooth and creamy, with no lumps remaining. This takes about 2-3 minutes on medium speed.
Gradually add 1 cup of powdered sugar and 1 teaspoon of vanilla extract to the cream cheese, beating until they are well combined and the mixture is light and fluffy. Scrape down the sides of the bowl as needed to ensure everything is incorporated.
- Step 5: Dissolve Gelatin.
Gently heat the bloomed gelatin. You can do this over a double boiler, stirring constantly, or in a microwave for 10-15 seconds on low power.
The goal is for the gelatin to become completely dissolved and clear, with no visible granules. It should be liquid, not hot. Be careful not to boil the gelatin, as this can reduce its setting power.
- Step 6: Combine Filling Components.
Slowly whisk the dissolved gelatin into the cooled cranberry puree you prepared earlier. Ensure it is fully incorporated.
Then, add this cranberry-gelatin mixture to the cream cheese mixture in the large bowl. Beat on low speed with your electric mixer until just combined, being careful not to overmix at this stage.
- Step 7: Whip Heavy Cream.
In a separate, clean, and ideally chilled bowl, pour 1 cup of cold heavy cream. Using your electric mixer with clean beaters, whip the heavy cream until soft peaks form.
Soft peaks will hold their shape briefly when the beaters are lifted but will still be somewhat pliable. Do not over-whip at this stage, as it can become grainy.
- Step 8: Gently Fold Together.
This step is crucial for maintaining the cheesecake’s fluffy texture. Using a spatula, gently fold the whipped cream into the cranberry cream cheese mixture.
Use a light hand, folding from the bottom up, until no streaks of whipped cream remain. Be very careful not to deflate the mixture, as this air is what gives your cheesecake its delightful lightness.
- Step 9: Assemble and Chill.
Carefully pour the assembled cranberry cheesecake filling over the chilled graham cracker crust in the springform pan. Use a spatula to smooth the top evenly.
Cover the pan loosely with plastic wrap to prevent any odors from permeating the cheesecake in the refrigerator.
- Step 10: Chill for a Guaranteed Firm Set.
Refrigerate the cheesecake for at least 6 hours. For the absolute best, most perfectly firm and sliceable results, I strongly recommend chilling it overnight.
Adequate chilling time allows the gelatin to fully set, ensuring your cheesecake holds its shape beautifully when removed from the pan and sliced.
- Step 11: Prepare Sugared Cranberries.
In a small saucepan, combine 1 cup of fresh cranberries, ¼ cup granulated sugar, and 2 tablespoons of water. Cook over medium heat for 2-3 minutes, stirring gently, until the sugar dissolves and the cranberries are lightly coated and glossy.
Do not cook them until they burst, you want them to remain whole. Drain any excess syrup and spread the cranberries in a single layer on parchment paper to dry slightly.
Once cool, for an extra “frosted” look, you can optionally roll them in a little extra granulated sugar.
- Step 12: Prepare Whipped Cream Garnish.
In a clean, chilled bowl, whip ½ cup of cold heavy cream with 2 tablespoons of powdered sugar using an electric mixer until stiff peaks form.
Stiff peaks will hold their shape firmly when the beaters are lifted, indicating a stable and pipeable whipped cream.
- Step 13: Serve Your Masterpiece.
Once thoroughly chilled and firm, carefully remove the cheesecake from the springform pan. Run a thin knife or spatula around the edge of the pan before releasing the clasp to ensure a clean release.
Slice your beautiful No-Bake Cranberry Cheesecake with a warm, clean knife for perfect portions. Serve each slice topped with dollops of the freshly whipped cream and a generous sprinkle of the sparkling sugared cranberries.
If you enjoy creamy cheesecake textures, try a slice of this caramel pecan crunch cheesecake for a different twist.
Phase 1: Building the Perfect Crust
Phase 2: The Cranberry Puree & Gelatin Activation
Phase 3: Assembling the Creamy Filling
Phase 4: Chill to Perfection & Garnish Prep
Phase 5: The Grand Reveal & Serving
Chef’s Secrets: Mastering Your No-Bake Cranberry Cheesecake
Achieving no-bake perfection comes down to a few key techniques. These expert tips will elevate your No-Bake Cranberry Cheesecake from good to unforgettable.
Gelatin: Your Firm-Set Friend, Not Foe
Gelatin is the unsung hero of no-bake cheesecakes. Proper blooming in cold water is essential; it allows the granules to fully hydrate before dissolving.
When dissolving, use gentle heat-a double boiler or quick microwave bursts-until it’s completely clear. Overheating or boiling gelatin can weaken its setting power, leading to a softer, less stable cheesecake.
Puree Perfection: Temperature Matters
Once you’ve cooked and strained your cranberry puree, allow it to cool slightly before whisking in the dissolved gelatin. Adding hot puree to gelatin can cause it to set too quickly, resulting in lumps.
A lukewarm or room-temperature puree ensures smooth, even distribution of the gelatin throughout the mixture, leading to a uniformly set filling.
Folding for Fluffiness: Don’t Deflate!
The whipped heavy cream adds essential lightness and air to your cheesecake. When combining it with the cranberry-cream cheese mixture, use a gentle hand and a rubber spatula.
Fold the ingredients by bringing the spatula from the bottom of the bowl up and over the top, carefully incorporating the cream without deflating the air you worked so hard to whip into it. This preserves the desired fluffy texture.
Chilling is NOT Optional: Why Time Matters
The extended chilling time (at least 6 hours, ideally overnight) is perhaps the most critical step for a no-bake cheesecake. It’s not just about getting it cold; it’s about allowing the gelatin to fully firm up and stabilize the entire structure.
Insufficient chilling will result in a soft, messy cheesecake that won’t hold its slice. Patience truly pays off here, guaranteeing that beautiful, clean slice.
Garnish Goals: Making Your Cheesecake Shine
The sugared cranberries and whipped cream aren’t just decorative; they add vital flavor and textural contrast. The tartness of the cranberries cuts through the rich, creamy cheesecake, while the whipped cream provides a light, airy counterpoint.
Arrange your garnishes thoughtfully for a stunning presentation. A sprinkle of fresh mint leaves or a dusting of powdered sugar over the whole cake can add an extra touch of elegance.
Troubleshooting Your No-Bake Cranberry Cheesecake Woes
Even expert bakers encounter challenges. Here are solutions to common issues you might face when making your No-Bake Cranberry Cheesecake.
“My Cheesecake Isn’t Setting!”
This is usually due to issues with the gelatin. Ensure your gelatin was properly bloomed in cold water and then completely dissolved (clear, no granules) before adding it to the filling.
Another common culprit is insufficient chilling time. This cheesecake absolutely needs those 6+ hours (or overnight) to firm up completely. Resist the urge to cut it too soon!
“The Filling Is Lumpy!”
Lumps typically stem from cream cheese that wasn’t sufficiently softened. Always bring your cream cheese to room temperature before beating to achieve a silky-smooth base.
Undissolved powdered sugar or gelatin can also cause lumps. Ensure both are fully incorporated and smooth before moving on to the next steps.
“My Crust Is Crumbly!”
A crumbly crust indicates either not enough melted butter or insufficient pressing. Make sure your graham cracker crumbs are thoroughly coated with butter.
When pressing the crust into the pan, apply firm, even pressure across the entire base. A well-compacted crust is key to a stable foundation.
“My Whipped Cream Deflated!”
Whipped cream can deflate if it’s over-whipped (beyond stiff peaks), if the cream itself isn’t cold enough, or if it’s folded too aggressively into the cheesecake mixture.
Always start with very cold heavy cream and a chilled bowl. When folding, be gentle and swift, incorporating just until no streaks remain.
Extending the Delight: Storage, Make-Ahead & Creative Twists
Planning ahead for your No-Bake Cranberry Cheesecake can make entertaining a breeze. Plus, there are endless ways to customize this delightful dessert!
Optimal Storage for Freshness
To keep your cheesecake fresh and delicious, cover it loosely with plastic wrap and store it in the refrigerator. It will maintain its optimal texture and flavor for 3-4 days.
For longer storage, individual slices can be wrapped tightly in plastic wrap and then foil, then frozen for up to one month. Thaw in the refrigerator before serving.
Make-Ahead Magic: Plan for Effortless Entertaining
This No-Bake Cranberry Cheesecake is the ultimate make-ahead dessert, perfect for stress-free party prep. You can prepare the entire cheesecake (including the garnishes) up to 2 days in advance.
Pair These With Your No-Bake Cheesecake
If you have leftover cranberries or want more creamy, tangy options to serve alongside the cheesecake, these two spreads work well on crackers, toast, or as a fruit dip.
- For a thicker, scoopable option with the same cranberry base, try this Cranberry Cream Cheese Dip with Thick Topping that uses cream cheese and a sweet top layer.
- If you want a spread with more texture and dried fruit, the Creamy Cranberry Apricot Cheese Spread adds apricot for a different sweet-tart balance.
Just store it covered in the refrigerator until you’re ready to serve. This allows ample time for setting and ensures you have one less thing to worry about on event day.
Flavorful Variations & Dietary Adaptations
The beauty of this recipe is its versatility. Feel free to experiment with different fruit purees-a raspberry puree or a delightful strawberry puree would make for a fantastic No-Bake Strawberry Cheesecake variation.
You can also experiment with the crust! Consider using crushed shortbread cookies or ginger snaps for a different flavor profile. For dietary adaptations, use gluten-free graham crackers for a gluten-free option.
For a dairy-free or vegan version, substitute vegan cream cheese, use full-fat canned coconut cream (chilled overnight and scooped from the top) for the heavy cream, and opt for vegan butter and gelatin substitutes if available.
Your No-Bake Cranberry Cheesecake Questions Answered
Can I use frozen cranberries for the puree?
Absolutely! Fresh or frozen cranberries work equally well for the puree. The cooking process is the same, as the heat will break down the cranberries whether they start fresh or frozen.
What if I don’t have a springform pan? Are there alternatives?
While a springform pan is ideal for clean release, you can use a regular 8 or 9-inch pie plate. Just be aware that removing the slices might be more challenging, as you won’t be able to unclip the sides.
Alternatively, you could make individual no-bake cheesecakes in small ramekins or dessert cups. Simply press a small amount of crust into the bottom of each, then top with the filling and chill.
How long does the finished No-Bake Cranberry Cheesecake last in the refrigerator?
When properly covered and refrigerated, your No-Bake Cranberry Cheesecake will stay fresh and delicious for about 3 to 4 days. Always keep it well-sealed to prevent it from absorbing refrigerator odors.
Can I skip the gelatin in this recipe?
No, the gelatin is a critical ingredient in this specific No-Bake Cranberry Cheesecake recipe. It is what provides the necessary structure and firmness to the filling, allowing it to set beautifully and hold its shape for slicing.
Without the gelatin, the cheesecake would remain too soft and would not be sliceable.
Is it possible to make this recipe dairy-free or vegan?
Yes, with a few careful substitutions, you can adapt this recipe to be dairy-free or vegan. Replace dairy cream cheese with a good quality vegan cream cheese alternative.
For the heavy cream, use full-fat canned coconut cream (chilled overnight, then scoop the solid cream from the top). Ensure your graham crackers are vegan, and look for a plant-based gelatin substitute like agar-agar powder, adjusting quantities as per package directions for setting power.
Ready to Create Your Cranberry Cheesecake Masterpiece?
You now have all the knowledge, tips, and precise instructions needed to confidently create a show-stopping No-Bake Cranberry Cheesecake. This recipe promises not just ease, but a truly remarkable texture and vibrant flavor that will leave everyone asking for more.
Gather your ingredients, trust the process, and get ready to impress with this perfectly firm, delightfully fluffy dessert. If you enjoy creating easy, elegant treats, you might also love our Decadent Pumpkin Pie Truffles for another no-bake delight!
Cranberry Cheesecake
Course: DessertCuisine: AmericanDifficulty: medium8
servings45
minutes10
minutes450
kcal420
minutesAchieve the perfect firm, yet delightfully fluffy, No-Bake Cranberry Cheesecake every time with this foolproof recipe. Say goodbye to soft, falling-apart desserts and enjoy an easy-to-make, game-changing treat that sets beautifully.
Ingredients
For the Crust:
1 ½ cups graham cracker crumbs
¼ cup granulated sugar
½ cup unsalted butter, melted
For the Cranberry Cheesecake Filling:
1 ½ cups fresh or frozen cranberries
¼ cup water (for cooking cranberries)
8 ounces cream cheese, softened
1 cup powdered sugar
1 teaspoon vanilla extract
1 cup heavy cream
1 tablespoon unflavored gelatin powder
¼ cup cold water (for blooming gelatin)
For the Garnish:
½ cup heavy cream
2 tablespoons powdered sugar
1 cup fresh cranberries (for sugared garnish)
¼ cup granulated sugar (for sugared garnish)
2 tablespoons water (for sugared garnish)
Directions
- Prepare the crust: In a medium bowl, combine graham cracker crumbs, ¼ cup granulated sugar, and melted butter. Press firmly into the bottom of an 8-inch springform pan. Chill in the refrigerator for at least 15 minutes while you prepare the filling.
- Make cranberry puree: In a small saucepan, combine 1 ½ cups cranberries and ¼ cup water. Bring to a simmer over medium heat and cook until cranberries burst and soften, about 5-7 minutes. Remove from heat and let cool slightly. Press the cooked cranberries through a fine-mesh sieve into a bowl to remove skins and seeds, creating a smooth puree. Set aside.
- Activate gelatin (key for firm set!): In a small bowl, sprinkle gelatin powder over ¼ cup cold water. Let stand for 5 minutes to bloom (thicken).
- Prepare cheesecake base: In a large bowl, using an electric mixer, beat softened cream cheese until smooth and creamy. Gradually add 1 cup powdered sugar and vanilla extract, beating until well combined.
- Dissolve gelatin: Gently heat the bloomed gelatin over a double boiler or microwave for 10-15 seconds until completely dissolved and clear, ensuring no granules remain. Do not boil.
- Combine filling: Slowly whisk the dissolved gelatin into the cranberry puree. Then, add the cranberry-gelatin mixture to the cream cheese mixture and beat on low speed until just combined.
- Whip cream: In a separate clean bowl, whip 1 cup heavy cream until soft peaks form.
- Fold together: Gently fold the whipped cream into the cranberry cream cheese mixture using a spatula until no streaks remain. Be careful not to deflate the mixture.
- Assemble and chill: Pour the filling over the chilled graham cracker crust in the springform pan. Smooth the top with a spatula.
- Chill for a guaranteed firm set: Cover the pan loosely with plastic wrap and refrigerate for at least 6 hours, or preferably overnight, until the cheesecake is completely firm.
- Prepare sugared cranberries: In a small saucepan, combine 1 cup fresh cranberries, ¼ cup granulated sugar, and 2 tablespoons water. Cook over medium heat for 2-3 minutes until sugar dissolves and cranberries are lightly coated. Do not let them burst. Drain excess syrup and spread cranberries on parchment paper to dry slightly. Once cool, they can be rolled in a little extra granulated sugar for a frosted look (optional).
- Prepare whipped cream garnish: In a clean bowl, whip ½ cup heavy cream with 2 tablespoons powdered sugar until stiff peaks form.
- Serve: Carefully remove the cheesecake from the springform pan. Slice and serve topped with whipped cream and sugared cranberries.
Notes
- Key gelatin activation steps ensure a perfectly firm set. Chill thoroughly for best results.