Mastering Roasted Cauliflower Shells and Cheese
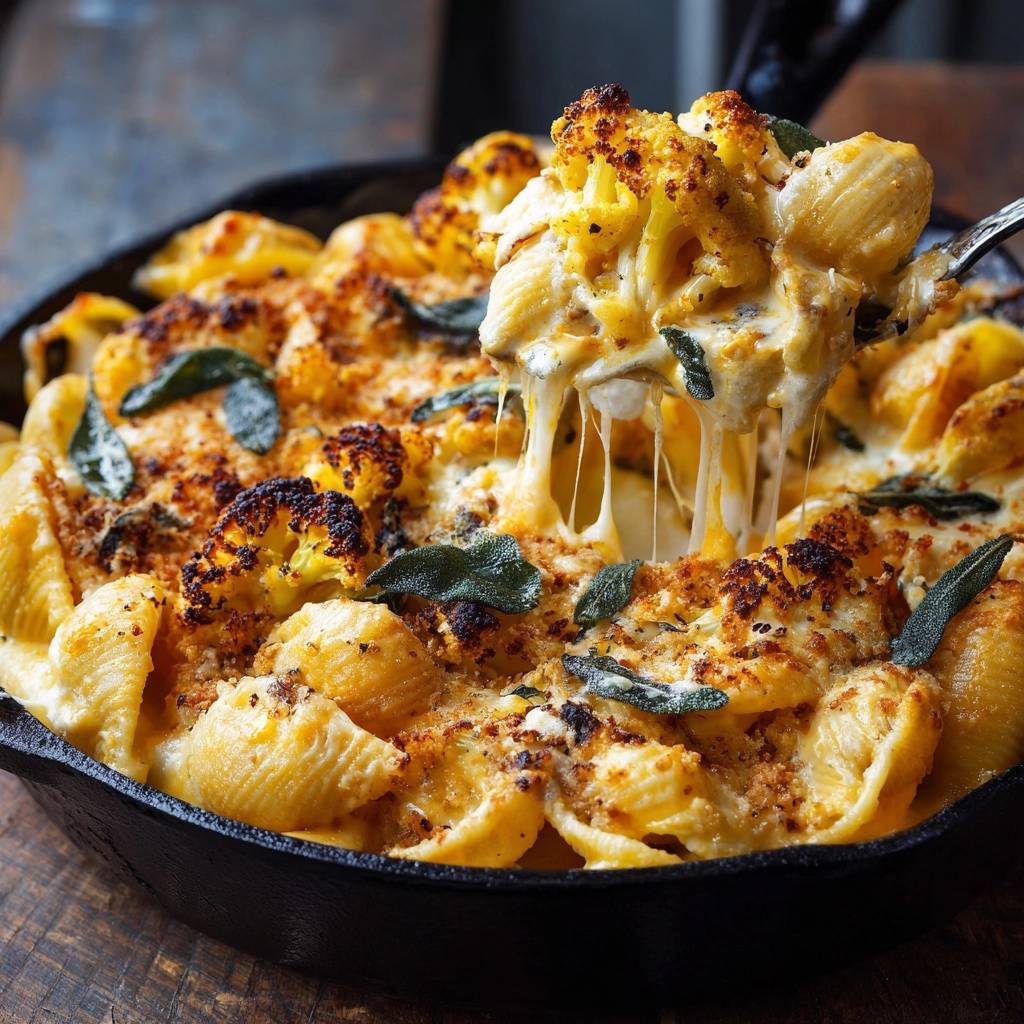
Most cauliflower pasta dishes end up in a sad, lukewarm puddle of liquid because the vegetable releases its moisture as it bakes. This recipe solves that common frustration by using a high-heat roasting method for the cauliflower before it ever touches the pasta. By caramelizing the florets first, you lock in the flavor and evaporate the excess water, ensuring your cheese sauce stays thick, velvety, and perfectly clingy to every shell.
You’re going to love how the charred, nutty edges of the cauliflower play against the sharp cheddar sauce. It’s a sophisticated upgrade to the blue-box classic that actually feels like a complete meal. The contrast between the tender pasta and the crispy Panko topping makes every bite interesting.
The secret to this dish’s success is the “under-boil” technique for the pasta shells. Since the shells continue to cook in the oven while soaking up the cheese sauce, you must drain them two minutes before they reach al dente. This prevents the pasta from turning into mush and ensures the shells maintain enough structure to hold those heavy pockets of molten cheese.
The Science of Preventing Watery Cauliflower Pasta
Cauliflower is roughly 92% water, which is why steaming it inside a casserole is a recipe for disaster. When you toss raw or boiled cauliflower into a cheese sauce, the heat breaks down the plant’s cell walls, causing them to dump all that internal moisture directly into your roux. This thins out the sauce and ruins the emulsion, leaving you with a grainy, separated mess.
High-heat roasting at 425°F triggers the Maillard reaction, which is a chemical reaction between amino acids and reducing sugars that gives browned food its distinctive flavor. This temperature is high enough to evaporate the vegetable’s water content before it can dilute your sauce. You aren’t just cooking the cauliflower; you’re concentrating its essence into something savory and sweet.
Why Caramelization Beats Steaming
Steamed cauliflower often carries a sulfurous, slightly bitter aroma that can overpower a delicate cheese sauce. Roasting transforms that profile entirely, bringing out nutty, earthy notes that complement the sharpness of the cheddar. Those dark, caramelized edges provide a much-needed structural contrast to the soft pasta shells, giving the dish a “meaty” bite without the meat.
Essential Components for the Perfect Shells and Cheese
Quality ingredients make or break a simple skillet meal like this. I always recommend buying a block of sharp cheddar and grating it yourself. Pre-shredded cheeses are coated in potato starch or cellulose to prevent clumping in the bag, but those additives also prevent the cheese from melting smoothly into the sauce. For the best “cheese pull” and a glossy finish, fresh-grated is the only way to go.
Medium shells are the superior vessel for this recipe because their concave shape acts like a little scoop. While elbows are classic, shells have a larger surface area to capture the roasted cauliflower bits and the thick Mornay sauce. Every forkful becomes a perfectly balanced package of pasta, veg, and cheese.
Selecting and Prepping the Cauliflower Head
Look for a head of cauliflower that feels heavy for its size and has tightly packed florets with no brown spots. When prepping, aim for “bite-sized” pieces. If the florets are too large, they won’t integrate with the shells; if they’re too small, they’ll vanish into the sauce. Tossing them with smoked paprika before roasting adds a subtle woodsy base that bridges the gap between the vegetable and the rich dairy.
The Dairy Trio: Milk, Cream, and Butter
Fat is the vehicle for flavor here, so don’t skimp on the whole milk and heavy cream. Using room-temperature milk is a pro move that prevents the roux from seizing or forming lumps when you hit the hot pan. The heavy cream acts as a stabilizer, ensuring the cheese sauce stays creamy even as it cools slightly on the plate.
Phase One: Roasting for Maximum Flavor Extraction
When you spread your cauliflower on the sheet pan, the “single layer” rule is absolute law. If the florets are crowded, they will trap steam between them and turn mushy instead of crisping up. You want enough space for the hot air to circulate around every single piece.
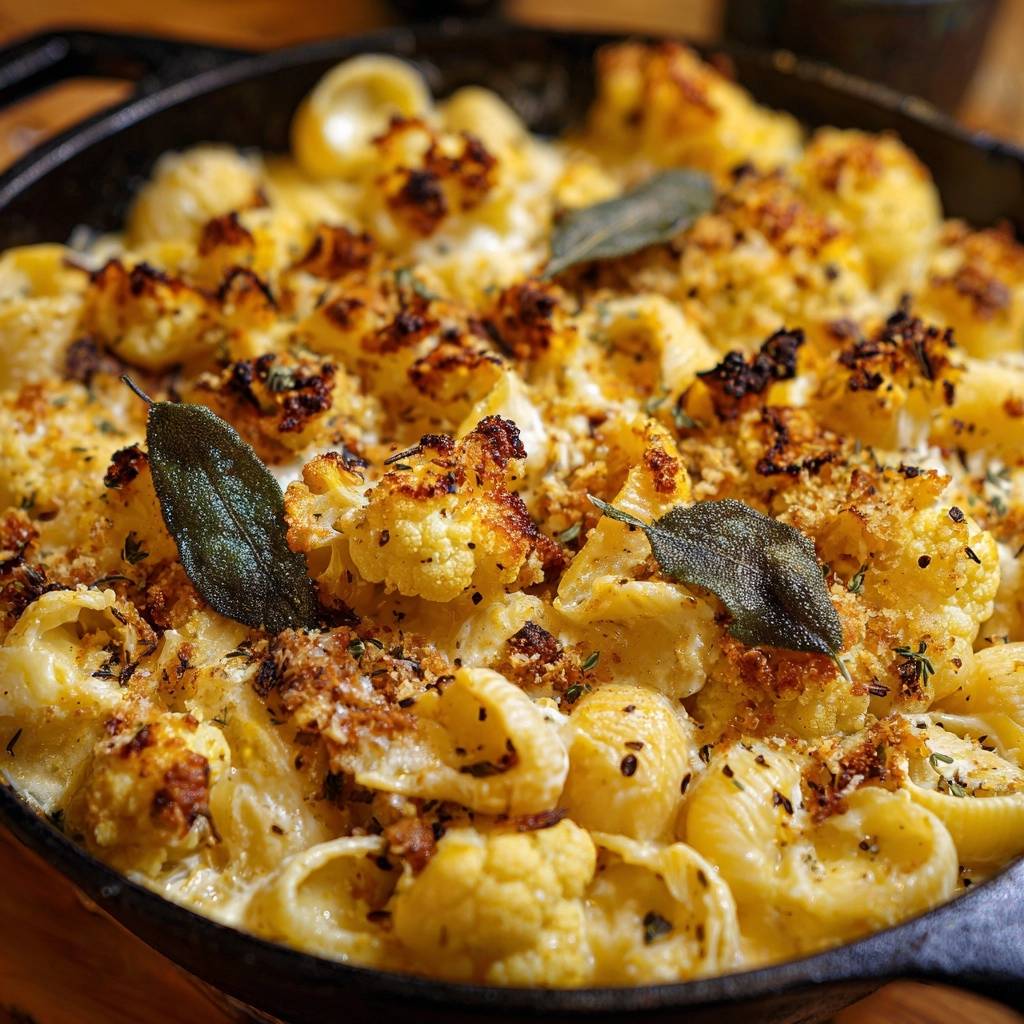
Don’t be afraid of a little char. You are looking for those deeply browned, almost blackened edges. These “burnt” highlights are where the flavor lives. They provide a smoky depth that cuts through the richness of the butter and cream, making the dish taste complex rather than just heavy.
Phase Two: Building a Stable Roux and Mornay Sauce
Building a roux is a foundational skill that requires your full attention for about two minutes. After melting the butter and whisking in the flour, keep it moving until it smells slightly nutty and looks like wet sand. This cooks out the “raw” flour taste. If you skip this, your sauce will taste like paste rather than a professional Mornay.
Slowly stream in your milk while whisking vigorously. You’ll notice the sauce go through a thick, doughy phase before it smooths out. Keep simmering until it reaches the “ribbon stage,” where you can draw a line through the sauce on the back of a spoon with your finger and the path stays clear.
If you enjoy this silky cheese sauce, you’ll love the creamy texture of this chicken and broccoli pasta bake.
Emulsifying the Cheddar and Mozzarella
This is the most critical step: remove the pan from the heat before adding your cheese. If you add cheese to a boiling liquid, the proteins will tighten up and squeeze out the fat, resulting in a grainy, oily sauce. By stirring the cheddar into the residual heat, you achieve a glossy, mirror-like finish that coats the pasta perfectly.
Phase Three: Assembly and the Final Bake
Gently fold your pasta and about three-quarters of the roasted cauliflower into the sauce. I like to save the remaining quarter of the cauliflower to nestle into the top. This keeps those crispy edges exposed to the heat so they don’t soften too much during the final bake.
The Panko breadcrumbs create a protective, crunchy barrier that prevents the cheese on top from drying out. It adds a shattered-glass texture that is incredibly satisfying against the creamy interior. Make sure the breadcrumbs are evenly distributed so every bite has that signature crunch.
The Role of Oil-Tossed Fresh Sage
Fresh sage and sharp cheddar are a match made in heaven. By tossing the leaves in a little olive oil before scattering them on top, you ensure they crisp up in the oven rather than shriveling away. As they bake, they release their oils into the cheese, adding a sophisticated herbal aroma that elevates the entire skillet.
Avoiding Common Roasted Cauliflower Pasta Mistakes
If you find your sauce is getting too thick during the assembly, don’t panic. A splash of the reserved pasta water can loosen it up instantly. The starch in that water helps maintain the emulsion while thinning the consistency. Just add a tablespoon at a time until it looks right.
Watch your oven during the final broiling phase. Every broiler has “hot spots,” and Panko can go from golden to burnt in about thirty seconds. Stay by the oven door and rotate the skillet if one side is browning faster than the other. You want a uniform, toasted tan across the whole surface.
Flavor Variations and Ingredient Swaps
If you want a nuttier, more “grown-up” flavor profile, try substituting half of the cheddar with Gruyère. It melts beautifully and pairs exceptionally well with the roasted cauliflower. You can also add a pinch of freshly grated nutmeg to the roux to enhance the creaminess of the milk.
For a truly decadent texture, this same cheese sauce technique works beautifully in a classic Southern style baked mac and cheese.
For those using gluten-free pasta, be aware that it tends to release more starch and can absorb sauce faster than wheat pasta. I recommend adding an extra half-cup of milk to the sauce to compensate for this absorption, ensuring the final dish doesn’t end up dry.
Optimal Pairings for This Hearty Skillet
Since this dish is quite rich, you’ll want a side that offers some acidity to cleanse the palate. A bright arugula salad with a simple lemon vinaigrette is the perfect companion. The peppery greens cut right through the heavy cheese sauce.
If you want to stay on the vegetable theme, roasted carrots or Brussels sprouts with a balsamic glaze provide a nice sweetness that complements the savory sage. Avoid serving this with heavy breads or starches, as the shells and cheese are plenty filling on their own.
What to Serve with Roasted Cauliflower Shells and Cheese
If you want more cauliflower dishes with a similar cheesy, roasted character, these two recipes fit right in.
- For extra crunch and a different take on the same vegetable, try these Cheesy Baked Cauliflower florets for a contrast in texture.
- Another option that shares the roasted flavor is this Cheesy Roasted Cauliflower, which stays tender-crisp alongside the creamy pasta.
Make-Ahead Strategy and Storage Instructions
While this dish is undeniably best when the Panko is fresh and shattering, you can prep the components ahead of time. Roast the cauliflower and make the sauce a day early, then just boil the pasta and assemble when you’re ready to eat. Store leftovers in an airtight container in the fridge for up to three days.
To reheat, avoid the microwave if possible, as it can make the pasta rubbery. Instead, put a portion in a small baking dish with a splash of milk, cover it with foil, and bake at 350°F until bubbly. I do not recommend freezing this dish; the cream and cheese emulsion often breaks during the thawing process, leaving you with a grainy texture.
Expert Troubleshooting
Why is my cheese sauce grainy?
Graininess usually happens for two reasons: using pre-shredded cheese with cellulose additives or adding the cheese while the sauce is boiling. The high heat causes the proteins to clump. If this happens, try whisking in a tablespoon of warm milk over very low heat to see if you can smooth it back out, but the best fix is prevention by using block cheese and off-heat mixing.
Can I use frozen cauliflower florets?
You can, but you have to be careful with the moisture. Thaw the florets completely and pat them very dry with paper towels before roasting. They may not get quite as crisp as fresh cauliflower because of the ice crystals that break down the cell walls during freezing, but they will still taste great if you give them enough space on the pan.
How do I keep the Panko from burning under the broiler?
The “watch-and-wait” technique is your best friend here. Once you switch to the broiler, do not walk away from the oven. It usually takes between 90 and 120 seconds for the breadcrumbs to reach perfection. If you see a specific spot browning too fast, pull the skillet out immediately.
What is the best substitute for fresh sage?
Fresh thyme or rosemary are excellent alternatives that provide a similar earthy vibe. However, rosemary is much stronger, so use about half the amount. Avoid using dried sage as a topper; it has a dusty texture and won’t crisp up in the oil like fresh leaves do.
How do I scale this for a larger crowd?
If you are doubling the recipe, your standard cast iron skillet won’t be big enough. Move the assembly to a large 9×13 baking dish. Make sure you still roast the cauliflower on two separate sheet pans so you don’t crowd the florets, otherwise, you’ll lose that essential caramelization that makes this dish special.
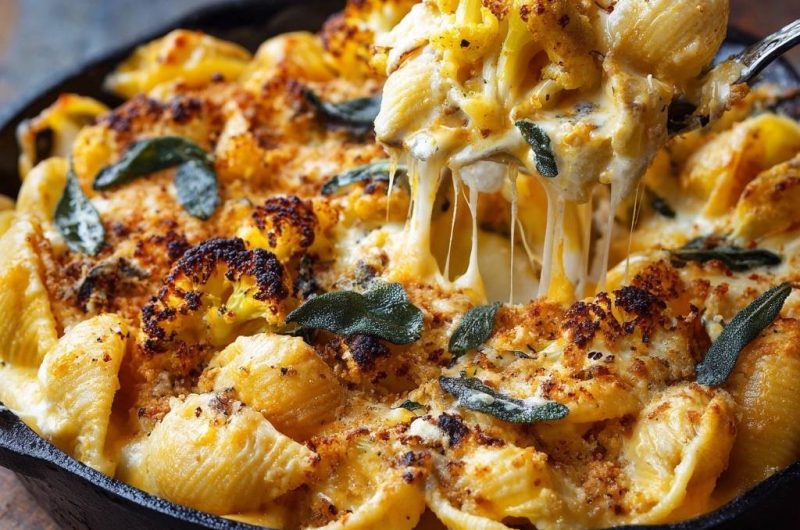
Cauliflower Shells and Cheese
Course: Main CourseCuisine: AmericanDifficulty: medium6
servings15
minutes35
minutes520
kcal50
MinutesThis recipe features caramelized roasted cauliflower florets folded into a rich cheese sauce with pasta shells. By roasting the vegetable at high heat first, moisture is removed, ensuring a thick and velvety sauce topped with crispy Panko and sage.
Ingredients
1 large head cauliflower, cut into bite-sized florets
1 pound medium pasta shells
4 tablespoons unsalted butter
1/4 cup all-purpose flour
3 cups whole milk, room temperature
1/2 cup heavy cream
3 cups sharp cheddar cheese, shredded (divided)
1 cup mozzarella cheese, shredded
1/2 cup Panko breadcrumbs
1/4 cup fresh sage leaves
3 tablespoons olive oil (divided)
1 teaspoon garlic powder
1/2 teaspoon smoked paprika
Salt and black pepper to taste
Directions
- Preheat your oven to 425°F (220°C). Toss the cauliflower florets with 2 tablespoons of olive oil, salt, pepper, and smoked paprika on a large sheet pan. Spread them in a single layer.
- Roast the cauliflower for 20-25 minutes, tossing halfway through, until the edges are deeply charred and dark golden. This step is vital to prevent a watery sauce and provide the visual “burnt” highlights seen in the dish.
- While cauliflower roasts, boil the pasta shells in heavily salted water for 2 minutes less than the package directions for al dente. Drain and set aside.
- In a large oven-safe cast iron skillet, melt the butter over medium heat. Whisk in the flour and cook for 1-2 minutes until the roux smells slightly nutty.
- Slowly pour in the milk and heavy cream while whisking constantly to prevent lumps. Continue to simmer and whisk until the sauce thickens enough to coat the back of a spoon.
- Remove from heat. Stir in the garlic powder and 2 cups of the cheddar cheese until the sauce is completely smooth and glossy.
- Gently fold the cooked pasta shells and about 3/4 of the roasted cauliflower into the cheese sauce.
- Top the skillet with the remaining cheddar, mozzarella, and Panko breadcrumbs. Arrange the remaining roasted cauliflower florets on top so they remain visible and crispy.
- Toss the fresh sage leaves in the remaining 1 tablespoon of olive oil and scatter them over the top.
- Place the skillet in the oven and bake for 10-15 minutes until the cheese is bubbling. Switch to the broiler for the final 2-3 minutes to ensure the breadcrumbs are toasted and the sage leaves are crisp. Serve immediately.
Notes
- Roasting the cauliflower until deeply charred is the key to preventing a watery sauce and adding a smoky depth of flavor.