Crispy Shrimp Sushi Sandwiches: Master the Golden Crunch
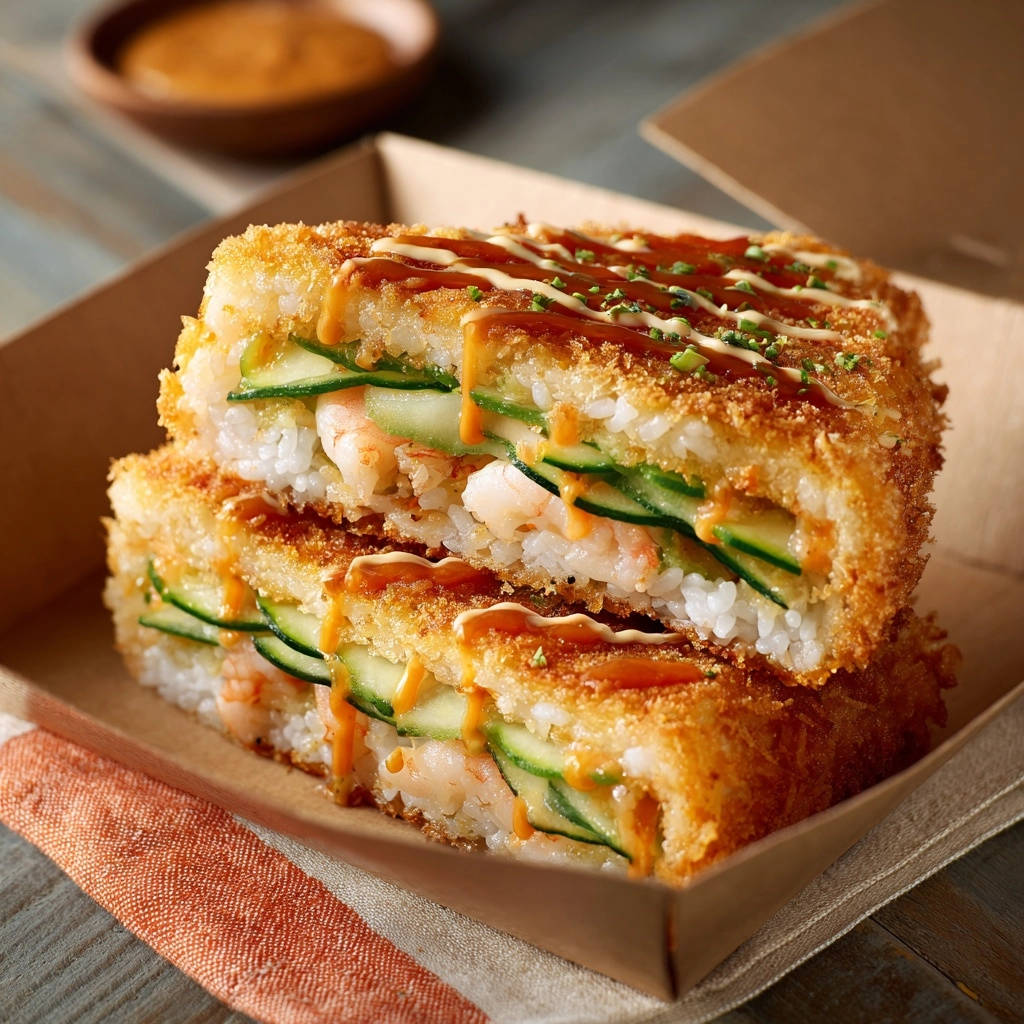
I remember the frustration of trying to recreate that perfect, shatteringly crisp fried sushi at home, only to end up with a disappointingly soggy mess. But after much experimentation, I finally unlocked the secret to truly spectacular Crispy Shrimp Sushi Sandwiches – a technique that guarantees a crunch you can hear across the room, every single time. This isn’t just a recipe; it’s your foolproof guide to achieving that irresistible texture and flavor, transforming a sushi bar craving into a homemade triumph.
Crunch Factor Unlocked: Why This Recipe is a Game-Changer
From Sushi Bar Craving to Homemade Delight
This recipe brings the vibrant flavors and exciting textures of a high-end sushi bar directly to your kitchen. You no longer need to dine out to enjoy perfectly fried sushi; these sandwiches are a celebration of fresh ingredients and a satisfying crunch, all crafted by your own hands.
For those who love the crisp texture of these sandwiches, you can get similar results when making Cajun shrimp creole by using the same high-heat searing technique.
The Secret to That Irresistible, Non-Greasy Crisp
The magic lies in a precise breading technique and careful oil temperature management. We’re not just frying; we’re creating a golden, protective Panko crust that seals in flavor and delivers an unparalleled, non-greasy crispness that is the hallmark of truly exceptional Crispy Shrimp Sushi Sandwiches.
If you enjoy the tender shrimp in this sandwich, the same ingredient shines in these silky shrimp scrambled eggs.
Surprisingly Simple: Your Weeknight Sushi Solution
Despite their gourmet appeal, these Crispy Shrimp Sushi Sandwiches are surprisingly straightforward to prepare. With clear, expert guidance, you’ll find the process manageable and rewarding, making them a fantastic option for an exciting weeknight meal or an impressive appetizer for guests.
Gather Your Essentials: The Building Blocks for Perfection
Quality ingredients are the foundation of any outstanding dish. Here’s what you’ll need to create your magnificent Crispy Shrimp Sushi Sandwiches.
For the Flavorful Sushi Rice Base
Cooked Sushi Rice: Short-grain rice is essential for its sticky, pliable texture, which allows it to hold its shape. Seasoning with rice vinegar, sugar, and salt creates that signature tangy-sweet sushi flavor.
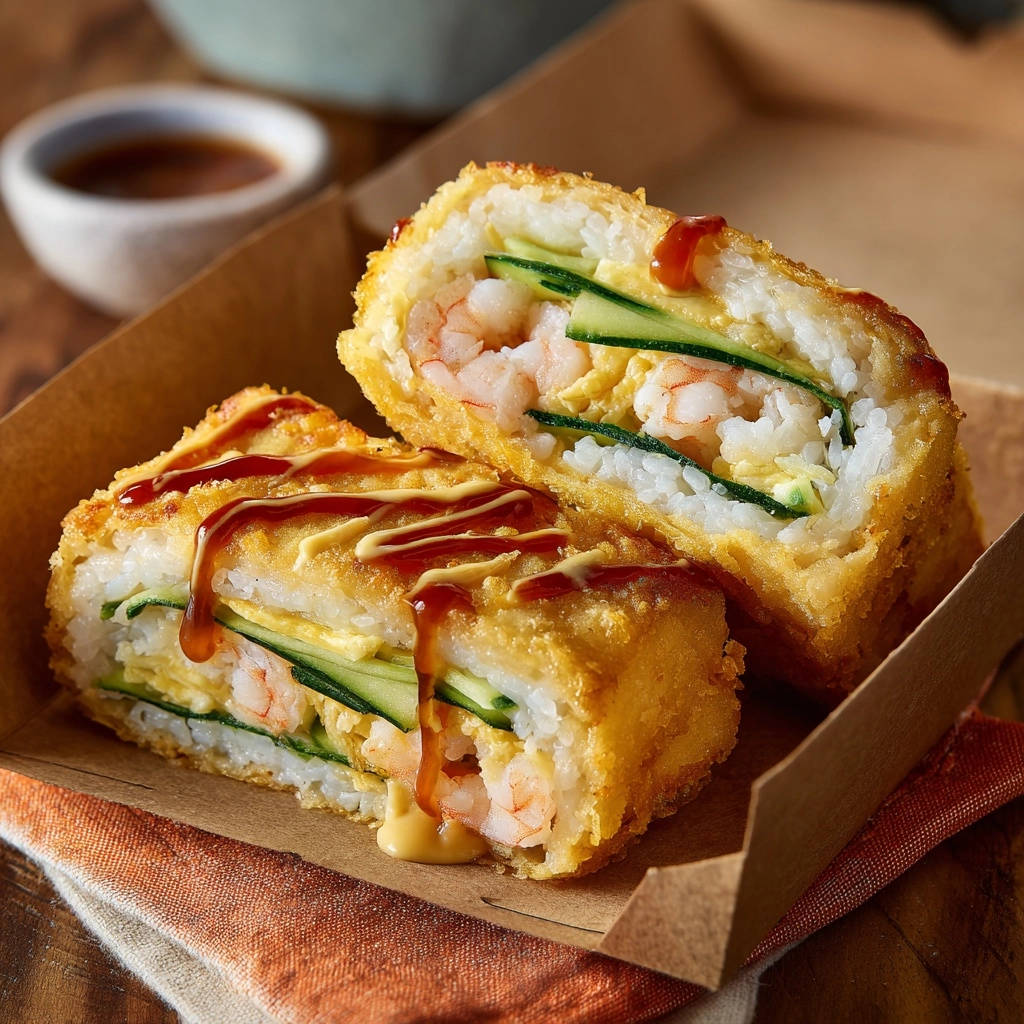
The Star Protein: Perfectly Prepped Shrimp
Cooked Small Shrimp: Using already cooked, small shrimp saves time and ensures a tender, juicy bite within your sandwich. Halving them provides even distribution and a pleasant texture.
Crunchy Companions: Fresh Cucumber & Panko
Small Cucumber: Thinly sliced cucumber ribbons add a refreshing, crisp contrast to the rich fried elements. Their mild flavor brightens each bite.
Panko Breadcrumbs: This is your secret weapon for extreme crispness. Panko’s larger, flakier crumb absorbs less oil and fries up significantly crunchier than regular breadcrumbs.
Sweet & Spicy Harmony: Crafting the Signature Sauces
All Purpose Flour & Large Eggs: These form the base of your breading station, ensuring the Panko adheres perfectly for a sturdy, crispy crust.
Vegetable Oil: A neutral, high-smoke-point oil is crucial for deep-frying, allowing the breading to achieve a beautiful golden brown without imparting unwanted flavors.
Mayonnaise & Sriracha: Whisked together, these create a creamy, spicy mayo that adds a delectable kick and balances the richness of the fried sandwich.
Sweet Soy Glaze or Teriyaki Sauce: A drizzle of this sweet, savory glaze provides a beautiful umami finish, rounding out the flavor profile and adding an authentic touch.
Garnish for a Flourish: Chives or Green Onions
Finely Chopped Chives or Green Onions: These aren’t just for looks; they offer a fresh, aromatic finish that cuts through the richness and adds a pop of color and subtle oniony flavor.
Kitchen Arsenal: Essential Tools for Your Crispy Creation
Heavy-Bottomed Skillet or Dutch Oven: Essential for even heat distribution during frying, which is key to consistent crispness and preventing scorching.
Wire Rack with Paper Towels: Crucial for draining excess oil immediately after frying. This allows air to circulate, preventing steam from building up and making the bottom soggy, thus maintaining the crispiness.
Square or Rectangular Container (4×4 inches): A small container, like a 4×4-inch square dish or a small loaf pan, is ideal for neatly shaping your sushi sandwiches into uniform blocks.
Plastic Wrap: Aids significantly in firm compaction of the rice and fillings, ensuring the sandwiches hold their shape during chilling and handling.
Shallow Dishes: Three shallow dishes are needed for an organized and efficient breading station (flour, egg, Panko).
Tongs: Essential for carefully placing, turning, and removing the delicate sandwiches from the hot oil without damaging their crispy coating.
Whisk: For effortlessly combining the mayonnaise and sriracha into a smooth, consistent spicy mayo.
Meat Thermometer (Optional but Recommended): For precise oil temperature control. This is the single best way to ensure your oil is at the perfect temperature for frying, leading to golden, not greasy, results.
Crafting Your Crispy Shrimp Sushi Sandwiches: A Step-by-Step Guide
Preparing Your Perfectly Seasoned Sushi Rice
Gently fold rice vinegar, sugar, and salt into your warm cooked sushi rice. The rice should be slightly warm to allow the seasonings to incorporate evenly and maintain its pliable, sticky texture, but cool enough to handle comfortably.
Expert Assembly for Stability and Structure
Line a square or rectangular container (about 4×4 inches is ideal) with plastic wrap, leaving an overhang. Spread approximately half a cup of seasoned sushi rice evenly on the bottom, pressing very firmly to create a solid base. Layer half of the thinly sliced cucumber, followed by half of the chopped shrimp. Top with another layer of cucumber, then cover with another half cup of seasoned sushi rice, pressing very, very firmly to compact all layers tightly. Repeat this process to form a second sandwich. Wrap tightly in the plastic wrap and let chill in the refrigerator for at least 30 minutes; this firming step is crucial for the sandwiches to hold their shape during breading and frying.
Setting Up the Triple-Layer Breading Station
Organize your breading station for efficiency: In the first shallow dish, place the all-purpose flour. In the second shallow dish, place the lightly beaten eggs. In the third shallow dish, spread out the Panko breadcrumbs. This setup ensures a clean and quick breading process.
The Crucial Breading Technique for Maximum Crisp
Remove the chilled sushi sandwiches from the plastic wrap. Carefully dredge each sandwich in the flour, tapping off any excess. Next, dip it fully into the beaten egg, allowing any extra to drip off. Finally, press it firmly into the Panko breadcrumbs, ensuring every side is generously and evenly coated. This step is critical: pressing the Panko firmly into the rice creates a robust, crispy crust that won’t fall apart in the hot oil.
Achieving the Ideal Oil Temperature for Frying
Heat the vegetable oil in a large, heavy-bottomed skillet or Dutch oven over medium-high heat. Aim for a temperature of 350-375°F (175-190°C). If you don’t have a thermometer, test the oil by dropping in a small piece of Panko; it should sizzle immediately and turn golden brown within 30 seconds.
Frying to Golden Perfection, Batch by Batch
Carefully place one or two breaded sushi sandwiches into the hot oil, ensuring you do not overcrowd the pan. Overcrowding drops the oil temperature, leading to greasy, less crispy results. Fry for 2-3 minutes per side, gently turning with tongs, until each side is a beautiful deep golden brown and exceptionally crispy. Frying in batches is essential for maintaining consistent oil temperature and achieving that perfect crunch.
The Critical Cooling Rack Drain (No Sogginess Here!)
Immediately transfer the fried sushi sandwiches to a wire rack set over paper towels. This crucial step allows excess oil to drain away and, more importantly, permits air to circulate around the sandwiches, preventing steam from building up underneath and making the bottom soggy. This ensures maximum crispness.
Whisking Up Your Signature Spicy Mayo
While the sandwiches are draining, prepare your sauces. In a small bowl, whisk together the mayonnaise and sriracha until well combined, creating a smooth and creamy spicy mayo.
Slice, Drizzle, Garnish & Serve Immediately
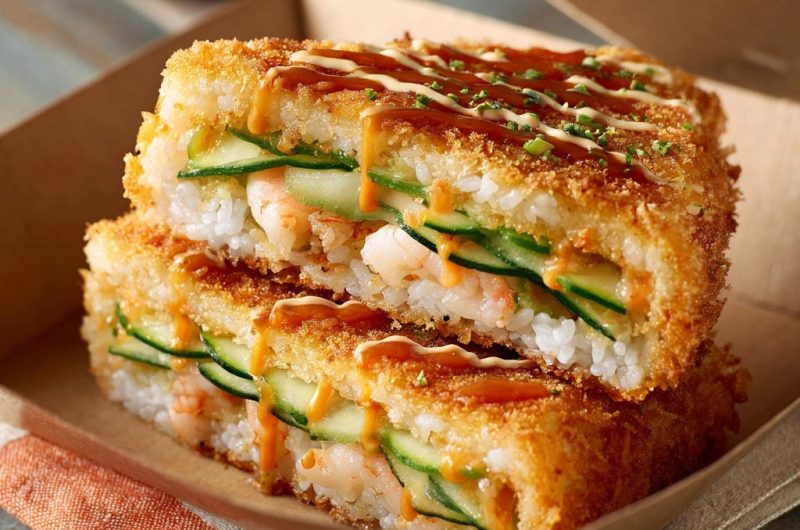
Once cooled slightly on the rack, slice each crispy sushi sandwich in half. Drizzle generously with your freshly made spicy mayo and the sweet soy glaze. Garnish with a sprinkle of finely chopped chives or green onions. Serve immediately to enjoy the ultimate crunch and irresistible flavors!
What to Serve Next
These shrimp sandwiches have a crunchy texture and a mild sweetness that pairs well with something spicy or sticky-sweet.
- For a cool, tangy contrast, try this Sweet and Spicy Chicken Salad with its creamy dressing and crunchy vegetables.
- If you want more crunch and a sticky glaze, the Crispy Glazed Chicken Salad uses a similar seared exterior and adds a bright, balanced finish.
Chef’s Secrets: Elevate Your Crispy Sushi Sandwich Experience
The Ultimate Panko Press: Why It Matters. Don’t just dust with Panko; actively press and pack it firmly onto the sushi sandwich. This intensive pressing creates a denser, more protective, and incredibly extra-crispy crust that adheres robustly and performs beautifully in the hot oil.
Oil Temperature Mastery: Your Key to Golden, Not Greasy. Maintaining the precise oil temperature of 350-375°F (175-190°C) is absolutely paramount. Too low, and your sandwiches will absorb excess oil, becoming unpleasantly greasy. Too high, and the exterior will burn before the Panko has a chance to fully crisp through. Invest in a good thermometer for consistent results.
Batch Frying Wisdom: Keep That Crisp Consistent. Resisting the urge to overcrowd the pan is vital. Frying too many sandwiches at once dramatically drops the oil temperature, leading to inconsistent browning and soggy breading. Always fry in small batches to ensure consistent, high heat and uniform crispiness for every single piece.
Sushi Rice Stickiness: The Foundation of Good Form. The success of these sandwiches starts with your sushi rice. Ensure it’s properly seasoned and slightly warm when you begin forming the sandwiches. This pliability is essential for the rice to compact tightly and maintain its structural integrity throughout the entire assembly and frying process.
Chill for Success: The Firmness Factor. Chilling the assembled sushi sandwiches for at least 30 minutes before breading and frying is a non-negotiable step. This refrigeration period firms them up considerably, making them far easier to handle during breading and significantly less prone to falling apart in the oil.
Troubleshooting Your Crispy Shrimp Sushi Sandwiches
Problem: Sandwiches Falling Apart During Frying
This issue often stems from insufficient compaction or chilling. Ensure your sushi sandwiches were pressed very firmly when assembled and allowed to chill for at least 30 minutes. Also, double-check that the Panko breading was pressed on tightly, creating a robust exterior shell.
Problem: Not Crispy Enough (or Too Greasy)
This is almost always a sign of incorrect oil temperature. If the oil is too cool, the breading will absorb too much oil, resulting in a greasy, soggy texture instead of a crisp one. If the oil is too hot, the exterior will brown too quickly without truly crisping through.
Additionally, remember to transfer them immediately to a wire rack after frying. Leaving them on paper towels can trap steam, which will lead to sogginess rather than continued crispness.
Problem: Uneven Frying or Browning
Uneven results usually occur if the frying pan is overcrowded, which causes the oil temperature to drop inconsistently. It can also happen if your heat source isn’t distributing warmth uniformly. Always fry in small batches to maintain a steady oil temperature and ensure your skillet heats evenly for a consistent golden crust.
Problem: Rice Sticking to the Pan or Hands
When working with sticky sushi rice, keep your hands slightly dampened with water or a little of the seasoned rice vinegar solution; this prevents the rice from clinging. For shaping, the plastic wrap lining the container is key to preventing sticking and ensuring a clean release.
Beyond the Basic Bite: Serving & Customization Ideas
Creative Toppings and Dipping Sauce Pairings
Elevate your Crispy Shrimp Sushi Sandwiches even further with creative additions. Beyond the classic spicy mayo and sweet soy, consider a rich drizzle of unagi sauce, a sprinkle of toasted sesame seeds for nutty depth, or a dollop of a creamy avocado lime sauce for a fresh, vibrant contrast.
Flavorful Filling Alternatives to Try
While shrimp is delicious, these sushi sandwiches are incredibly versatile. Experiment with other cooked seafood like delicate crab meat or seared tuna. For a heartier option, you could try using perfectly prepared crispy fried chicken or even tender pulled chicken. Vegetarian options are also fantastic, such as baked tofu, creamy avocado slices, or a medley of savory sautéed mushrooms.
Make-Ahead Magic: Prep Tips for Busy Days
You can certainly get a head start on this recipe. Cook and season your sushi rice a day in advance, storing it in an airtight container in the refrigerator (gently reheat or let it come to room temperature before forming). The shrimp can also be cooked and chopped ahead of time. For the best crispness, assemble and chill the sandwiches on the day you plan to fry them.
Storing Leftovers for Best Enjoyment
Crispy Shrimp Sushi Sandwiches are undeniably at their peak perfection immediately after frying, when their crunch is most pronounced. While you can store any leftovers in an airtight container in the refrigerator for up to 1-2 days, be aware they will inevitably lose some of their initial crispness. For a chance at reviving some crunch, you might try reheating them briefly in an air fryer or oven, but they won’t quite match the fresh-from-the-fryer experience.
Your Crispy Shrimp Sushi Sandwich Questions Answered
Can I use pre-cooked shrimp for this recipe?
Yes, absolutely! In fact, the recipe specifically calls for cooked small shrimp, which significantly speeds up the preparation process. Just ensure they are fully thawed if you’re using frozen shrimp, and cut them in half as directed for ideal texture and distribution within the sandwich.
What if I don’t have Panko breadcrumbs?
While Panko breadcrumbs are highly recommended for delivering the ultimate, most superior crunch, you can certainly substitute with regular fine breadcrumbs in a pinch. However, for that truly “crispy” and light texture that these sushi sandwiches are known for, Panko is the preferred choice. As an alternative, you could also try finely crushed cornflakes for a unique, albeit different, crispy coating.
Can I bake or air fry these instead of deep frying?
While deep-frying provides the absolute ultimate golden crispness and flavor, you can try air frying for a lighter preparation method. To air fry, preheat your air fryer to 375°F (190°C), lightly spray the breaded sandwiches with a little oil, and air fry for approximately 10-15 minutes, flipping them halfway through, until they are beautifully golden brown and crispy. Baking is less recommended as it typically struggles to achieve the same satisfying level of crunch and browning.
How do I make the sushi rice perfectly sticky?
The secret to perfectly sticky yet distinct sushi rice lies in using short-grain rice, rinsing it thoroughly before cooking to remove excess starch, and then seasoning it with rice vinegar, sugar, and salt while it’s still warm. This careful combination creates the desired pliable stickiness and signature flavor. Avoid over-stirring or mashing the rice during seasoning to maintain its integrity.
Is it possible to make this gluten-free?
Yes, it’s definitely possible to adapt this recipe to be gluten-free! You would need to ensure you use certified gluten-free Panko breadcrumbs and confirm that your all-purpose flour substitute and sweet soy glaze are also gluten-free. Most rice vinegar is naturally gluten-free, but it’s always wise to double-check labels to be completely sure. The remaining core ingredients are typically naturally gluten-free.
Ready to Impress? Share Your Crispy Shrimp Sushi Sandwiches!
There you have it-your definitive, E-E-A-T rich guide to crafting Crispy Shrimp Sushi Sandwiches that will not only satisfy your deepest cravings but also undoubtedly impress everyone lucky enough to try them. The secret to that glorious, audible crunch is now officially yours! Don’t be afraid to experiment with different flavorful fillings or innovative sauces to truly make this delightful recipe your very own culinary masterpiece.
We’d absolutely love to see your incredible culinary creations! Please share your beautiful Crispy Shrimp Sushi Sandwiches on social media and tag us, or take a moment to leave a comment below with your favorite topping combinations and any unique twists you discovered. Happy frying, and get ready for a flood of rave reviews!
Crispy Shrimp Sandwiches
Course: Main CourseCuisine: AsianDifficulty: medium2
large sandwiches50
minutes15
minutes1200
kcal60
minutesUnlock the secret to perfectly crispy fried sushi sandwiches at home. This recipe guides you through creating irresistible shrimp and rice sandwiches with a satisfying golden crunch. Say goodbye to greasy disappointments and hello to homemade crispy masterpieces!
Ingredients
2 cups cooked sushi rice, seasoned with 2 tablespoons rice vinegar, 1 tablespoon sugar, and 1/2 teaspoon salt
1/2 pound cooked small shrimp, tails removed, cut in half
1 small cucumber, thinly sliced into ribbons or long strips
1 cup Panko breadcrumbs
1/2 cup all purpose flour
2 large eggs, lightly beaten
4 cups vegetable oil, for frying
2 tablespoons mayonnaise
1 teaspoon sriracha (or to taste)
2 tablespoons sweet soy glaze or teriyaki sauce
1 tablespoon finely chopped chives or green onions, for garnish
Directions
- Prepare your sushi rice: If not already seasoned, gently fold in the rice vinegar, sugar, and salt into the warm cooked rice. Allow it to cool slightly, but keep it warm enough to be pliable.
- Assemble the sushi sandwiches: Lay a piece of plastic wrap inside a square or rectangular container (about 4×4 inches is ideal, or a small loaf pan). Spread about 1/2 cup of seasoned sushi rice evenly on the bottom, pressing firmly. Layer half of the cucumber slices, followed by half of the chopped shrimp. Top with another layer of cucumber, then cover with another 1/2 cup of seasoned sushi rice, pressing very firmly to compact. Repeat for a second sandwich. Wrap tightly in the plastic wrap and let chill in the refrigerator for at least 30 minutes to help them hold their shape.
- Set up your breading station: In one shallow dish, place the all purpose flour. In a second shallow dish, place the beaten eggs. In a third shallow dish, place the Panko breadcrumbs.
- Remove the chilled sushi sandwiches from the plastic wrap. Carefully dredge each sandwich in the flour, shaking off any excess. Then dip it into the beaten egg, ensuring it’s fully coated. Finally, press it firmly into the Panko breadcrumbs, making sure every side is generously and evenly coated. Pressing the Panko firmly into the rice is key for a strong, crispy crust that won’t fall apart.
- Achieving the Golden Crunch: Heat the vegetable oil in a large, heavy-bottomed skillet or Dutch oven over medium high heat to 350-375°F. If you don’t have a thermometer, a small piece of Panko should sizzle immediately and turn golden brown within 30 seconds.
- Carefully place one or two sushi sandwiches into the hot oil, ensuring not to overcrowd the pan. Frying in batches is crucial to maintain oil temperature and get that even crisp. Fry for 2-3 minutes per side, turning gently with tongs, until each side is beautifully deep golden brown and exceptionally crispy.
- Transfer the fried sushi sandwiches immediately to a wire rack set over paper towels. This crucial step allows air to circulate, preventing steam from building up and making the bottom soggy.
- While the sandwiches are draining, prepare your sauces. In a small bowl, whisk together the mayonnaise and sriracha for a spicy mayo.
- Slice each crispy sushi sandwich in half. Drizzle generously with the spicy mayo and sweet soy glaze. Garnish with chopped chives. Serve immediately and enjoy that perfect crunch!