Golden Caramelized Pudding Bake: Master the Crunchy Top

I remember countless attempts at achieving that elusive, perfectly shimmering caramel crust on a warm, creamy pudding, often ending in frustration with either a bitter burnt mess or barely melted sugar. But after refining the technique over time, I’ve finally perfected the method for this show-stopping Golden Caramelized Pudding Bake, ensuring a deep golden crunch every single time.
This recipe isn’t just about a delicious dessert; it’s about unlocking the secret to a flawless caramelized topping that will elevate your home baking and impress everyone. Get ready to create a dessert that’s truly golden.
Why This Golden Caramelized Pudding Bake Will Be Your New Favorite
This isn’t just another dessert recipe; it’s a foolproof guide to achieving what many consider the holy grail of puddings: a pristine, crackable caramel layer. The beauty of this Golden Caramelized Pudding Bake lies in its reliable outcome, transforming simple ingredients into something extraordinary.
The Secret to a Perfect, Non-Burnt Caramel Crust (Every Time!)
The biggest hurdle with caramelized desserts is preventing that acrid, burnt sugar taste. Our specific chilling technique for the custard base before caramelization is the absolute key to a consistently gorgeous, deep golden crunch without any bitterness.
This method prevents the delicate custard from overcooking or melting prematurely under the heat of the torch or broiler, ensuring the sugar can achieve its perfect amber hue.
Beyond Basic: A Simple Trick for Stunning Dessert Presentation
With minimal effort, this particular Golden Caramelized Pudding Bake elevates a humble pudding into an elegant, impressive dessert. The dramatic crack of the golden sugar crust creates an experience that’s both delicious and visually stunning.
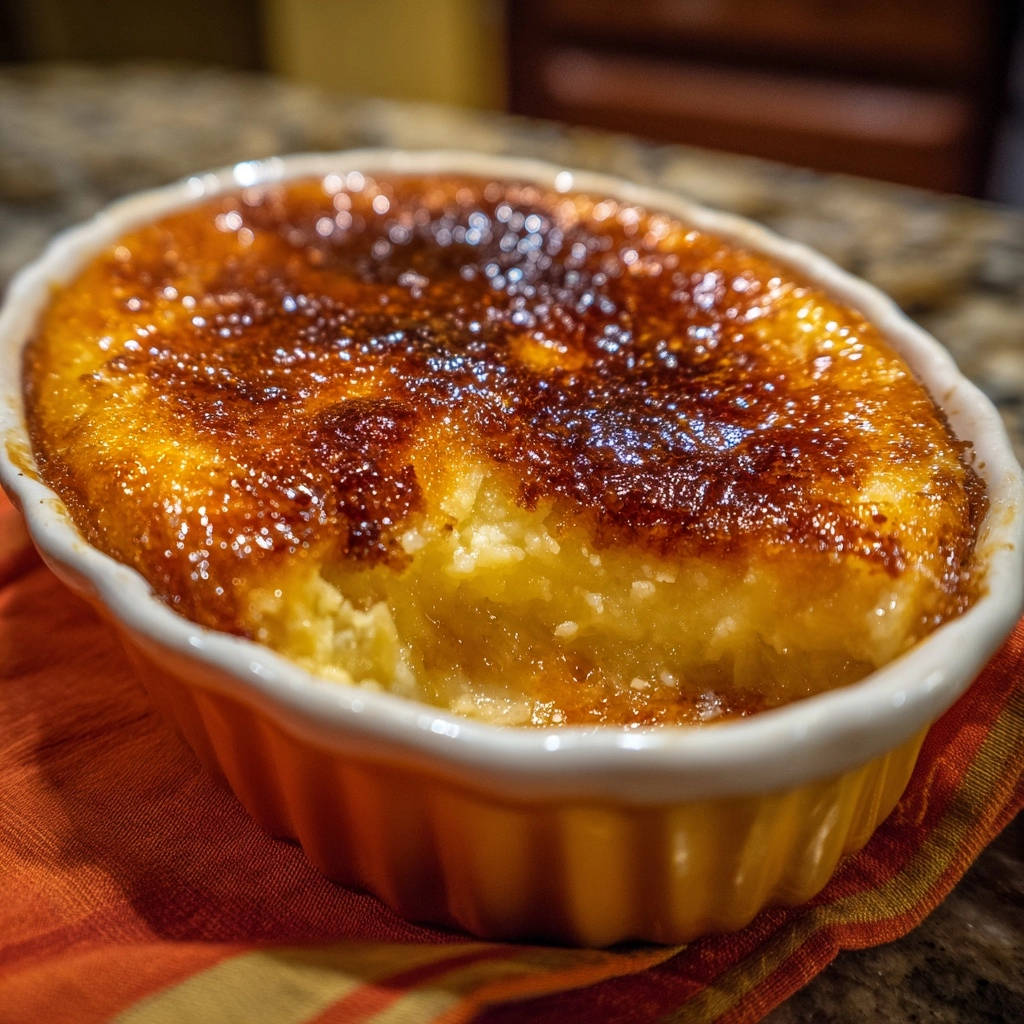
It’s a dessert that speaks of sophistication and skill, yet is surprisingly accessible for home bakers.
Essential Ingredients for Your Golden Caramelized Pudding Bake
Quality ingredients are the foundation of any great dessert. Here’s a closer look at what you’ll need and why each element is important for our creamy pudding bake.
The Custard Core: Building Creamy Perfection
Large Eggs: These are crucial for the custard’s structure and richness. They provide the creamy texture and help the pudding set beautifully.
Granulated Sugar (for custard): This sweetens the custard subtly, balancing the richness without making it overly sweet, as the caramel provides additional sweetness.
Vanilla Extract: A touch of quality vanilla is essential for a warm, aromatic flavor. It truly enhances the dessert’s overall profile.
Whole Milk: The fat content in whole milk is key to achieving a truly luxurious, smooth, and creamy custard. Avoid lower-fat milks, as they can result in a less rich texture.
Pinch of Salt: Just a tiny pinch brightens all the other flavors, making the vanilla and sugar taste more vibrant and well-rounded.
The Golden Top: Achieving That Irresistible Crunch
Granulated Sugar (for caramel topping): Standard granulated sugar is perfect for the caramel crust. Its fine granules melt evenly and quickly under heat, creating that signature golden layer.
Ensure it’s spread in an even, thin layer for consistent caramelization.
Gather Your Culinary Gear: Essential Tools for Pudding Bake Success
Having the right tools makes all the difference in achieving perfect results for your Golden Caramelized Pudding Bake. From mixing to caramelizing, these items are indispensable.
Standard Baking Equipment
Medium Bowl & Whisk: Essential for combining and smoothing your custard mixture without introducing too much air.
Oven-Safe Baking Dish(es): A single 1-quart dish or four individual ramekins work perfectly. Choose based on your preferred serving style and baking time.
Larger Roasting Pan: This is critical for creating the essential water bath, ensuring a gentle and even bake for the custard.
Wire Rack: Necessary for proper cooling and air circulation after the pudding comes out of the oven, preventing a soggy bottom.
The Caramelization Catalysts
Kitchen Torch (Preferred Method): A butane kitchen torch offers precise control over caramelization, allowing you to achieve an even, golden crust without overheating the pudding.
Always exercise caution and follow manufacturer safety guidelines when using a kitchen torch.
Broiler (Alternative Method): If you don’t have a torch, a preheated broiler can work. It requires intense vigilance and constant attention to prevent burning, but it will achieve the desired crust.
Your Step-by-Step Journey to Golden Caramelized Pudding Bake Mastery
Follow these detailed steps to create a truly exceptional dessert with that signature crackly, golden caramel topping.
Crafting the Silky Custard Base
Begin by preheating your oven to 325°F (160°C). This ensures the oven is at a consistent temperature when the pudding goes in.
In a medium bowl, thoroughly whisk together the eggs, 1/4 cup granulated sugar, vanilla extract, and a pinch of salt. Whisk until the mixture is well combined and slightly frothy, which indicates the sugar has begun to dissolve and the ingredients are fully integrated.
Slowly whisk in the whole milk until the mixture is smooth. This gentle addition prevents the eggs from scrambling and ensures a perfectly uniform custard base. Pour this silky mixture into your chosen oven-safe baking dish(es).
The Gentle Bake: Water Bath Wonders
Place your filled baking dish(es) into a larger roasting pan. This setup is crucial for the water bath, which acts as a buffer against direct oven heat.
Carefully pour hot water into the roasting pan until it comes halfway up the sides of the pudding dish(es). This gentle, even heat from the water bath prevents the custard from curdling or cracking, resulting in an incredibly smooth texture.
Bake for 45-60 minutes for a large dish, or 30-40 minutes for individual ramekins, or until the edges are set and the center has a slight jiggle. A clean knife inserted near the edge confirms it’s cooked. Once baked, carefully remove the pudding dish(es) from the water bath and let them cool completely on a wire rack.
The Crucial Chill: Prepping for Perfection
This next step is absolutely fundamental for achieving that flawless, non-burnt caramel top. Once cooled, you must chill the pudding in the refrigerator for at least 2 hours, or preferably overnight.
This firming up and chilling of the custard is the undisputed key. It prevents the custard from warming up and overcooking or melting when you apply intense heat for the caramelization, ensuring a clean, crisp finish.
The same gentle heat that sets this pudding’s top also ensures your custard stays silky in these creamy baked custard tarts.
The Grand Finale: Achieving the Signature Caramel Top
When you’re ready to serve, evenly sprinkle the remaining 1/4 cup of granulated sugar over the chilled surface of the pudding. It’s important to create a thin, even layer, covering the entire top for consistent caramelization.
Using a kitchen torch, hold the flame a few inches above the sugar, moving it constantly in small circles. Watch intently as the sugar melts, bubbles, and swiftly transforms into a rich golden brown.
Keep the torch in continuous motion to prevent any spots from burning while ensuring even caramelization across the entire surface. If using a broiler, place the dish under a preheated broiler (on high heat) for 1-3 minutes, watching it with extreme closeness and rotating the dish if necessary, until it’s deeply golden. The broiler method demands intense supervision to avoid burning.
Let the caramelized top cool for a few minutes until it hardens and forms that beautiful, crackly crust. Serve immediately to savor the delightful contrast of the warm, creamy pudding and the crisp, golden sugar.
Chef’s Secrets: Elevating Your Golden Caramelized Pudding Bake
Unlock even more potential in your Golden Caramelized Pudding Bake with these expert tips and insights.
Achieving the Perfect Caramelized Finish
An even layer of sugar is paramount; any thick spots will take longer to caramelize and can lead to burning in other areas. When torching, move the flame continuously to distribute heat evenly and prevent hot spots.
For the broiler method, place the dish on an upper rack, but always keep your eye on it. The transformation from perfect golden to burnt happens in mere seconds.
Understanding the Importance of the Chill
The thorough chilling of your custard base is non-negotiable for a perfect caramel layer. A cold custard resists the heat of the torch or broiler, maintaining its silky texture while the sugar above gets perfectly crisp.
Without this critical step, your custard could turn watery or even melt, ruining the structural integrity and the contrast we aim for.
Serving Temperature Matters
For the ultimate sensory experience, serve your Golden Caramelized Pudding Bake immediately after the caramel has set. The contrast between the still-cool, creamy pudding and the warm, freshly hardened, crisp sugar is simply divine.
For a perfect pairing, try our Mastering Classic Zesty Lemon Bars with a Crisp Shortbread Base.
Vanilla Excellence: Choosing Your Extract
While often overlooked, the quality of your vanilla extract significantly impacts the overall flavor profile of the custard. Opt for a pure vanilla extract or even vanilla bean paste for a more profound and aromatic depth that truly shines through.
Golden Caramelized Pudding Bake Rescue: Common Issues & Solutions
Even seasoned chefs encounter hiccups. Here are solutions to common challenges when making your Golden Caramelized Pudding Bake.
Caramel Burns Too Quickly or Unevenly
If your caramel is burning, you might be holding the torch too close or for too long in one spot. Increase the distance slightly and maintain constant, even movement with your torch.
Ensure the pudding is perfectly chilled; a warmer custard can accelerate the melting process from underneath. For the broiler, check your rack position and consider moving it further from the heat source, reducing the intensity.
Pudding is Watery, Grainy, or Cracks
A watery or grainy pudding often indicates overbaking, causing the proteins to tighten too much. Cracks are also a sign of overbaking or uneven heat. Ensure your water bath is adequately filled and maintains a consistent temperature throughout the baking process.
Avoid over-whisking the custard mixture, as incorporating too much air can lead to a frothy, less smooth texture. The goal is smooth integration, not aeration.
Caramel Doesn’t Harden or Stays Sticky
This usually means the sugar layer wasn’t thick enough, wasn’t caramelized enough, or wasn’t allowed sufficient cooling time. Ensure you apply an even and adequate layer of sugar.
Allow the caramelized sugar to cool for at least 5-10 minutes at room temperature before serving; it needs time to set. High humidity in your kitchen can also sometimes prevent the sugar from fully hardening, so consider cooling it in a drier spot.
Tailor-Made Treat: Creative Variations & Smart Substitutions
Personalize your Golden Caramelized Pudding Bake with these inventive twists and practical adjustments to suit your taste and dietary needs.
Flavor Twists for Your Custard
Infuse your custard with different aromatics for unique flavors. A hint of orange or lemon zest adds a bright, citrusy note, while a pinch of ground cardamom or cinnamon can introduce warm, exotic undertones.
For coffee lovers, a teaspoon of instant espresso powder dissolved in the milk will create a sophisticated coffee-flavored pudding base.
Dairy-Free & Gluten-Free Options
While this recipe is naturally gluten-free, making it dairy-free requires careful substitution. Full-fat coconut milk or a rich plant-based cream (like cashew or oat cream) can replace whole milk, though the texture might be slightly softer and the flavor more pronounced.
Be aware that plant-based milks can sometimes behave differently with heat, so monitor the baking closely. For another delightful dessert, consider whipping up a batch of decadent pumpkin pie truffles for a different kind of sweet treat.
Individual Servings vs. Family Style
Using individual ramekins offers elegant presentation and portion control, making them ideal for dinner parties. They also bake and chill faster than a large dish.
A single large baking dish is perfect for family-style serving and requires less effort in preparation. However, caramelizing a larger surface area with a torch may take a bit longer, but yields a grander presentation.
Beyond the Bake: Serving, Storing, and Enjoying Your Creation
Ensure your Golden Caramelized Pudding Bake is enjoyed to its fullest with these tips for presentation, storage, and making ahead.
Presentation Perfection: Serving Suggestions
The beauty of this Golden Caramelized Pudding Bake often lies in its simplicity, but a few garnishes can enhance its appeal. A sprinkling of fresh berries (raspberries or blueberries) adds a pop of color and tartness that beautifully complements the sweet caramel.
A delicate dollop of lightly sweetened whipped cream or a light dusting of cocoa powder can also provide an elegant finish.
Storing Leftovers: Keeping it Fresh
While best enjoyed immediately, any leftover pudding should be covered and refrigerated. Be aware that the caramelized crust will soften and become sticky over time due to moisture from the pudding and humidity.
For the best experience, try to caramelize only what will be consumed immediately. If you have a sweet tooth, our chocolate crumb cheesecake bars are another excellent choice for delicious leftovers.
Make-Ahead Magic: Prep for Parties
This recipe is excellent for entertaining! The custard base can be prepared and baked a day or two in advance, then chilled thoroughly in the refrigerator.
Perform the caramelization step just before serving to ensure that iconic crispy, crackly topping. This allows you to focus on your guests while still delivering a show-stopping dessert.
What to Serve Alongside
That golden pudding bake with its crunchy top pairs well with something crisp or creamy on the side.
- Start the morning with Ultimate Thick-Cut French Toast for a similar caramelized finish and soft center.
- Add Sugared Fried Cheese Balls for a sweet-savory contrast that stays crisp without leaking.
Your Golden Caramelized Pudding Bake Questions Answered
Here are quick answers to some frequently asked questions about this delightful Golden Caramelized Pudding Bake.
Can I make this dairy-free?
Yes, you can substitute whole milk with full-fat coconut milk or a rich oat or cashew cream. Be aware that the flavor profile and texture may differ slightly, but it will still yield a delicious dairy-free pudding.
What if I don’t have a kitchen torch?
No torch? No problem! As detailed in the instructions, you can use your oven’s broiler. Place the chilled pudding under a high broiler, watching it very closely and rotating it constantly until the sugar is deeply golden. This method requires intense vigilance to prevent burning.
How long does the caramelized top stay crispy?
The caramelized top is at its crispiest immediately after creation and cooling. It typically stays crisp for about 15-30 minutes, after which it will gradually soften and become sticky due to moisture absorption from the custard and the surrounding air. Serving immediately is highly recommended.
Can I bake this in a larger dish?
Yes, the recipe specifies a 1-quart dish. If using a larger dish (e.g., 9×13), you will need to double or triple the recipe quantity. Adjust baking times accordingly, as a larger volume will require more time to set, and always check for the characteristic ‘slight jiggle’ in the center.
Is this recipe naturally gluten-free?
Yes, this Golden Caramelized Pudding Bake recipe is naturally gluten-free, as it contains no wheat or gluten-containing ingredients. It’s a fantastic dessert option for those with gluten sensitivities or dietary preferences.
Ready to Impress? Share Your Golden Caramelized Pudding Bake Masterpiece!
Now that you’re equipped with all the secrets and techniques, it’s time to create your own unforgettable Golden Caramelized Pudding Bake. This dessert is more than just a treat; it’s an experience, from the satisfying crack of the caramel to the creamy indulgence beneath.
Don’t be shy – dive into this recipe, experiment with the variations, and get ready for rave reviews. We can’t wait to see your golden creations!
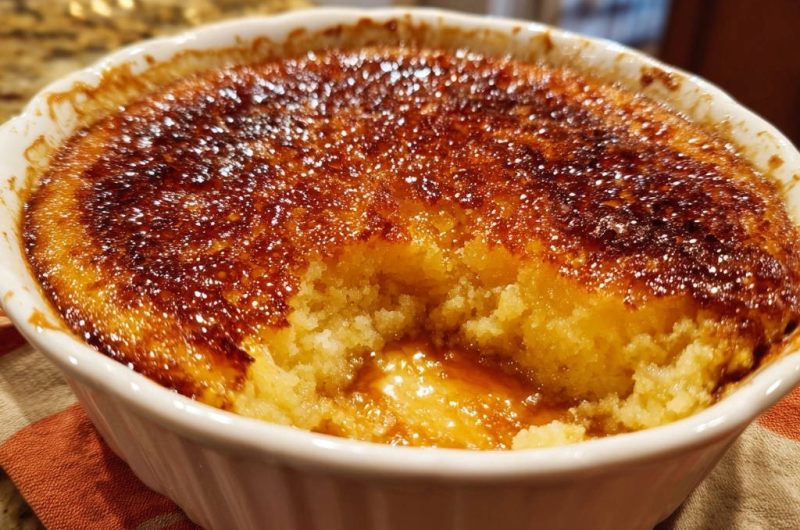
Caramelized Pudding Bake
Course: DessertCuisine: InternationalDifficulty: medium4
servings15
minutes1
hour240
kcal300
minutesDreaming of that perfect, shimmering caramelized crust on a warm pudding? This recipe delivers a gorgeous, deep golden crunch every single time, without a hint of bitterness. The secret lies in a simple chilling trick that transforms your dessert game forever, guaranteeing a flawless, crackly top.
Ingredients
2 large eggs
1/4 cup granulated sugar (for custard)
1/4 teaspoon vanilla extract
1 1/2 cups whole milk
Pinch of salt
1/4 cup granulated sugar (for caramel topping)
Directions
- Preheat oven to 325F (160C).
- In a medium bowl, whisk together eggs, 1/4 cup granulated sugar, vanilla extract, and a pinch of salt until well combined and slightly frothy.
- Slowly whisk in the whole milk until the mixture is smooth.
- Pour the mixture into a single 1-quart oven-safe baking dish or four individual ramekins.
- Place the baking dish(es) into a larger roasting pan. Carefully pour hot water into the roasting pan until it comes halfway up the sides of the pudding dish(es). This water bath ensures a gentle, even bake.
- Bake for 45-60 minutes for a large dish, or 30-40 minutes for ramekins, or until the edges are set and the center has a slight jiggle. A knife inserted near the edge should come out clean.
- Carefully remove the pudding dish(es) from the water bath and let them cool completely on a wire rack.
- This next step is absolutely crucial for that perfect, non-burnt caramel top! Once cooled, chill the pudding in the refrigerator for at least 2 hours, or preferably overnight. This firming up and chilling of the custard is the key to preventing it from overcooking or melting when you caramelize the sugar.
- When you’re ready to serve, evenly sprinkle the remaining 1/4 cup granulated sugar over the chilled surface of the pudding. Make sure it’s a thin, even layer, covering the entire top.
- Using a kitchen torch, hold the flame a few inches above the sugar, moving it constantly in small circles. Watch it like a hawk! The sugar will begin to melt, bubble, and then quickly turn a rich golden brown. Keep the torch moving continuously to prevent any spots from burning while ensuring even caramelization across the whole surface. If you don’t have a torch, you can place the dish under a preheated broiler (on high heat) for 1-3 minutes, watching it extremely closely and rotating the dish if necessary, until deeply golden. The broiler method requires intense supervision to prevent burning.
- Let the caramelized top cool for a few minutes until it hardens and forms that beautiful, crackly crust. Serve immediately to enjoy the contrast of the warm pudding and crisp, golden sugar.
Notes
- Chilling the pudding thoroughly is crucial for a perfect, non-burnt caramel topping.