Mastering the Glazed Cranberry Orange Loaf
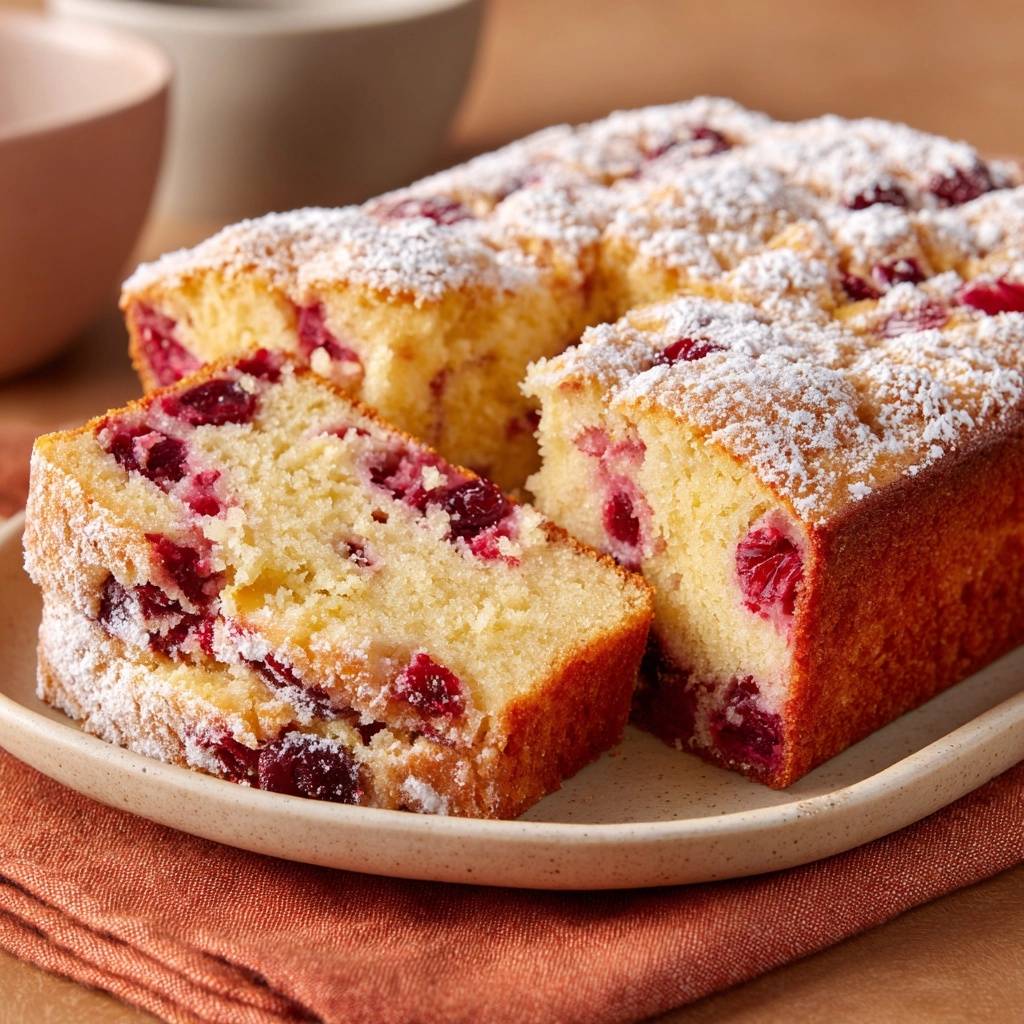
Nothing ruins a beautiful loaf cake faster than cutting into it only to find all the fruit has turned into a soggy mess at the very bottom. You expect a vibrant, fruit-filled slice, but instead, you get a dense layer of purple mush underneath a plain sponge. It is a common frustration that makes many bakers shy away from using fresh fruit in quick breads.
This Glazed Cranberry Orange Loaf solves that problem entirely by focusing on the physics of the batter. The contrast between the tart, popping cranberries and the sweet, citrus-infused crumb creates a bright flavor profile that feels both sophisticated and comforting. It is the kind of bake that fills your entire kitchen with the scent of fresh oranges and warm sugar.
The secret to this recipe’s success lies in a simple dry-coating technique that anchors the fruit in place. By creating a rough, flour-based exterior on the berries, we give the batter something to grip onto. This prevents gravity from pulling the heavy fruit through the crumb during the initial stages of baking, ensuring a perfectly even distribution in every single slice.
The Science of Preventing Fruit Sinking
Gravity is the enemy of the inclusion-heavy quick bread. In a standard thin batter, heavy items like fresh cranberries or chocolate chips naturally sink to the bottom before the heat of the oven can set the structure. This results in a “soggy bottom” where the fruit juices pool and prevent the dough from rising correctly.
The dry-coating technique is your best defense against this culinary fail. When you toss the cranberries in a portion of the flour mixture, you are creating friction. This dusty coating acts like a microscopic hook, allowing the fruit to hang onto the batter’s proteins as the loaf expands. Without this step, the smooth skin of the cranberry acts like a slide, letting it drop straight to the pan surface.
Batter viscosity also plays a massive role in supporting your fruit. This recipe utilizes sour cream to create a thick, sturdy suspension. Unlike thinner batters made solely with milk or oil, this high-fat, high-viscosity base is dense enough to hold the weight of the berries. The sour cream provides the structural integrity needed to keep those tart gems suspended exactly where you put them.
Essential Components for the Citrus Crumb
Every ingredient in this loaf serves a specific chemical purpose beyond just flavor. We use a combination of baking powder and baking soda to ensure a perfect rise. The baking soda reacts immediately with the acidic orange juice and sour cream, while the baking powder provides a second lift once the heat hits the oven. This dual-leavening approach creates a light, airy texture despite the heavy fruit.
The choice of fat is equally important for the final mouthfeel. While oil makes a cake moist, melted butter provides a superior, rich flavor that pairs beautifully with citrus. By incorporating sour cream with a 14% milkfat content, we achieve a “velvet” crumb that stays moist for days. This combination of fats ensures the loaf is tender but sturdy enough to slice cleanly.
For a perfect pairing, try our Mastering the Glazed Lemon Blueberry Loaf.
For the best citrus punch, never skip the fresh orange zest. The zest contains volatile oils that provide a deep, aromatic orange flavor that juice alone cannot replicate. When you rub the zest into the sugar or whisk it into the wet ingredients, those oils release, permeating the entire loaf with a bright, sunshine-filled fragrance that balances the tartness of the berries.
Fresh vs. Frozen Cranberries
You can use either fresh or frozen cranberries for this recipe with excellent results. If you choose frozen berries, do not thaw them before adding them to the batter. Thawing causes the berries to release excess moisture, which can streak the batter with purple juice. Simply toss them in the flour while frozen and add about 3 to 5 minutes to your total bake time to account for the lower starting temperature.
The Role of Room Temperature Ingredients
It is vital to use room temperature eggs and sour cream. When you mix cold ingredients into melted butter, the butter can seize and create small clumps. Room temperature ingredients ensure a smooth emulsification, which leads to a uniform crumb. If your batter looks curdled or “broken,” it is usually because the ingredients were at different temperatures, preventing them from bonding correctly.
Step-by-Step: Mixing the Perfect Loaf
The first phase is the Dry Mix. Whisk your flour, sugar, and leavening agents thoroughly in a large bowl. This ensures the baking soda is evenly distributed, preventing any bitter pockets in the finished bread. Remember to pull out those two tablespoons of flour now to coat your berries; it is much harder to do once the wet ingredients are in the bowl.
Next comes the Emulsion. In a separate bowl, whisk the melted butter, sour cream, orange juice, zest, eggs, and vanilla. You are looking for a completely smooth, pale orange liquid. This is the stage where you build the flavor base, so make sure the zest is well-distributed and the eggs are fully incorporated into the fats.
The final phase is the Marriage of the two mixtures. Pour the wet ingredients into the dry and use a large spatula to fold them together. Stop the moment you no longer see streaks of dry flour. The batter should look thick and slightly lumpy. Over-mixing at this stage develops too much gluten, which will turn your light, tender loaf into something tough and rubbery.
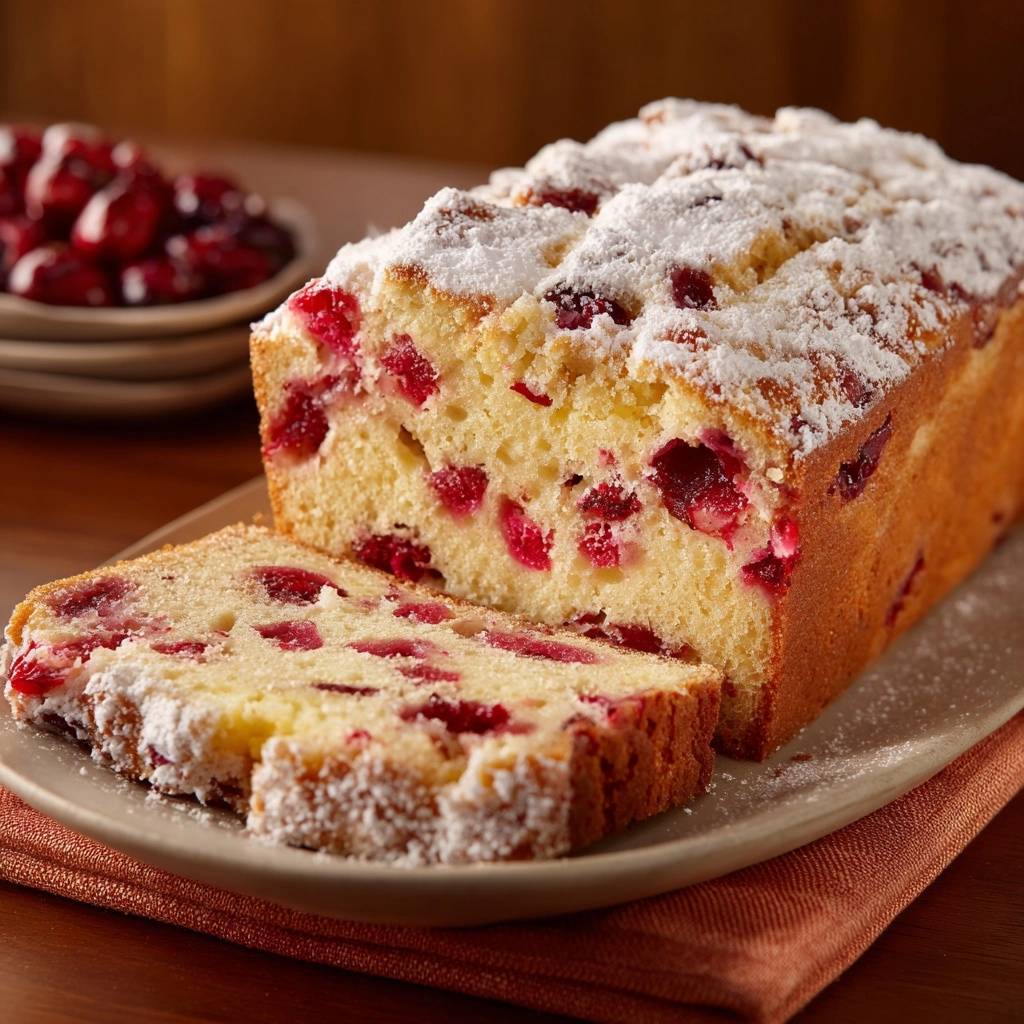
Gently fold in the flour-coated cranberries using a slow, sweeping motion with your spatula. You want to distribute them without crushing the fruit. Once the batter is in the pan, scatter the remaining uncoated berries on top. Press them in just a tiny bit so they stay put but remain visible, creating that beautiful, professional-looking crust.
For a perfect pairing, try our Mastering Glazed Strawberry Sweet Rolls Without the Soggy Bottom.
Preparing the Loaf Pan for Release
While the traditional “grease and flour” method works, a parchment paper sling is the gold standard for this loaf. Cut a strip of parchment that fits the width of your pan with a bit of overhang on the sides. This allows you to lift the entire loaf out once it has cooled slightly, protecting the delicate fruit on top and ensuring the sides don’t stick to the metal.
Baking Precision and Temperature Control
Place your loaf on the middle rack of a preheated 350°F oven. This position allows for the most even heat distribution around the pan. If the loaf is too high, the top will burn before the center sets; too low, and the bottom will overcook. Watch the loaf closely around the 40-minute mark.
Because of the sugar in the orange juice, the top of this loaf tends to brown quickly. If it looks golden brown but the center is still wobbly, tent it loosely with a piece of aluminum foil. This reflects the direct heat away from the surface while allowing the internal temperature to continue rising until the crumb is fully baked through.
Use a long toothpick or a wooden skewer to test for doneness. Insert it into the thickest part of the center. It should come out clean or with just a few moist crumbs attached. Be careful not to mistake a burst cranberry for raw batter; if the toothpick comes out with red juice but no sticky dough, your loaf is likely finished.
Achieving the Signature Orange Finish
Patience is the most important ingredient once the loaf leaves the oven. Let it sit in the pan for exactly 15 minutes. This allows the structure to firm up so it doesn’t crumble when you move it. After 15 minutes, use your parchment sling to transfer the loaf to a wire rack to cool completely.
Wait until the loaf is entirely cool before dusting it with powdered sugar. If the bread is even slightly warm, the sugar will melt into the crust and disappear. For an extra punch of flavor, you can brush the warm loaf with a tablespoon of fresh orange juice before it cools, which creates a slightly tacky, intensely citrusy glaze that the powdered sugar will cling to beautifully.
Troubleshooting Common Quick Bread Failures
If your loaf develops a deep crack down the middle, don’t panic! This is actually a sign of a good rise. As the outside of the loaf sets, the steam from the center needs a place to escape, creating that classic “quick bread” look. However, if the crack is jagged and the loaf is dry, you may have over-mixed the batter or your oven might be running too hot.
Pair These With Your Cranberry Orange Loaf
The bright, tangy-sweet loaf pairs nicely with something savory and rich. Here are two dishes that balance the citrus notes and make a full meal.
- The soft, fluffy texture of Creamy Chicken and Dumplings offers a mild, comforting contrast to the tart cranberry and orange flavors.
- For a hearty, earthy side, Southern Biscuits and Mushroom Gravy brings a rich, savory element that complements the loaf’s sweetness without overwhelming it.
A rubbery or dense texture is almost always the result of over-working the flour. Once the liquid hits the flour, the gluten starts to develop. Stir only until the flour disappears. If you see the sides of your loaf getting very dark while the middle stays raw, check your pan. Dark metal pans absorb more heat than light-colored ones; if using a dark pan, drop your oven temperature by 25°F.
Storage, Freezing, and Make-Ahead Tips
This is one of those rare bakes that actually tastes better the next day. As the loaf sits, the moisture from the cranberries migrates into the crumb, and the sharp acidity of the fruit mellows out. Store the loaf in an airtight container at room temperature for up to three days. If you live in a very humid climate, the refrigerator is a better bet to prevent the fruit from spoiling.
To freeze this loaf, wrap it tightly in two layers of plastic wrap followed by a layer of heavy-duty aluminum foil. It will stay fresh in the freezer for up to three months. When you are ready to eat it, thaw the loaf overnight on the counter while still wrapped. This allows the moisture to be reabsorbed into the bread rather than evaporating, keeping it soft and delicious.
Expert Baking FAQ
Can I use Greek Yogurt instead of Sour Cream?
Yes, you can substitute full-fat Greek yogurt for sour cream at a 1:1 ratio. Both ingredients provide the necessary acidity to activate the baking soda and the fat required for a moist crumb. Avoid using non-fat yogurt, as the lack of lipids will result in a drier, tougher loaf that lacks the signature velvet texture.
How do I stop the top cranberries from burning?
The best way to protect the surface fruit is to “tent” the pan with aluminum foil about two-thirds of the way through the baking process. If you notice the berries or the crust getting too dark around the 40-minute mark, simply drape a piece of foil over the top. This blocks the direct radiant heat while the internal temperature continues to rise.
Can I turn this into muffins?
Absolutely. This batter makes excellent muffins. Line a muffin tin with paper liners and fill them about three-quarters full. Increase the oven temperature to 375°F and bake for 18 to 22 minutes. The higher heat helps the muffins develop a nice domed top, but keep a close eye on them so the smaller portions don’t dry out.
Why did my cranberries burst and turn the bread purple?
Cranberries naturally burst when they reach a certain temperature, but excessive purple streaking usually comes from over-mixing the fruit into the batter. If you are using frozen berries, adding them while they are still rock-solid helps them maintain their shape longer. Use a gentle folding motion rather than a vigorous stir to keep the juices contained within the fruit.
Is there a substitute for the orange juice?
If you are out of orange juice, you can use milk or even water mixed with a little extra orange zest. However, the acidity in the orange juice is part of what reacts with the baking soda to create lift. If you swap it for milk, add a teaspoon of lemon juice or white vinegar to the liquid to ensure the loaf still rises properly.
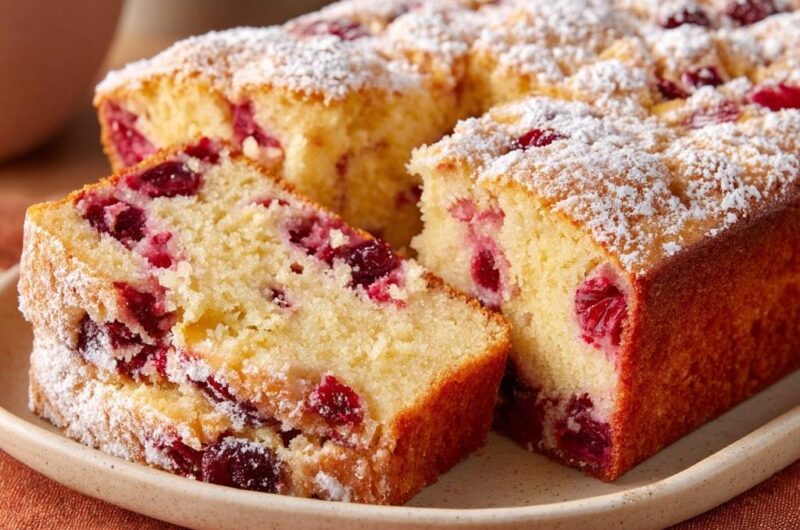
Cranberry Orange Loaf
Course: Dessert and BreadCuisine: AmericanDifficulty: medium8
slices15
minutes55
minutes340
kcal70
MinutesThis recipe ensures a perfectly balanced loaf where tart cranberries are evenly distributed throughout a sweet orange-scented crumb. By coating the fruit in flour before folding it into the batter, you achieve a professional result with fruit in every bite.
Ingredients
2 cups all-purpose flour
1 cup granulated sugar
1.5 teaspoons baking powder
0.5 teaspoon baking soda
0.5 teaspoon salt
1.5 cups fresh or frozen cranberries (divided)
1 tablespoon orange zest
0.5 cup unsalted butter, melted and slightly cooled
0.5 cup sour cream or Greek yogurt (for the moist crumb shown)
0.25 cup orange juice
2 large eggs
1 teaspoon vanilla extract
Powdered sugar for dusting
Directions
- Preheat your oven to 350°F (175°C). Grease and flour a 9×5 inch loaf pan, or line it with parchment paper.
- In a large bowl, whisk together the flour, sugar, baking powder, baking soda, and salt.
- The Secret Step: Take 2 tablespoons of the dry flour mixture and toss it with 1 cup of the cranberries in a small bowl until they are completely coated. This creates a rough surface that allows the batter to grip the fruit, preventing them from sliding to the bottom. Set the remaining 0.5 cup of uncoated cranberries aside.
- In a separate bowl, whisk together the melted butter, sour cream, orange juice, orange zest, eggs, and vanilla extract until smooth.
- Pour the wet ingredients into the dry ingredients. Stir with a spatula just until combined; do not overmix, as this results in a tough loaf.
- Gently fold the flour-coated cranberries into the batter.
- Pour the batter into the prepared loaf pan. Scatter the remaining 0.5 cup of uncoated cranberries over the top, pressing them slightly into the surface (this ensures the fruit is visible on the top crust as seen in the image).
- Bake for 55 to 65 minutes, or until a toothpick inserted into the center comes out clean. If the top browns too quickly, tent loosely with foil after 40 minutes.
- Allow the loaf to cool in the pan for 15 minutes before transferring to a wire rack.
- Once completely cool, dust the top generously with powdered sugar using a fine-mesh sieve before slicing.
Notes
- To prevent over-browning, tent the loaf loosely with foil after 40 minutes of baking. Ensure the loaf is completely cool before dusting with powdered sugar.