Classic Chocolate Chip Cookies: Thick, Chewy, & Never Flat!
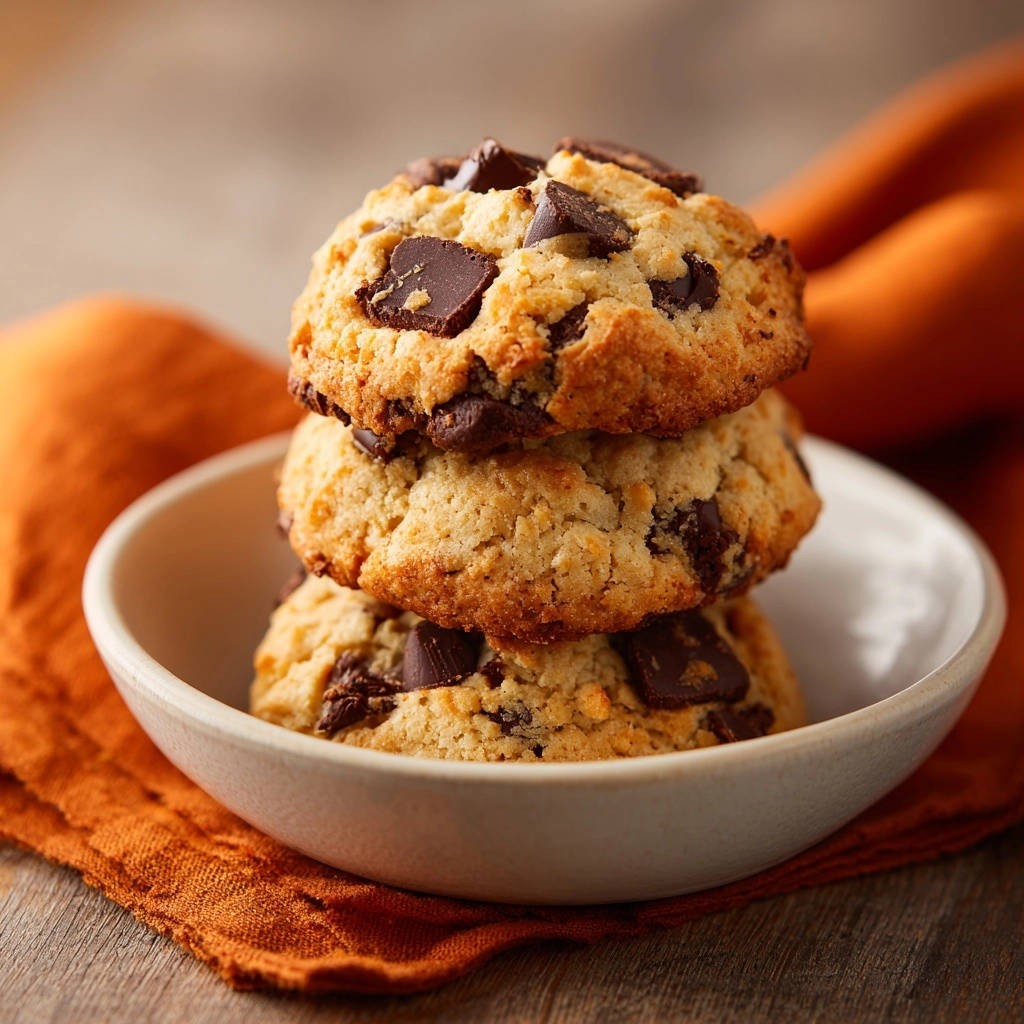
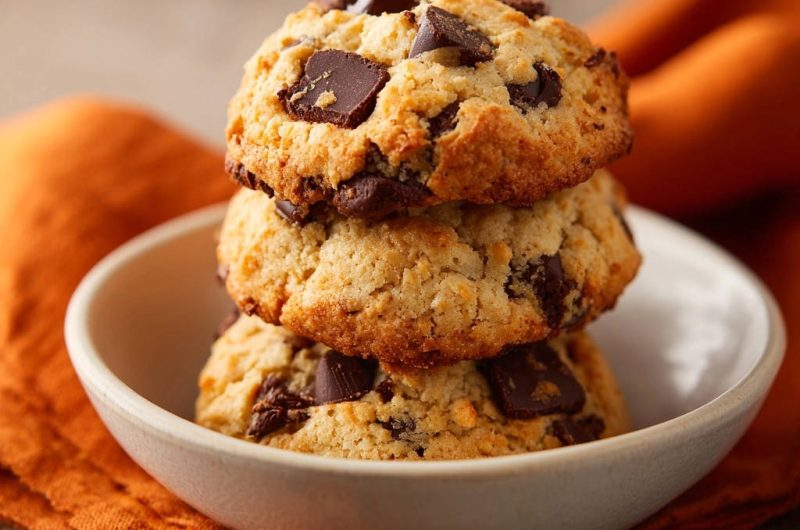
There’s nothing quite as frustrating as anticipating a warm, bakery-style cookie only to pull a batch of flat, greasy discs from the oven. For years, I battled the dreaded “pancake cookie,” but through countless experiments, I finally perfected the formula. This recipe for Classic Chocolate Chip Cookies consistently delivers that ideal thick, chewy texture with irresistible pools of melted chocolate, making it a true game-changer for any home baker.
The Secret to Perfectly Thick & Chewy Classic Chocolate Chip Cookies
Achieving bakery-quality cookies at home isn’t magic; it’s about understanding key techniques. Our recipe focuses on proven methods to ensure every batch is a success.
Why Our Recipe Guarantees No More Flat Cookies
The secret weapon against flat cookies lies primarily in chilling the dough. This crucial step solidifies the butter, which then melts slower in the oven, preventing excessive spread.
It also allows the flour to fully hydrate, leading to a sturdier structure and a more tender crumb. Say goodbye to wafer-thin cookies!
That Melt-in-Your-Mouth Chocolate Puddle Effect
We all crave those gorgeous, gooey chocolate puddles that stretch when you break a cookie in half. This recipe maximizes that effect by using quality chocolate and baking at just the right temperature.
A combination of chips and chopped chocolate also contributes to varied melt points and a truly decadent experience.
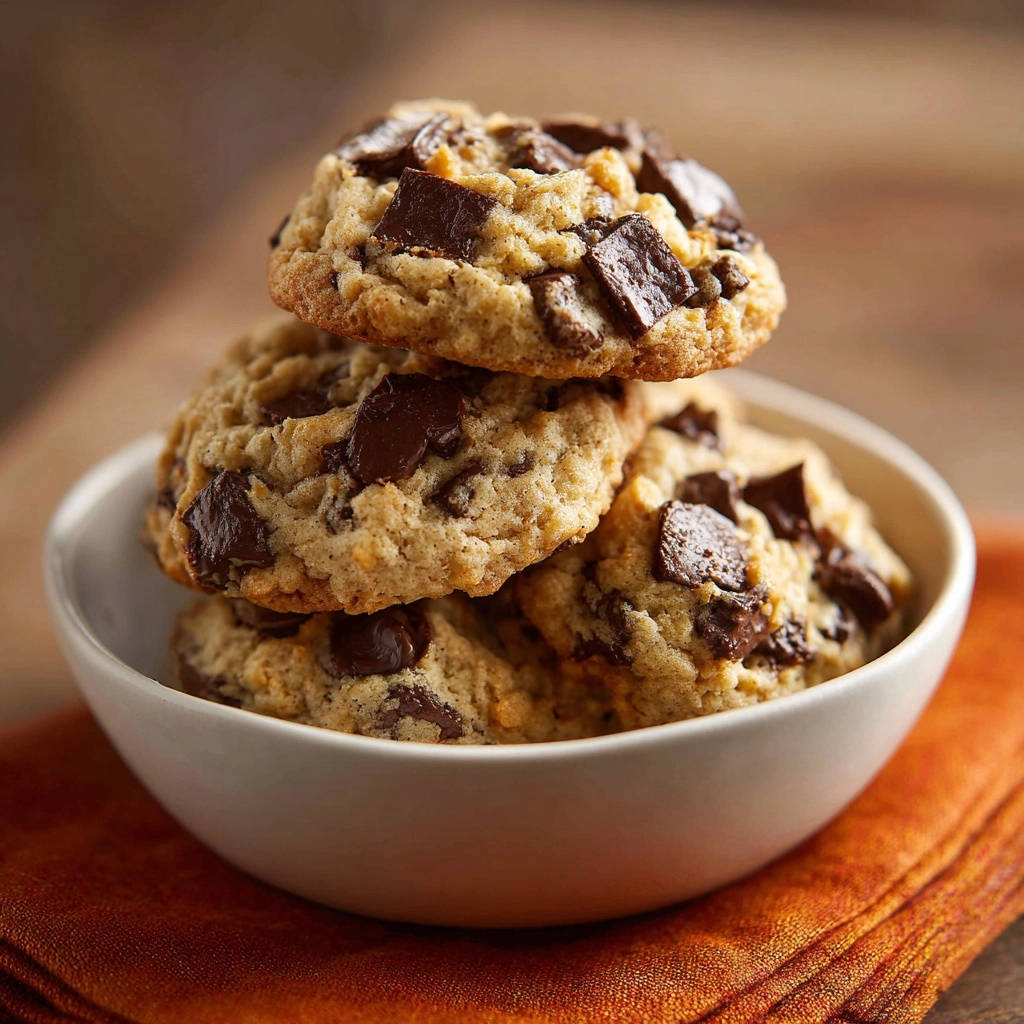
Achieving a Consistent, Chewy Interior Every Time
The perfect chewy interior comes from a careful balance of ingredients, especially the ratio of brown sugar to granulated sugar. Brown sugar adds moisture and tenderness, crucial for that satisfying chew.
Beyond ingredients, precise mixing techniques and knowing exactly when to pull your cookies from the oven are key to avoiding dryness or a cakey texture.
Gather Your Essentials: Ingredients for Classic Chocolate Chip Cookies
Quality ingredients are the foundation of any exceptional bake. Here’s a breakdown of what you’ll need and why each component is important for these Classic Chocolate Chip Cookies.
The Foundation: Butter, Sugars, and Extracts
1 cup (2 sticks) unsalted butter, softened: Use unsalted butter to control the salt content. Ensuring it’s perfectly softened is critical for proper creaming and preventing dense cookies.
3/4 cup granulated sugar: Provides sweetness and contributes to the crisp edges and initial spread of the cookie.
3/4 cup packed light brown sugar: This is a key player for chewiness and moisture. The molasses in brown sugar keeps the cookies tender and adds depth of flavor.
2 large eggs: Act as a binder, provide structure, and add richness. Ensure they are at room temperature for better emulsion with the butter mixture.
1 teaspoon vanilla extract: A cornerstone flavor that elevates the overall taste profile. Use pure vanilla for the best results.
Flour & Leavening: The Dry Duo
2 1/4 cups all-purpose flour: Provides the necessary structure for your cookies. Measure accurately by spooning flour into the cup and leveling with a knife.
1 teaspoon baking soda: This leavening agent reacts with the acidic brown sugar to create lift and contributes to the cookie’s spread and tender crumb.
1/2 teaspoon salt: Balances the sweetness and enhances all the other flavors in the cookie, a crucial ingredient often underestimated.
Choosing Your Chocolate Chips: Melty or Chunky?
1 1/2 cups semi-sweet chocolate chips or chunks: Semi-sweet is the traditional choice, offering a balanced sweetness. Good quality chocolate makes a significant difference in flavor and melt.
While chips hold their shape well, using chopped chocolate bars or a mix of both creates those desirable “chocolate puddles” and varied textures. Dark chocolate or milk chocolate can also be used for different flavor profiles.
Essential Tools for Your Classic Cookie Baking Journey
Having the right equipment makes the baking process smoother and ensures consistent, professional-looking results. Here are the must-have tools for your Classic Chocolate Chip Cookies.
Mixing & Measuring Must-Haves
Large Mixing Bowls: Designate one for wet ingredients and another for dry, allowing for proper aeration and preventing spills during mixing.
Measuring Cups & Spoons: Precision is paramount in baking. Accurate measurements ensure the correct ingredient ratios for the perfect cookie texture.
Electric Mixer (Stand or Handheld): Essential for thoroughly creaming butter and sugars until light and fluffy, a step that’s difficult to achieve by hand and crucial for texture.
Whisk: Perfect for blending dry ingredients evenly, ensuring that the baking soda and salt are well distributed throughout the flour mixture.
Baking Sheet & Cooling Rack Setup
Light-Colored Baking Sheets: These prevent the bottom of your cookies from over-browning too quickly compared to darker sheets, promoting even baking.
Parchment Paper: A non-negotiable for non-stick baking and easy cleanup. It also helps with even heat distribution and prevents cookies from spreading too much.
Wire Cooling Rack: Allows air to circulate all around the cookies as they cool, preventing moisture from condensing on the bottom and making them soggy.
Baking Perfection: Step-by-Step Classic Chocolate Chip Cookies Guide
Follow these detailed steps to bake your best batch of thick, chewy Classic Chocolate Chip Cookies yet.
Crafting the Butter-Sugar Foundation
In a large mixing bowl, combine the 1 cup of softened unsalted butter with 3/4 cup granulated sugar and 3/4 cup packed light brown sugar.
Using an electric mixer, cream these together on medium speed until the mixture is light, fluffy, and noticeably paler in color, which usually takes 2-3 minutes. Be careful not to overmix here, as excessive air can cause cookies to spread too much.
Incorporating Wet Ingredients with Care
Beat in the 2 large eggs, one at a time, ensuring each egg is fully incorporated into the butter mixture before adding the next.
Once the eggs are combined, stir in the 1 teaspoon of vanilla extract until just blended. Avoid overmixing the dough at this stage to prevent toughening the cookies.
Folding in the Dry Ingredients
In a separate, medium-sized bowl, whisk together the 2 1/4 cups all-purpose flour, 1 teaspoon baking soda, and 1/2 teaspoon salt.
Gradually add this dry mixture to the wet ingredients, mixing on low speed with your electric mixer until just combined. It’s crucial to stop mixing as soon as no dry streaks of flour are visible to keep the cookies tender.
Stirring in Your Chocolate Chips
Gently fold in the 1 1/2 cups of semi-sweet chocolate chips or chunks using a sturdy spatula until they are evenly distributed throughout the dough.
This ensures that every bite of your Classic Chocolate Chip Cookies is packed with delicious chocolatey goodness.
The Game-Changing Dough Chilling Process
This is the most critical step for achieving thick, chewy, no-spread cookies: cover the bowl tightly with plastic wrap.
Refrigerate the dough for at least 2 hours, or for even better results, preferably overnight (up to 72 hours). Chilling the dough solidifies the butter, which makes the cookies spread less in the oven and significantly enhances their flavor and texture.
Prepping for the Oven
When you’re ready to bake, preheat your oven to 375 degrees Fahrenheit (190°C).
Line your baking sheets with parchment paper. This prevents sticking, ensures even baking, and makes cleanup incredibly easy.
Scooping & Spacing Your Cookies
Scoop rounded tablespoons of the thoroughly chilled dough onto the prepared baking sheets.
Leave about 2 inches of space between each cookie to allow for proper spreading without them merging into one giant cookie.
Baking to Golden Perfection
Bake for 9-12 minutes, keeping a close watch. The edges of the cookies should be golden brown, but the centers should still appear slightly soft and puffy.
A slightly soft center indicates a perfectly chewy interior; they will continue to set up as they cool on the baking sheet.
The Crucial Cooling Phase
Remove the Classic Chocolate Chip Cookies from the oven and let them cool directly on the baking sheet for 5 minutes.
This critical resting period helps them set up and maintain their desired chewy texture before you carefully transfer them to a wire rack to cool completely.
Chef’s Secrets: Elevate Your Classic Chocolate Chip Cookies Game
Unlock the next level of cookie perfection with these expert tips, transforming your bake from good to truly extraordinary.
The Magic of Chilling: Why It’s Non-Negotiable
Chilling the dough does more than just prevent spread; it allows the flour to fully absorb the liquids, resulting in a more tender and complex flavored cookie.
The colder butter melts slower, extending the baking time slightly and allowing the edges to crisp while the center stays gooey.
Mastering the Mix: Preventing Dense or Flat Cookies
For airy and fluffy cookies, ensure you cream the butter and sugars thoroughly until pale and voluminous, incorporating enough air.
However, once you add the flour, mix only until just combined. Overmixing develops gluten, which leads to tough, dense, or rubbery cookies.
Visual Cues: Knowing When Your Cookies Are Done
Perfectly baked Classic Chocolate Chip Cookies will have golden-brown edges and a center that looks slightly underdone or still soft to the touch.
Trust these visual cues! They will continue to firm up as they cool, so pulling them out when they look slightly soft ensures a wonderfully chewy interior.
The Art of Cooling: For Chewy Perfection
Allowing cookies to cool on the hot baking sheet for those initial 5 minutes is vital. It continues the cooking process gently and allows their delicate structure to set.
Transferring them to a wire rack afterward ensures even cooling and prevents moisture from accumulating, which could lead to soggy bottoms.
Achieving Signature Chocolate Puddles
To get those magazine-worthy chocolate puddles, use a mix of chocolate chips and roughly chopped high-quality chocolate bars (like Ghirardelli or Guittard).
For an extra touch, immediately after removing the cookies from the oven, press a few extra chocolate chips or chunks onto the tops of the warm cookies. They will melt beautifully into perfect puddles.
Common Cookie Conundrums: Troubleshooting Your Batch
Even seasoned bakers encounter challenges. Here’s how to troubleshoot common issues when making Classic Chocolate Chip Cookies.
If your cookies come out too flat, try the reverse creaming method used in these loaded almond chocolate chunk cookies.
Why Are My Cookies Still Flat?
This often happens if your butter was too soft or melted when creamed, or if the dough wasn’t sufficiently chilled. Ensure your butter is softened but still cool to the touch.
Always adhere to the minimum 2-hour chilling time. Also, verify your oven temperature with an oven thermometer; a cooler oven can cause excessive spreading.
My Cookies Are Too Cakey or Dry!
The most frequent cause of cakey or dry cookies is overbaking. Pull them from the oven when the centers still look slightly soft, even if the edges are golden.
Too much flour can also lead to dryness. Always spoon and level flour into your measuring cup rather than scooping directly from the bag.
The Chocolate Chips Aren’t Melty Enough
Some lower-quality chocolate chips contain stabilizers that prevent them from fully melting into gooey puddles. Invest in good quality semi-sweet chocolate chips or bars.
Ensure your oven is preheated accurately and baking at the correct temperature for proper melting.
My Cookies Spread Too Much, Despite Chilling!
Beyond butter temperature and chilling, check the freshness of your baking soda. Old leavening agents can lose their potency and affect cookie structure.
Additionally, avoid placing chilled dough onto a hot baking sheet; always use cool or room-temperature sheets, ideally lined with parchment paper.
Beyond Basic: Classic Chocolate Chip Cookies Variations & Serving Ideas
While the classic version is perfect, don’t hesitate to get creative with your Classic Chocolate Chip Cookies! Here are some ideas to inspire you.
Exciting Flavor Swaps & Add-Ins
Infuse new life into your cookies by experimenting with different chocolate types-dark, milk, or even white chocolate chips offer unique flavor profiles. For a nutty crunch, stir in 1/2 cup of toasted chopped walnuts or pecans.
A sprinkle of flaky sea salt on top before baking enhances the sweetness of the chocolate, and a teaspoon of instant espresso powder can deepen the chocolate flavor without making the cookies taste like coffee.
Perfect Pairings: What to Enjoy with Your Cookies
There’s nothing quite like a tall, cold glass of milk to accompany a warm Classic Chocolate Chip Cookie. These treats also pair beautifully with a hot cup of coffee, tea, or even hot chocolate for ultimate comfort.
If you enjoy the step-by-step technique of incorporating eggs into butter, try these dark chocolate chunk cookies for a similar rich texture.
For a truly decadent dessert, sandwich a scoop of your favorite ice cream between two cookies, or crumble them over a bowl of vanilla bean ice cream for an instant sundae.
What to Serve with Your Cookies
If you are craving more chocolate, these pairings bring together warm, comforting flavors that match the chewy, rich texture of your cookies.
- For a double dose of chocolate, pull apart a batch of Ultra-Gooey Chocolate Cinnamon Rolls — the soft, swirled dough and chocolate filling echo the cookie’s sweetness in a breakfast-worthy form.
- If you want a savory contrast, the buttery layers and creamy Southern Biscuits and Mushroom Gravy offer a hearty, earthy counterpoint that balances the
Keeping Your Cookies Fresh: Storage & Make-Ahead Tips
Maximize the enjoyment of your Classic Chocolate Chip Cookies with these storage and make-ahead strategies.
Storing Baked Cookies for Maximum Freshness
Once your Classic Chocolate Chip Cookies have completely cooled, store them in an airtight container at room temperature. They will maintain their delicious chewy texture and freshness for up to 3-4 days.
For an extra tip, place a half slice of plain bread into the container with your cookies; it helps keep them soft and prevents them from drying out by releasing moisture.
Freezing Dough & Baked Cookies for Later
To freeze unbaked dough, scoop rounded tablespoons onto a parchment-lined baking sheet and freeze until solid, about 1-2 hours. Transfer the frozen dough balls to a freezer-safe bag or container and store for up to 3 months.
You can bake these directly from frozen, adding an extra 1-3 minutes to the baking time. Baked cookies can also be frozen for up to 2 months; simply thaw them at room temperature before serving for a quick treat.
Your Top Questions Answered: Classic Chocolate Chip Cookies FAQs
Here are answers to some of the most common questions about baking the perfect Classic Chocolate Chip Cookies.
Can I substitute ingredients for dietary needs (e.g., gluten-free, dairy-free)?
Yes, you can adapt these Classic Chocolate Chip Cookies for dietary needs. For gluten-free, use a high-quality 1:1 gluten-free baking flour blend that contains xanthan gum. For dairy-free, substitute a good quality plant-based butter alternative and use dairy-free chocolate chips.
Be aware that substitutions might slightly alter the texture and flavor profile, but delicious results are still achievable. For more baking inspiration, check out our recipe for classic banana bread, which offers adaptable ingredient suggestions.
How long can I chill the dough, and is it always necessary?
Chilling the dough for at least 2 hours is essential for this recipe’s thick, chewy outcome. You can chill the dough for up to 72 hours (3 days) for an even richer, more developed flavor.
While you can bake cookies without chilling, it’s not recommended for achieving the specific thick, no-spread, and chewy texture this recipe guarantees.
Can I make a smaller or larger batch?
Absolutely! This recipe for Classic Chocolate Chip Cookies can be easily halved or doubled, depending on your needs. Just ensure you maintain all ingredient ratios precisely for the best outcome.
When doubling, use a larger mixing bowl and ensure your oven isn’t overcrowded if baking multiple sheets at once, as this can affect even baking.
What’s the best type of chocolate for those “puddles”?
For truly irresistible chocolate puddles, a mix of high-quality semi-sweet chocolate chips and roughly chopped semi-sweet chocolate bars (around 60-70% cacao) is ideal. The varied sizes of chopped chocolate melt beautifully.
Brands like Ghirardelli, Guittard, or Callebaut semi-sweet wafers are excellent choices for their superior melt and flavor.
How do I know if my butter is “softened” correctly?
Perfectly softened butter should yield easily when gently pressed with your finger, leaving an indentation, but it should still be cool and hold its shape. It should not be greasy, shiny, or melted.
Typically, butter reaches this stage by sitting at room temperature for 30-60 minutes, or through short, controlled bursts in the microwave (5-10 seconds at a time).
Ready to Bake Your Best Batch? Share Your Classic Chocolate Chip Cookies!
Now, with all the expert knowledge and detailed instructions, you’re perfectly equipped to bake the most exceptional batch of Classic Chocolate Chip Cookies you’ve ever made!
I am confident these thick, chewy, no-fail cookies with their delightful chocolate puddles will quickly become a cherished recipe in your repertoire. Don’t forget to share your baking triumphs with us; we love seeing your creations!
If you’re looking for another delightful chocolate-infused treat, you might also love our recipe for chewy pumpkin chocolate chip blondies, offering a slightly different twist on a classic flavor combination.
Chocolate Chip Cookies
Course: DessertCuisine: AmericanDifficulty: easyServings2
dozen cookiesPrep time20
minutesCooking time9
minutesCalories700
kcalTotal time120
minutesSay goodbye to thin, flat cookies! This recipe guarantees perfectly thick, chewy chocolate chip cookies with gorgeous chocolate puddles. The key is in chilling the dough for ultimate texture and flavor.
Ingredients
1 cup (2 sticks) unsalted butter, softened
3/4 cup granulated sugar
3/4 cup packed light brown sugar
2 large eggs
1 teaspoon vanilla extract
2 1/4 cups all-purpose flour
1 teaspoon baking soda
1/2 teaspoon salt
1 1/2 cups semi-sweet chocolate chips or chunks
Directions
- In a large bowl, cream together the softened butter, granulated sugar, and brown sugar until light and fluffy. Be careful not to overmix, as this can incorporate too much air and contribute to spreading.
- Beat in the eggs one at a time, then stir in the vanilla extract until just combined.
- In a separate bowl, whisk together the flour, baking soda, and salt. Gradually add the dry ingredients to the wet ingredients, mixing on low speed until just combined. Do not overmix the dough.
- Stir in the chocolate chips or chunks until evenly distributed throughout the dough.
- This is the key step to prevent flat cookies: Cover the bowl with plastic wrap and refrigerate the dough for at least 2 hours, or preferably overnight. Chilling the dough solidifies the butter, which makes the cookies spread less in the oven.
- When ready to bake, preheat your oven to 375 degrees Fahrenheit. Line baking sheets with parchment paper.
- Scoop rounded tablespoons of chilled dough onto the prepared baking sheets, leaving about 2 inches between each cookie.
- Bake for 9-12 minutes, or until the edges are golden brown and the centers are still slightly soft.
- Remove from the oven and let the cookies cool on the baking sheet for 5 minutes before transferring them to a wire rack to cool completely. This helps them set up and maintain their chewy texture.
Notes
- Chilling the dough is crucial for thick, chewy cookies and prevents spreading.